Per-User Database Architecture with Xata, Clerk Webhooks, Hookdeck, and Next.js
When building an application you often think of having a database with a table named users and then throughout your database schema you have references to users for the owner of a row in each referencing table. This works in many cases. However, in addition to it becoming much easier to creating a new database instance, there are a growing number of use cases where there is a need to have a database instance per-user. For example, where there is a need for data isolation for security or compliance, and to maximize database access times. Also, when you think about it, this removes a lot of the complexity that comes from all those users references.
In this tutorial, you'll learn of some uses cases where a per-user database architecture makes sense and then walk through how to create a new Xata database per-user whenever a new user is created in Clerk, a user auth and management service, using Clerk webhook notifications. You'll use the Hookdeck event gateway to help both during development with localhost webhook tooling and in production to secure the webhooks and guarantee at-least-once delivery. You'll build the app in Next.js.
The use cases for a per-user database architecture
As mentioned, a per-user database architecture is often required to guarantee data isolation which satisfies security and compliance considerations such as access control and data residency. The location of the database can also improve data access performance.
Here are some concrete examples of where a per-user or per-device database makes sense:
Software as a Service (SaaS) Platforms: Each tenant can have their own database to ensure data isolation and security. This setup is advantageous for businesses like Fogbugz, which uses a database per-customer model to manage isolated customer data efficiently.
Healthcare Systems: Per-user databases can securely store sensitive patient data, ensuring compliance with privacy regulations like HIPAA. This approach allows for personalized care and easy retrieval of patient records.
Financial Services: Online banking and fintech platforms can benefit from per-user databases by securely managing individual financial data. This setup enhances security and simplifies the process of auditing and compliance
Social Media Applications: Per-user databases can handle vast amounts of unstructured data, such as posts and interactions, while maintaining user privacy and providing personalized content feeds.
IoT Applications: Per-device databases can manage data from individual sensors or devices, allowing for real-time analytics and efficient data processing.
Tutorial: Building a Per-User Database Architecture with Xata, Clerk Webhooks, Hookdeck, and Next.js
Before you begin
You'll need a free account with the following services:
Tech Stack
You'll use the following technologies in this tutorial:
| Technology | Description |
|---|---|
| Xata | Serverless Postgres database platform for scalable, real-time applications. |
| Clerk | Platform that provides user authentication and management services |
| Hookdeck | Provides tools and infrastructure for reliable asynchronous messaging, debugging, and scaling. |
| Next.js | A React framework for building fast, user-friendly web applications with server-side rendering and static site generation. |
Install and configure the Hookdeck CLI
Install the Hookdeck CLI that provides localtunnel functionality allowing webhooks to be received on your localhost:
npm i -g hookdeck-cli
And login:
hookdeck login
When prompted, open the browser window and authenticate the Hookdeck CLI.
Scaffold a Next.js app
Next, create the basic Next.js application.
Run the following and accept all defaults:
npx create-next-app@latest xata-per-user-db
When prompted, answer the questions as follows:
✔ Would you like to use TypeScript? … Yes
✔ Would you like to use ESLint? … Yes
✔ Would you like to use Tailwind CSS? … No
✔ Would you like your code inside a `src/` directory? … Yes
✔ Would you like to use App Router? (recommended) … Yes
✔ Would you like to use Turbopack for next dev? … No
✔ Would you like to customize the import alias (@/* by default)? … No
Navigate to the new app directory:
cd xata-per-user-db
Add Clerk
Clerk has a Next.js SDK with in-build React components to support user authentication and management.
Install the Clerk Next.js package:
npm install @clerk/nextjs
Go to the Clerk dashboard and create a new Clerk application. Choose Email and any other sign in options you like.
Next, head to the Configure section. Then click on API keys under the Developers heading. Copy the Publishable key and Secret key -> default values and add them to a new .env.local file within your application:
NEXT_PUBLIC_CLERK_PUBLISHABLE_KEY=...
CLERK_SECRET_KEY=...
Next, add the Clerk middleware. Create a src/middleware.ts file as follows:
import { clerkMiddleware } from "@clerk/nextjs/server";

export default clerkMiddleware();

export const config = {
  matcher: [
    // Skip Next.js internals and all static files, unless found in search params
    "/((?!_next|[^?]*\\.(?:html?|css|js(?!on)|jpe?g|webp|png|gif|svg|ttf|woff2?|ico|csv|docx?|xlsx?|zip|webmanifest)).*)",
    // Always run for API routes
    "/(api|trpc)(.*)",
  ],
};
Update src/app/layout.tsx to the following:
import {
  ClerkProvider,
  SignInButton,
  SignUpButton,
  SignedIn,
  SignedOut,
  UserButton,
} from "@clerk/nextjs";
import "./globals.css";

export default function RootLayout({
  children,
}: {
  children: React.ReactNode;
}) {
  return (
    <ClerkProvider>
      <html lang="en">
        <body>
          <header>
            <SignedOut>
              <SignInButton mode="modal" />
              <SignUpButton mode="modal" />
            </SignedOut>
            <SignedIn>
              <UserButton />
            </SignedIn>
          </header>
          <main>{children}</main>
        </body>
      </html>
    </ClerkProvider>
  );
}
This adds the Clerk provided sign in and sign out functionality.
Add the following to src/app/global.css to improve the button styling a little:
header {
  text-align: center;
  margin-top: 20px;
  display: flex;
  gap: 20px;
  justify-content: center;
}

header button {
  border-radius: 128px;
  height: 48px;
  padding: 0 20px;
  border: 1px solid transparent;
  cursor: pointer;
  font-size: 16px;
  background: var(--background);
  border-color: var(--gray-alpha-200);
}

header button:last-of-type {
  background: var(--foreground);
  color: var(--background);
}
Test the Next.js application
Run the application:
npm run dev
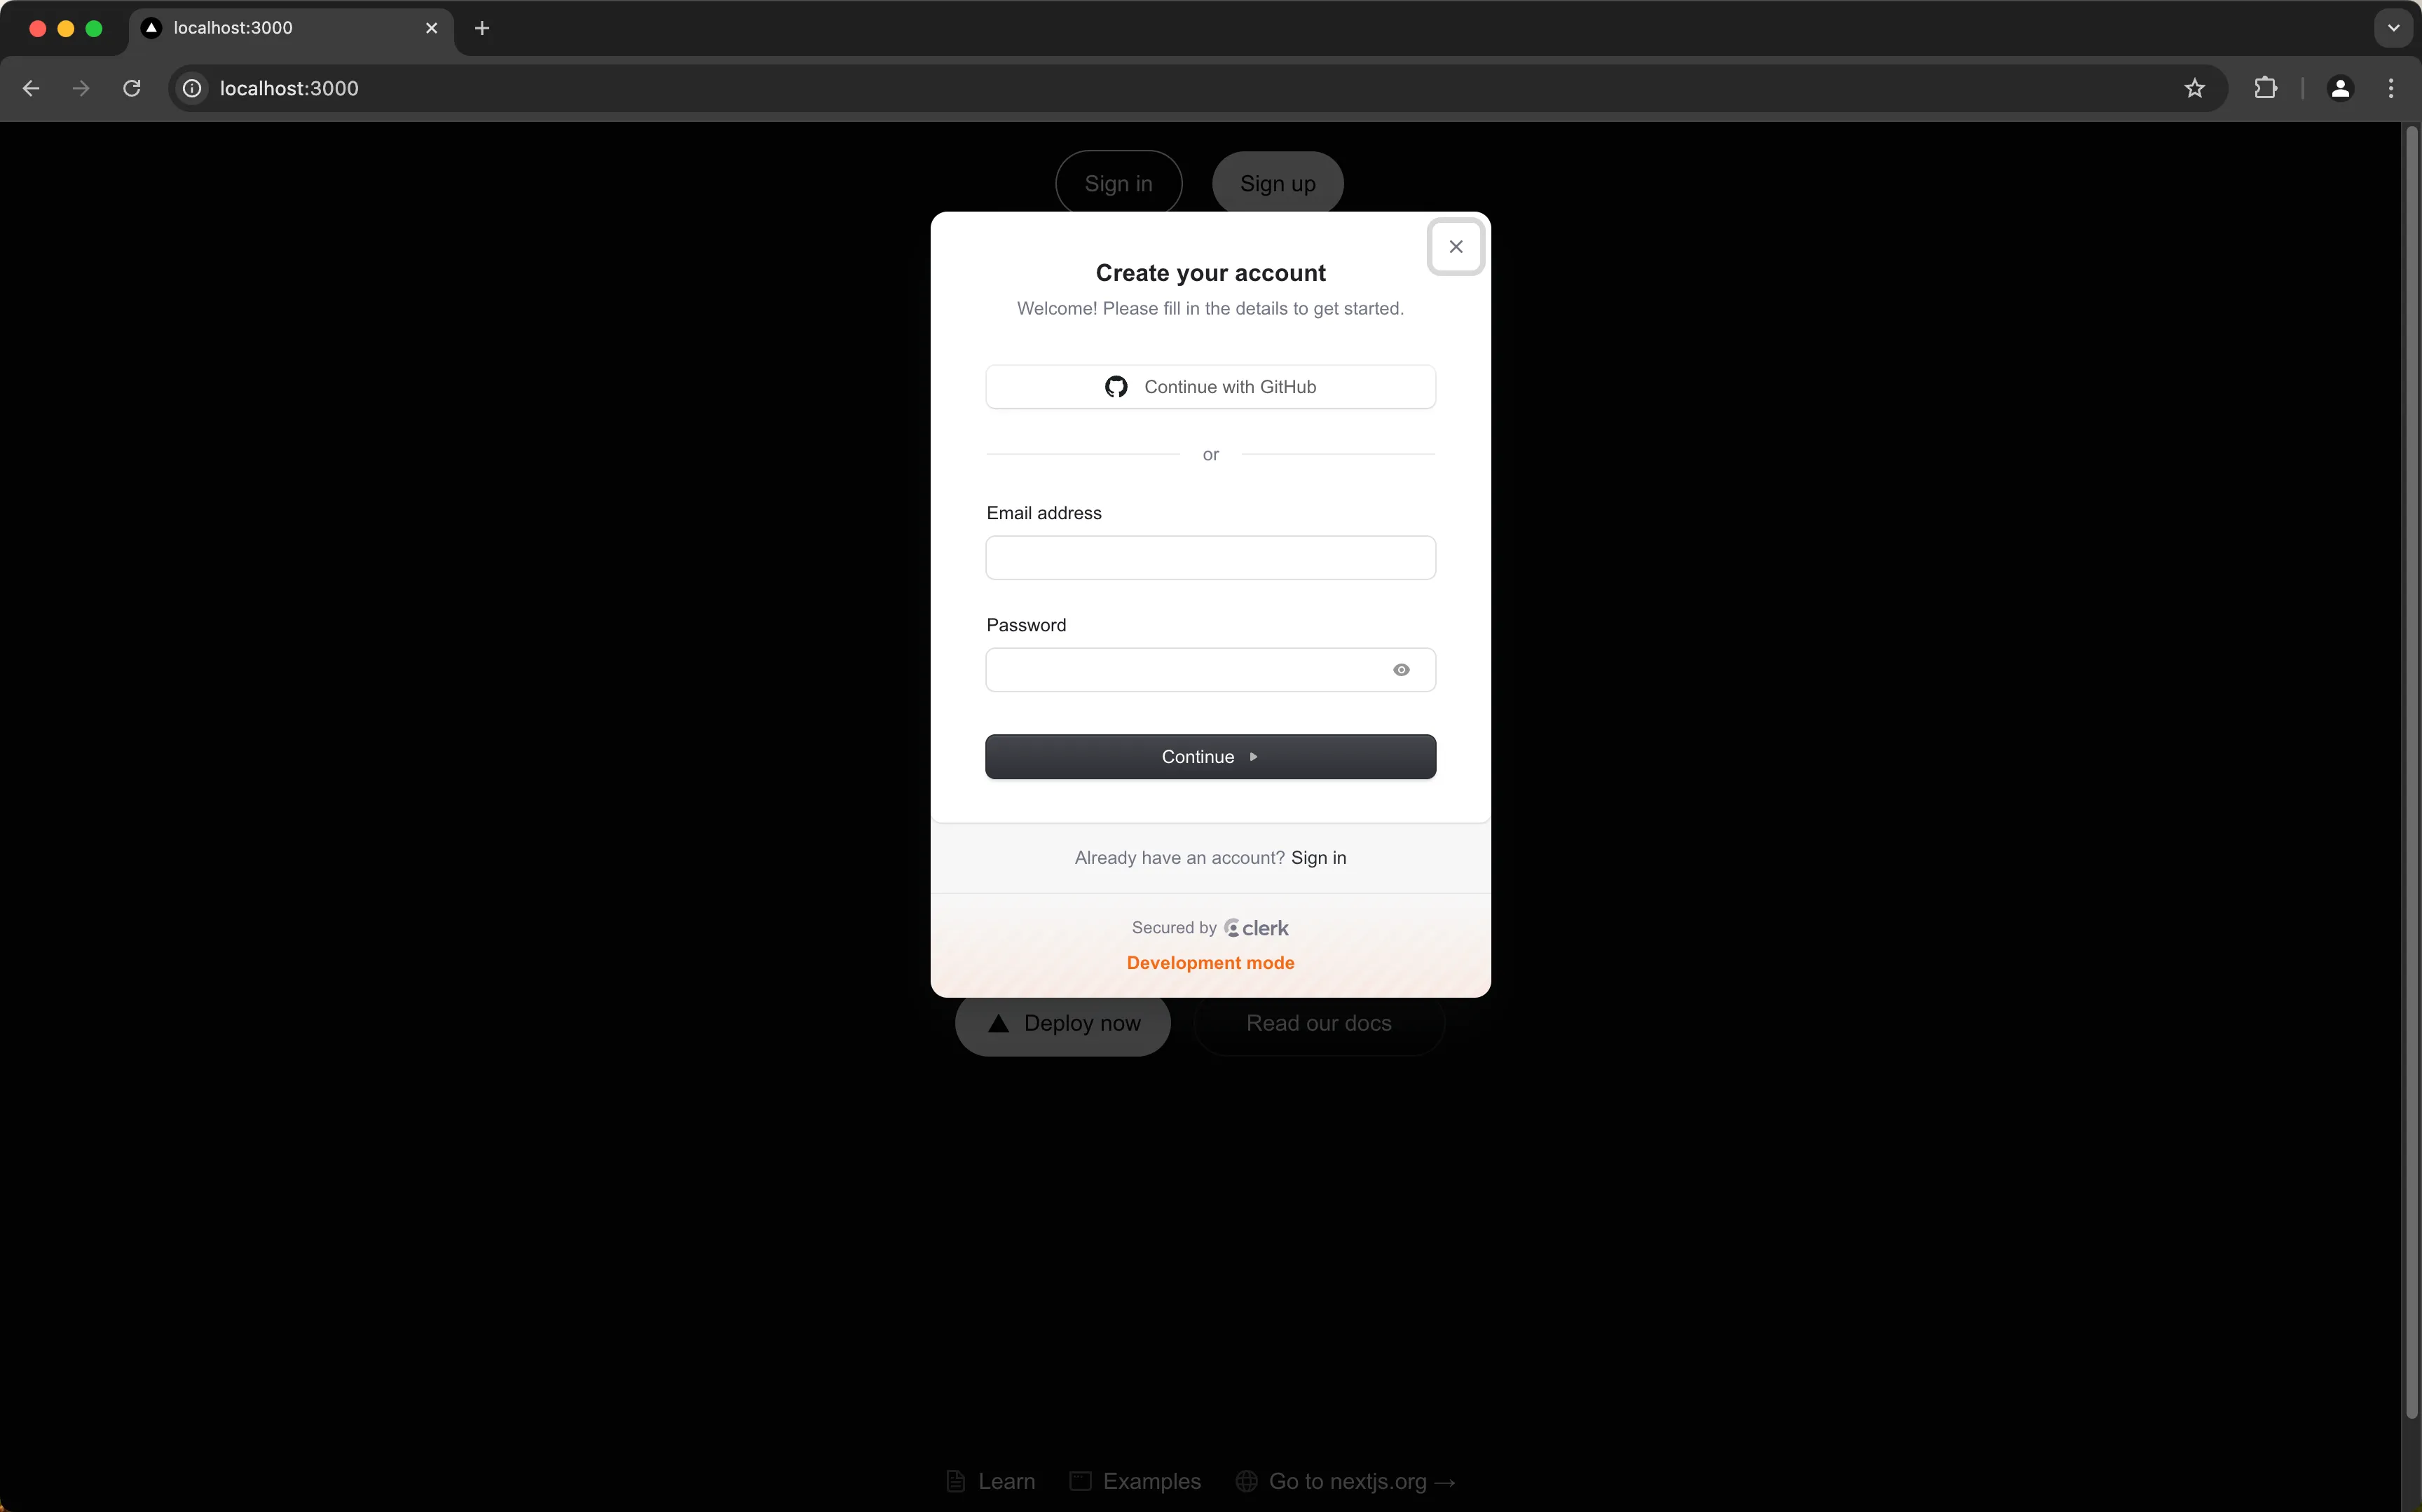
Head to localhost:3000 and click on the Sign In and ensure you go to the Clerk sign in modal appears. Don't complete the sign in / sign up flow yet!
Add the Clerk webhook route
Next, create a webhook handler route to be used to handle the Clerk webhook when a new user is created.
Go to the Hookdeck Dashboard. In the Settings section of your Hookdeck project, go to Secrets, and copy the Signing Secret value. Add it to a HOOKDECK_WEBHOOK_SECRET variable in your .env.local:
NEXT_PUBLIC_CLERK_PUBLISHABLE_KEY=...
CLERK_SECRET_KEY=...
+
+ HOOKDECK_WEBHOOK_SECRET=...
If you are new to Hookdeck your project will be called Default Project. See the Hookdeck Project docs for more information.
Install the Hookdeck SDK to be used to verify the webhook:
npm i @hookdeck/sdk
Create a file src/app/webhooks/clerk/route.ts:
import { NextRequest, NextResponse } from "next/server";
import { verifyWebhookSignature } from "@hookdeck/sdk/webhooks";

const HOOKDECK_WEBHOOK_SECRET = process.env.HOOKDECK_WEBHOOK_SECRET;

if (!HOOKDECK_WEBHOOK_SECRET) {
  console.error("Please set HOOKDECK_WEBHOOK_SECRET environment variable");
  process.exit(1);
}

export async function POST(request: NextRequest) {
  try {
    const headers: Record<string, string> = {};
    request.headers.forEach((value, key) => {
      headers[key] = value;
    });

    const rawBody = await request.text();

    const verificationResult = await verifyWebhookSignature({
      headers,
      rawBody,
      signingSecret: HOOKDECK_WEBHOOK_SECRET!,
    });

    if (!verificationResult.isValidSignature) {
      console.error("Invalid signature");
      return NextResponse.json({ error: "Invalid signature" }, { status: 401 });
    }

    const event = JSON.parse(rawBody);

    console.log("Received event", event);

    return NextResponse.json(event);
  } catch (error) {
    console.error(error);
    return NextResponse.json({ error }, { status: 500 });
  }
}
In additional to the Next.js classes, import verifyWebhookSignature from @hookdeck/sdk/webhooks to verify webhook signatures.
Next, retrieve the HOOKDECK_WEBHOOK_SECRET from your environment variables. This secret is used to verify the webhook came from Hookdeck. If the secret is not set, log an error message and exit the process to prevent the server from running without the necessary configuration.
Now, define an asynchronous function named POST to handle incoming POST requests. Inside this function, populate the headers variable with key-value pairs of request headers.
Read the raw body of the request using await request.text().
Use the verifyWebhookSignature function to verify the webhook signature. Pass the headers, rawBody, and the HOOKDECK_WEBHOOK_SECRET to this function. If the signature is invalid, log an error message and return a 401 response with an error message indicating an invalid signature.
If the signature is valid, parse the raw body to extract the event data (you need to do this rather than use request.json() as the request stream may have closed when calling request.text()). Log the received event for debugging purposes.
Finally, return the event data as a JSON response. If any errors occur during the process, catch them, log the error, and return a 500 response with the error message.
All responses from your Next.js application go back to Hookdeck and not to Clerk.
Create a localtunnel with the Hookdeck CLI
Set up a localtunnel and Hookdeck connection to the webhook route to receive webhooks events on in your local development environment:
hookdeck listen 3000 clerk --path /webhooks/clerk
If you already have a Hookdeck account, use
hookdeck project useto select the Hookdeck project you are using for this app.
A path (
/webhooks/clerk) can also be defined when creating a localtunnel with the Hookdeck CLI, which is different to the approach taken by other tools such as ngrok.
You will see output similar to the following:
Dashboard
👉 Inspect and replay events: https://dashboard.hookdeck.com?team_id={team_id}

Sources
🔌 clerk URL: https://hkdk.events/{source_id}

Connections
clerk -> clerk_to_cli-clerk forwarding to /webhooks/clerk

> Ready! (^C to quit)
Copy the clerk URL value that is output.
Configure Clerk webhooks
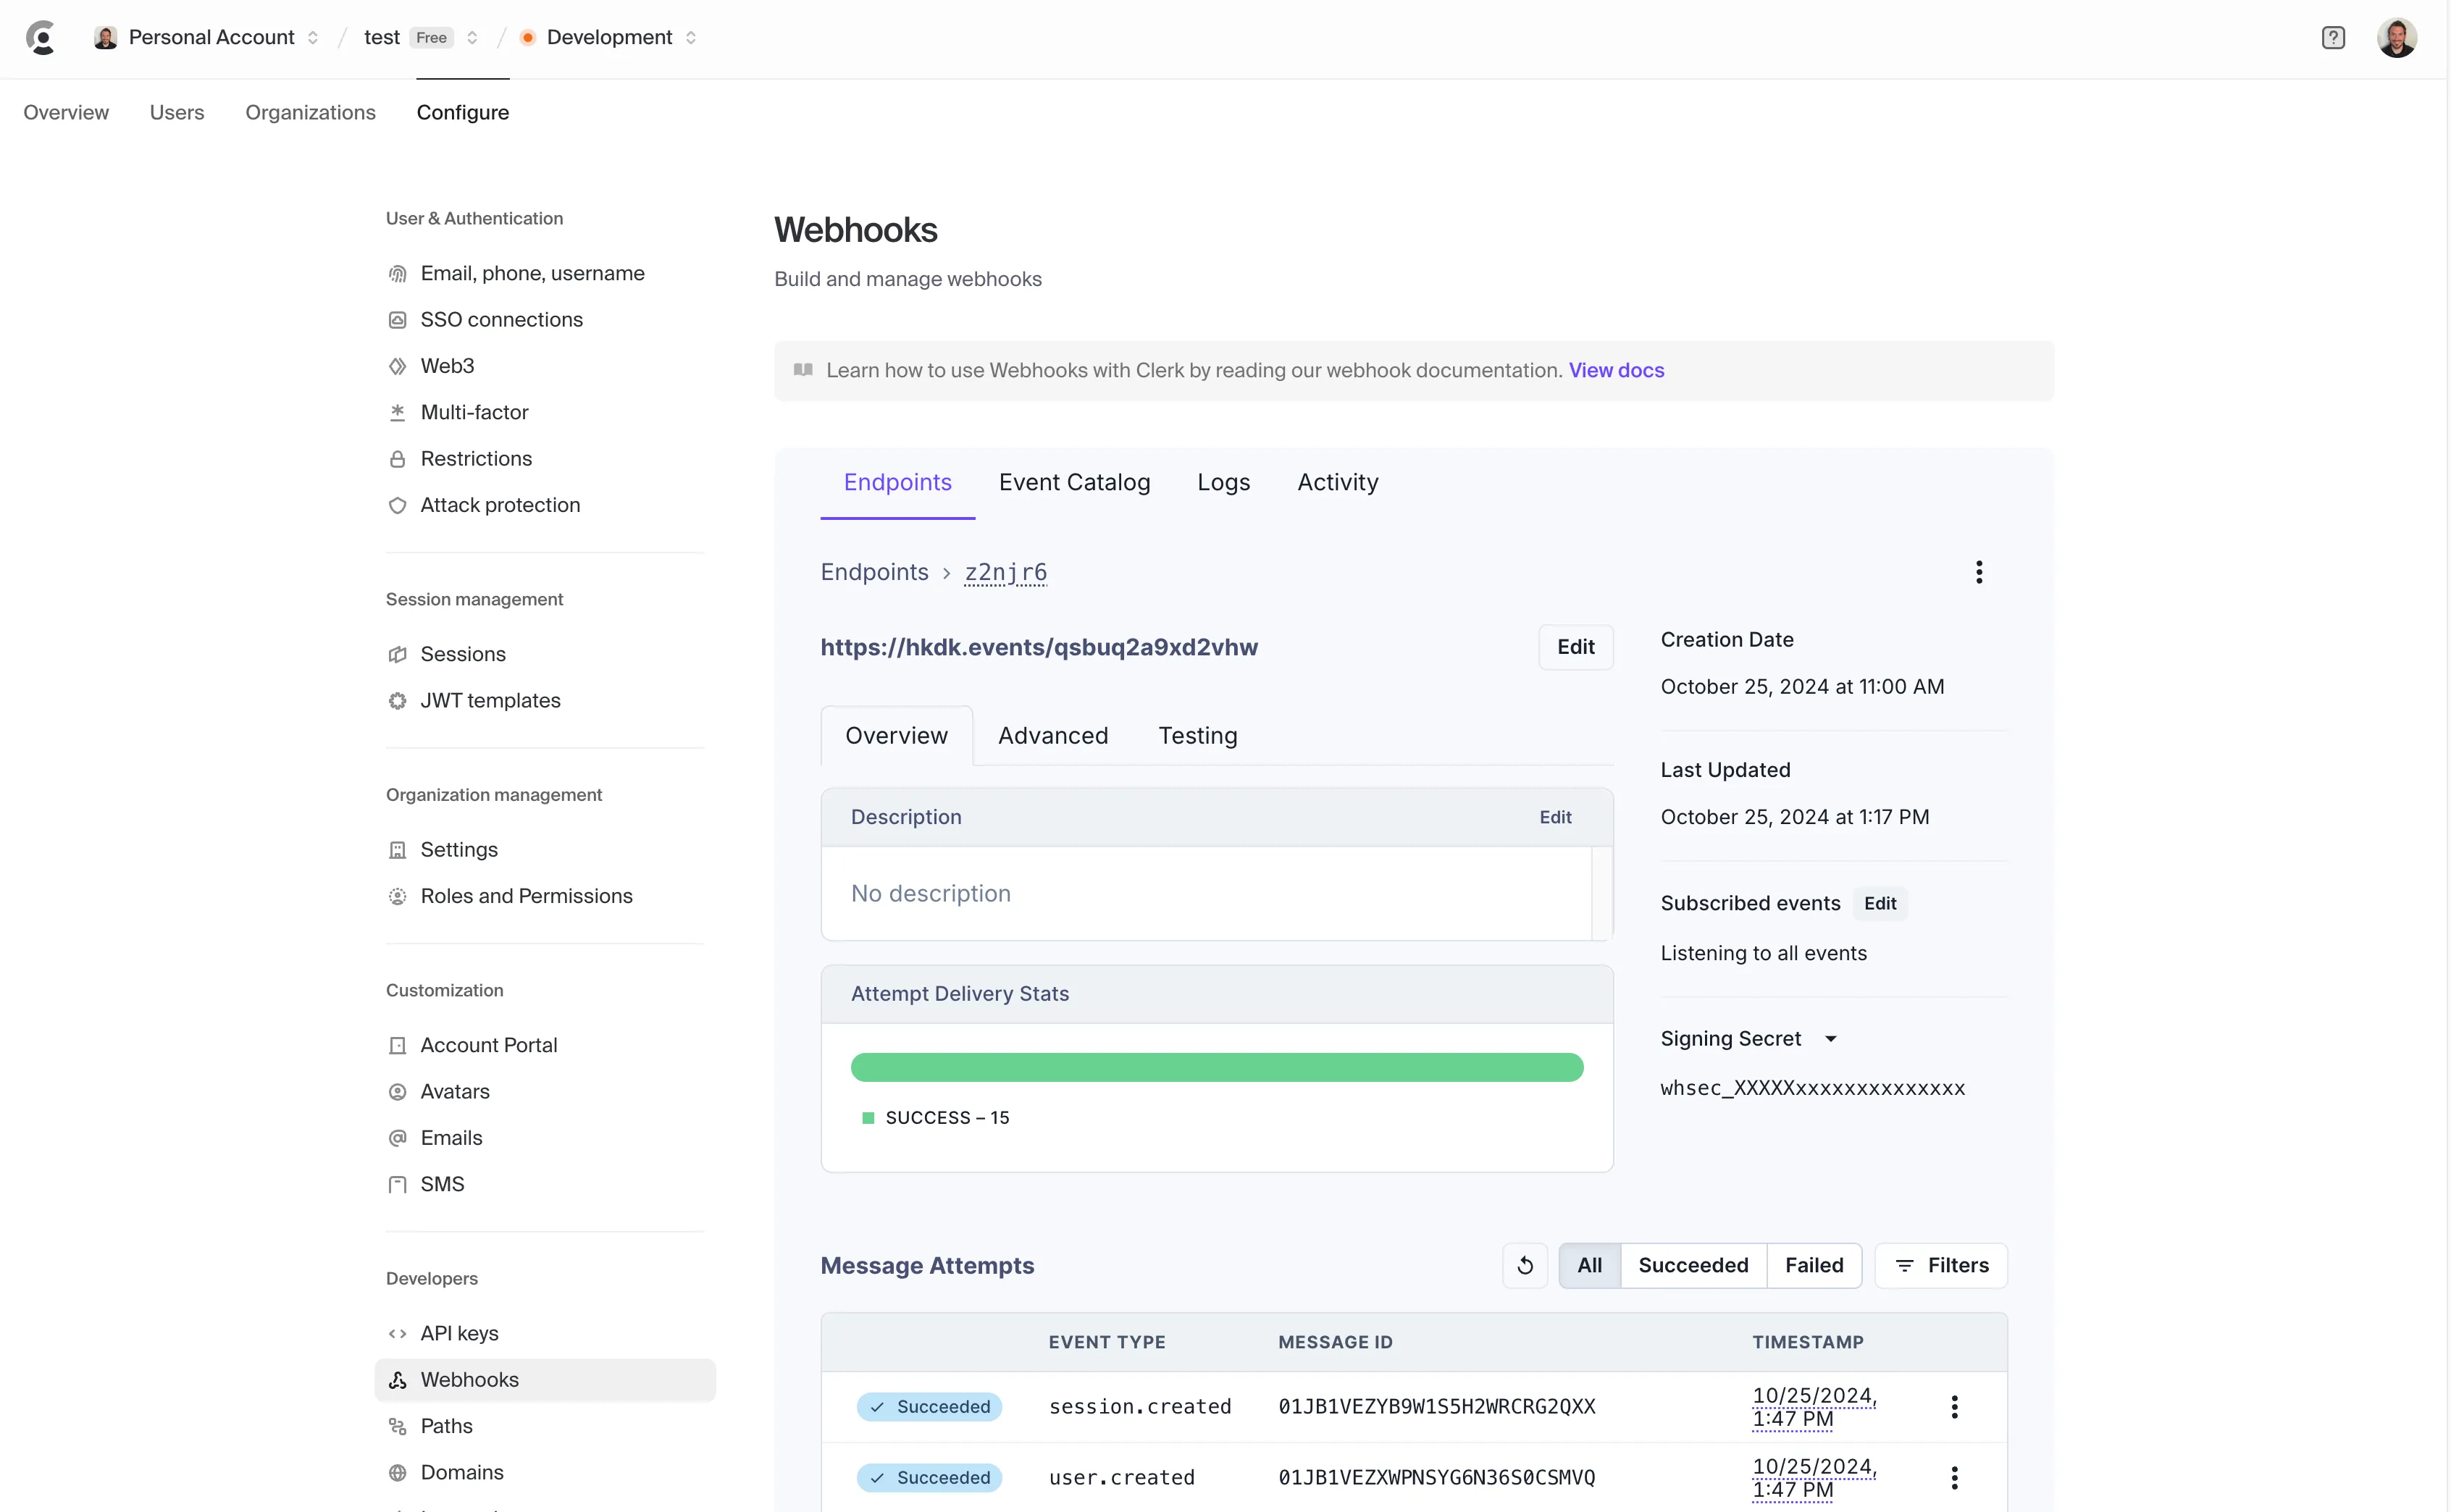
Head to the Clerk Dashboard and go to the Configure -> Webhooks section.
Click + Add Endpoint and enter the Hookdeck URL you copied in the previous step. You can ignore the Subscribe to events section and in doing so effectively subscribe to all events. We'll do the event filtering within Hookdeck. Click Create to create the webhook subscription.
In the following screen, copy the Signing Secret.
Verify the Clerk webhook within Hookdeck
Hookdeck can verify webhooks from number providers and also supports common webhook verification standards. This allows you to offload the effort of maintaining a variety of webhook verification methods, resulting in the need for a single standard of webhook verification from Hookdeck within your codebase.
Go to the Hookdeck Dashboard, click on Connections. Click on the visual representation of the Clerk Source named clerk to open the dialog. Click Open Source.
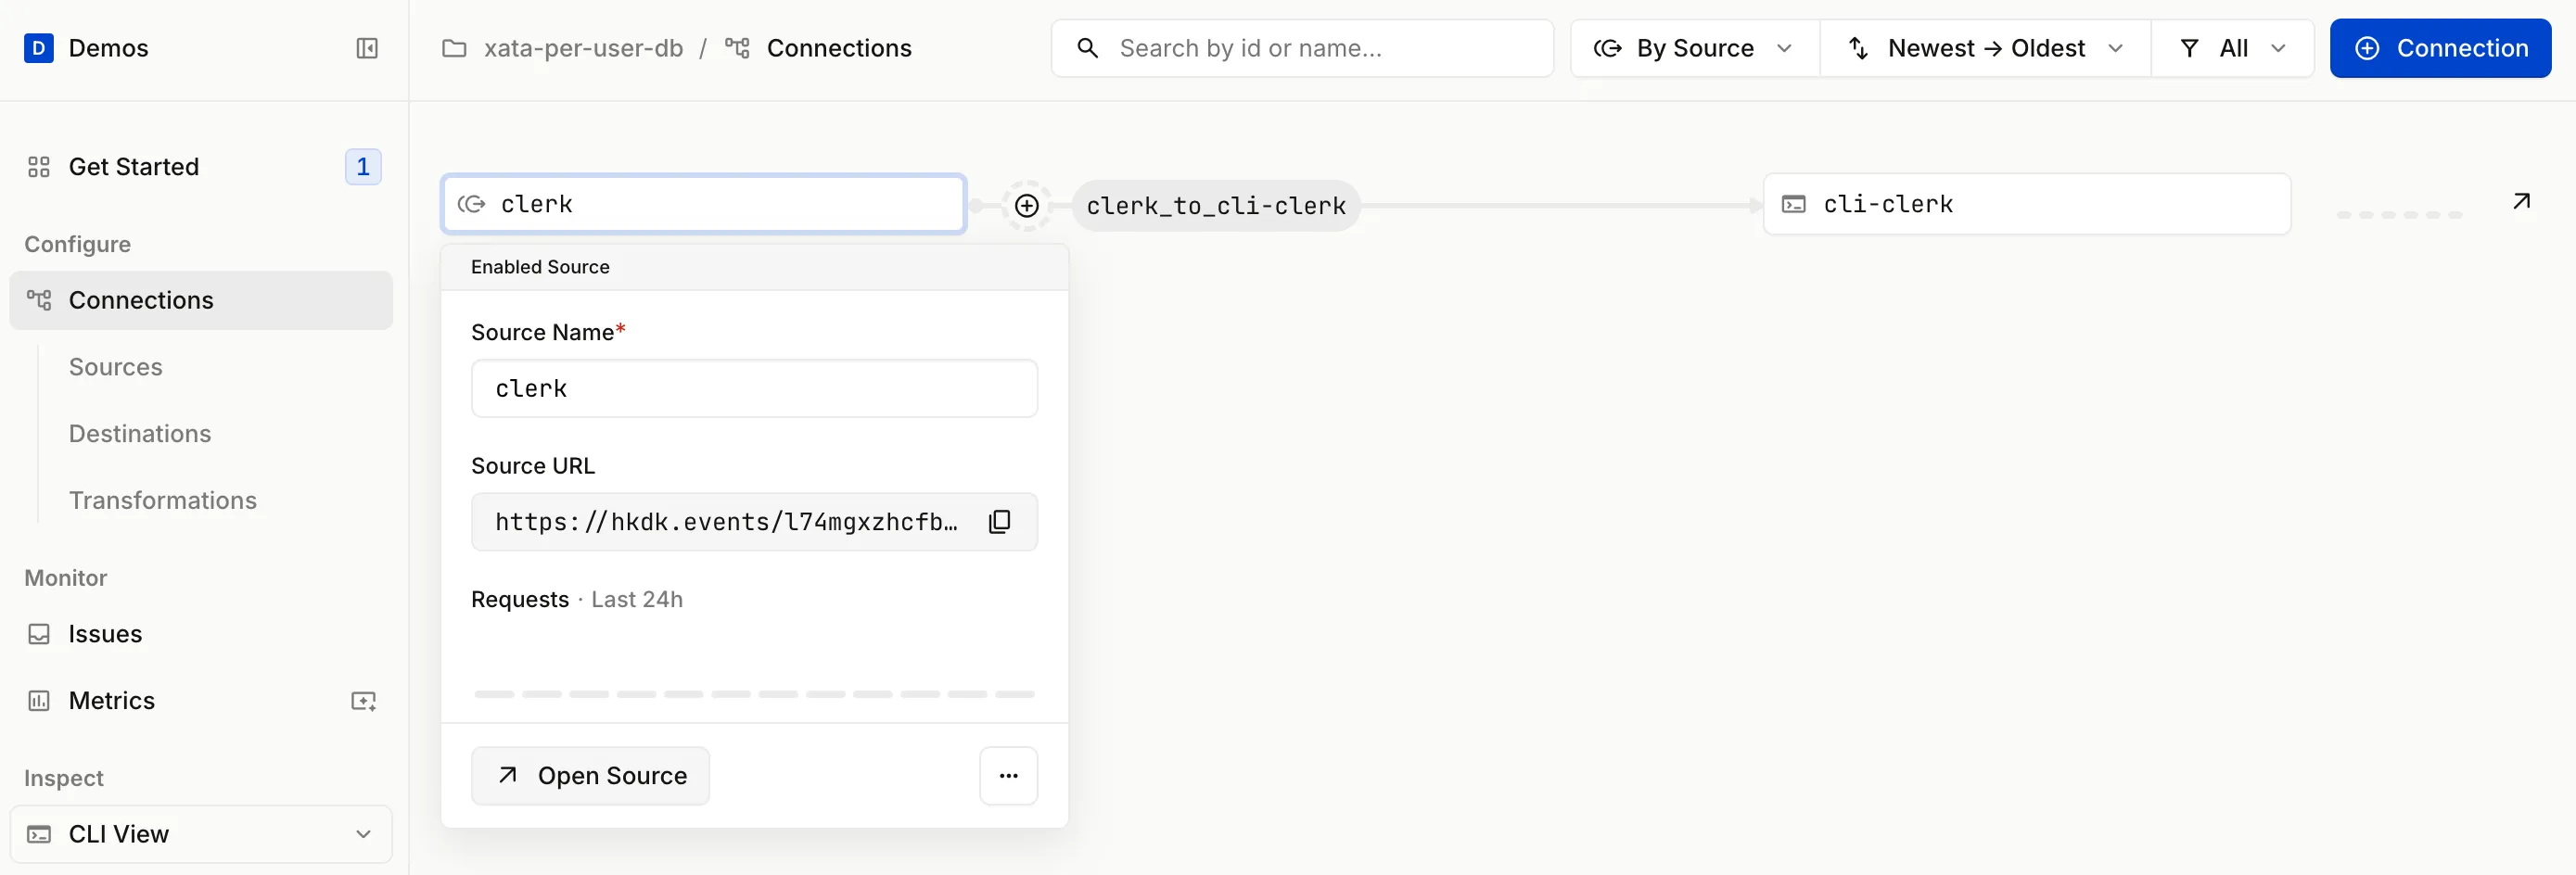
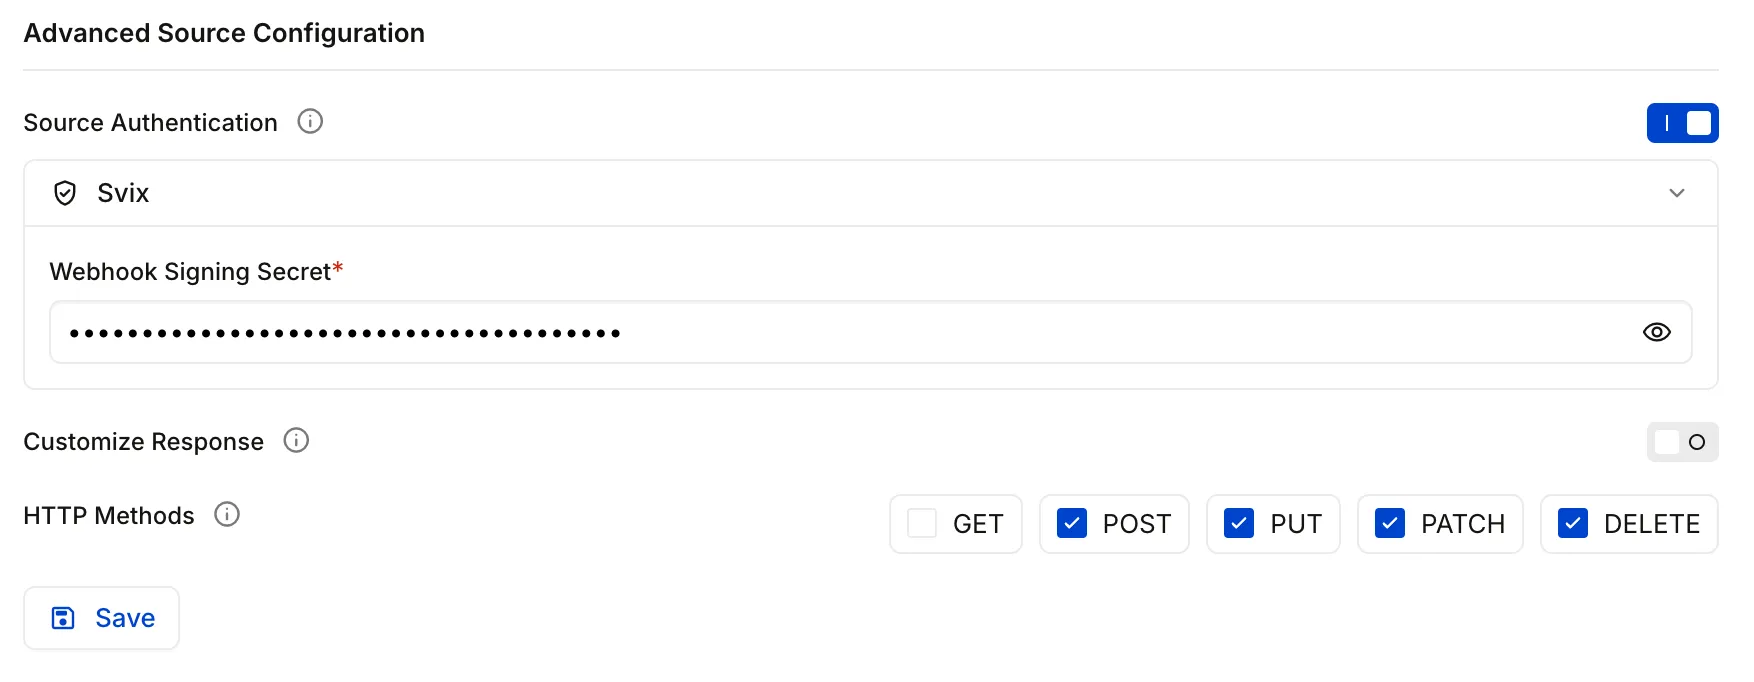
Scroll to the Advanced Source Configuration section and enable Source Authentication. Select Svix, the provider Clerk uses for outbound webhooks, from the dropdown, and populate the Webhook Signing Secret text field with the Clerk webhook signing secret you copied earlier. Click Save.
Trigger the Clerk webhook
You now have Clerk webhooks configured to be sent to Hookdeck and the Hookdeck CLI connected to receive webhooks on your localhost.
Head back to your application in your browser and complete the sign up / sign in flow.
Depending on your method of signup, you will receive at least two webhook events in your local application via Hookdeck.
user.createdsession.created
Go back to the Hookdeck Dashboard, go to the Events section, and ensure the dropdown under the Inspect section on the left is set to CLI View. You will see the received events in the tabular view:
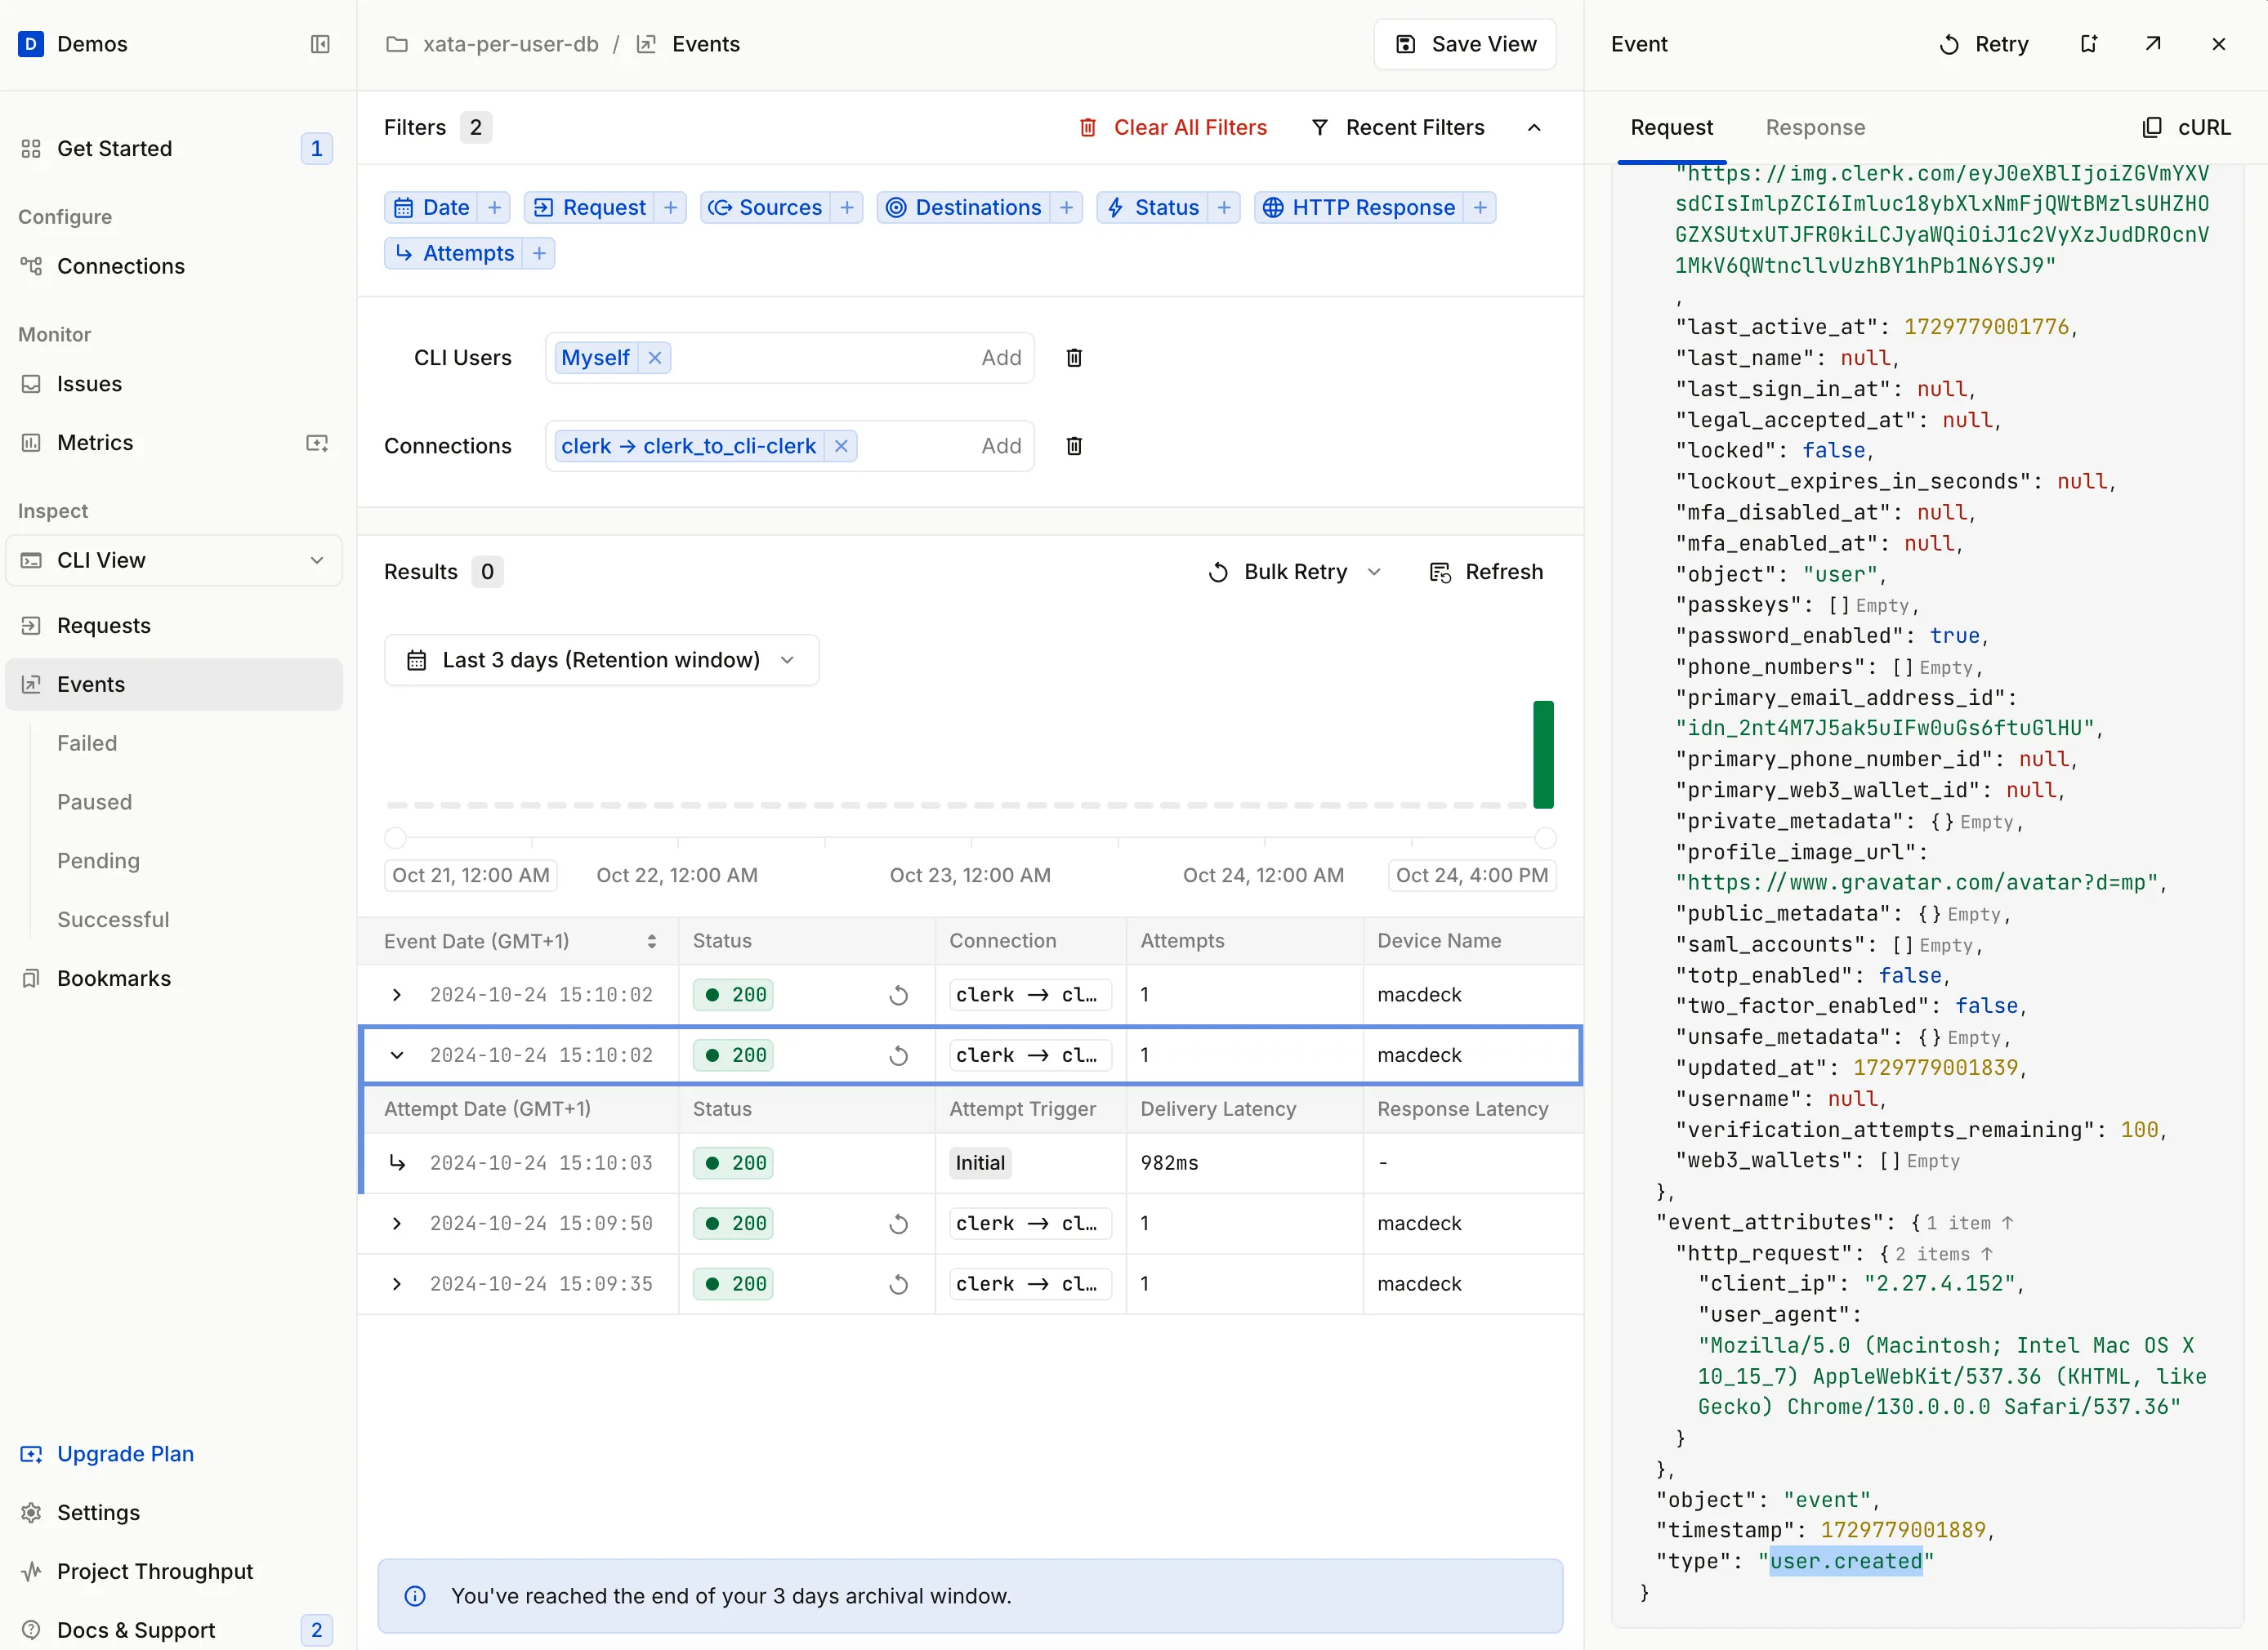
Hookdeck has the concept of Requests which then generate Events. Read more about the Hookdeck Concepts.
Filter Clerk webhooks with Hookdeck Filters
Since you only want to create a database for each new user, set up a Hookdeck Filter to only allow user.created Clerk webhook events.
Go back to the Connections section within the Hookdeck Dashboard. Click the Connection, this is the line with the clerk_to-cli-clerk label. This opens a dialog that show the Connection Name and Connection Rules.

Then click the Filter + button. Enter the following filter in the text area:
{
  "type": "user.created"
}
Click Save.
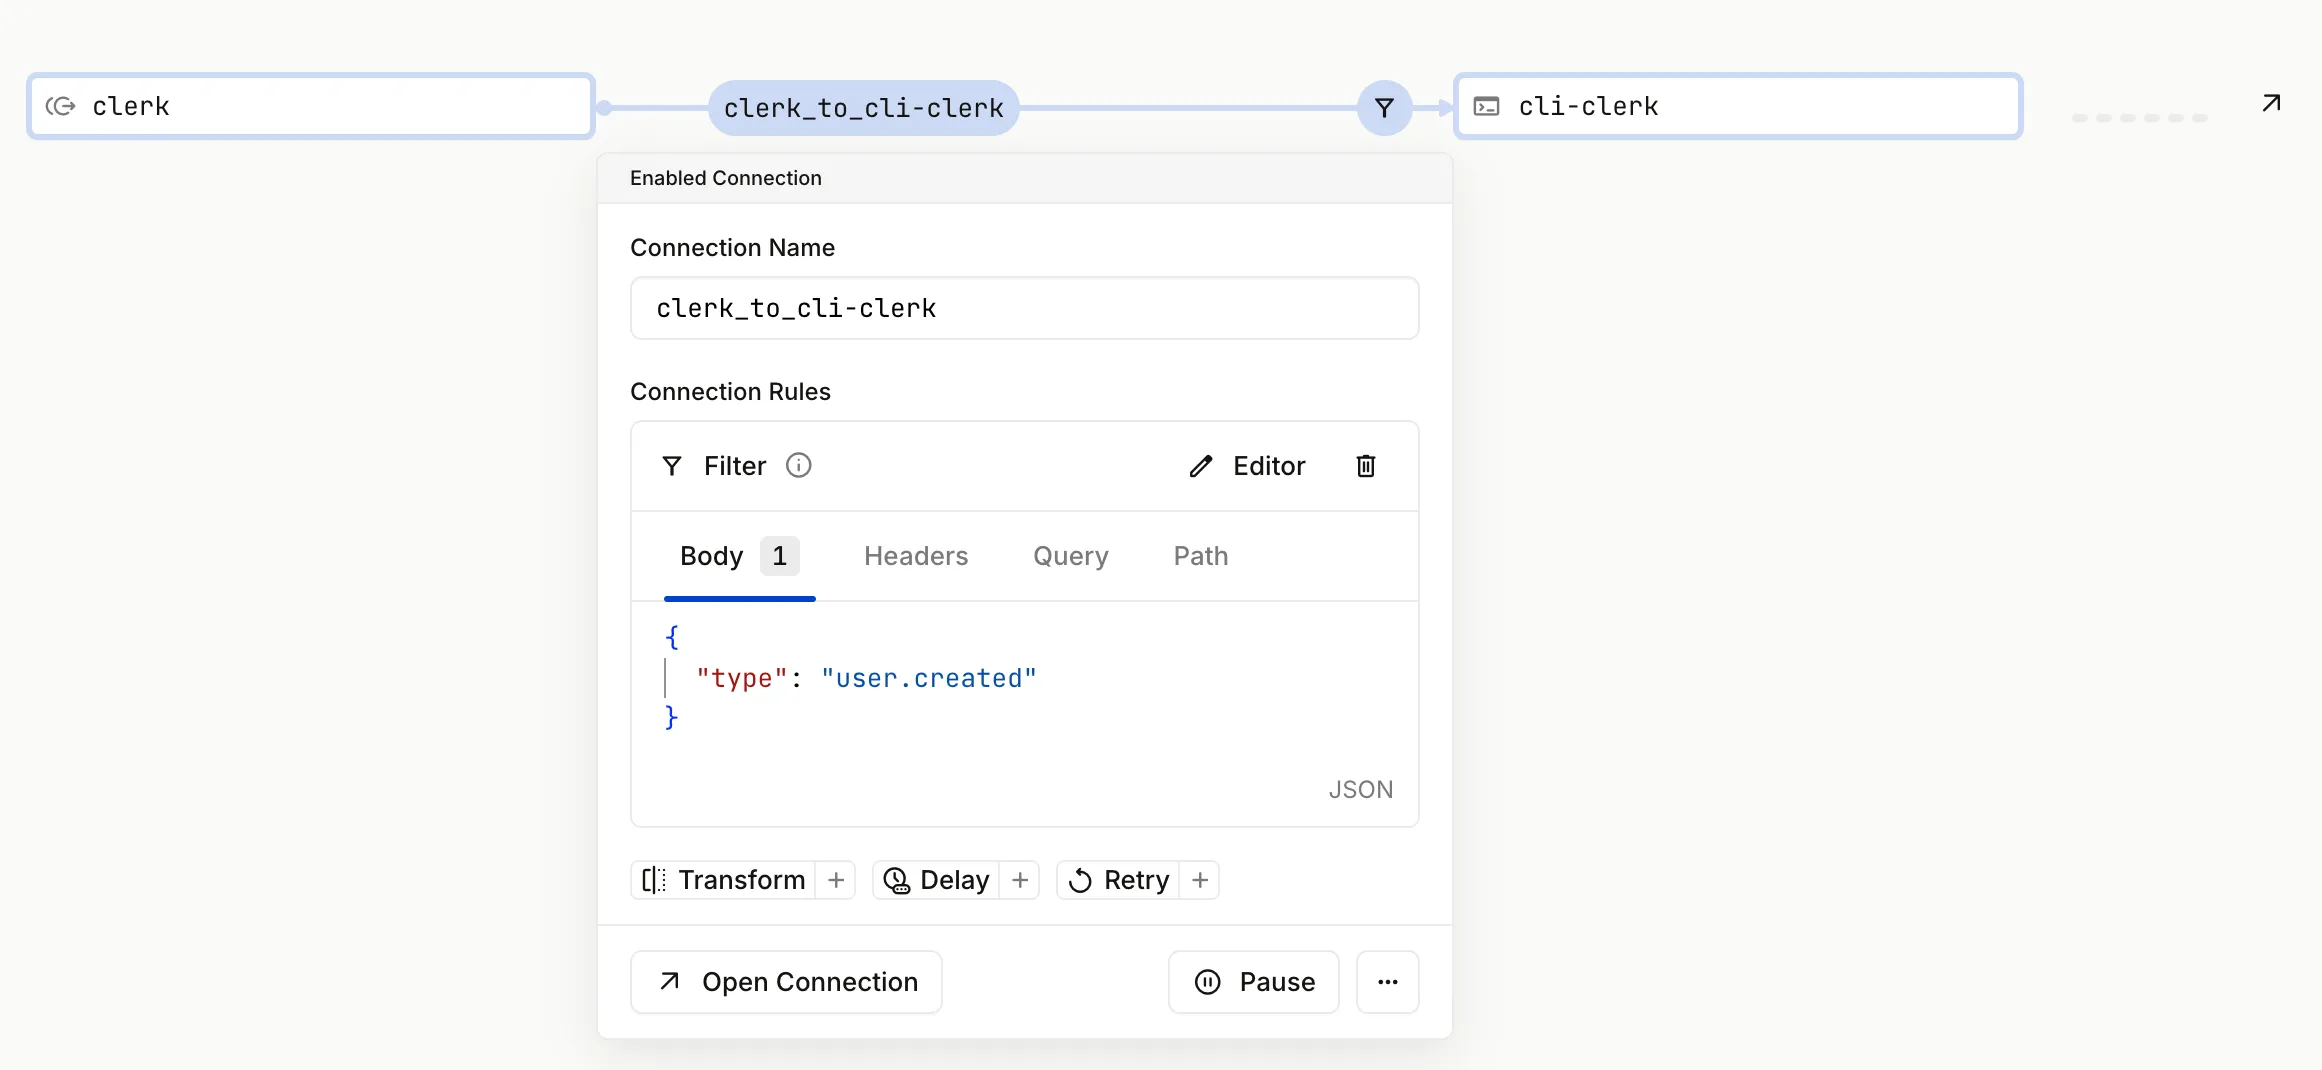
This filter ensures that only webhooks events with a type property that has a value of user.created will result in an event being delivered to the Next.js application.
Test by creating a new user and checking which events reach your app.
Hint: You can use sub-addressing with your email to create multiple accounts with Clerk. For example, you can use phil@example.com and phil+test1@example.com.
Add Xata to the Next.js application
Go to your Xata workspaces and ensure you are within the correct workspace. Go to the Settings section and get your API Key and Workspace slug.
If you are prompted to create a new database, skip that step by clicking the Skip connection guide link.
Also, go to the Account settings section from the menu under your avatar. Scroll to the Personal API keys section, click + Add a key and enter per-user-db-app, and click Save. Copy the newly created API key.
Save the Workspace slug value as XATA_WORKSPACE_SLUG and the Xata API key as XATA_API_KEY in your .env.local file:
NEXT_PUBLIC_CLERK_PUBLISHABLE_KEY=...
CLERK_SECRET_KEY=...

HOOKDECK_WEBHOOK_SECRET=...
+
+ XATA_WORKSPACE_SLUG=...
+ XATA_API_KEY=...
Install the Xata TypeScript client:
npm i @xata.io/client
Update route.ts to import the XataApiClient, get the Xata credentials, and create a Xata client instance:
import { NextRequest, NextResponse } from "next/server";
import { verifyWebhookSignature } from "@hookdeck/sdk/webhooks";
import { XataApiClient } from "@xata.io/client";

const HOOKDECK_WEBHOOK_SECRET = process.env.HOOKDECK_WEBHOOK_SECRET;

if (!HOOKDECK_WEBHOOK_SECRET) {
  console.error("Please set HOOKDECK_WEBHOOK_SECRET environment variable");
  process.exit(1);
}

const XATA_API_KEY = process.env.XATA_API_KEY;
const XATA_WORKSPACE_SLUG = process.env.XATA_WORKSPACE_SLUG;

const xata = new XataApiClient({
  apiKey: XATA_API_KEY,
});

...
Create a new Xata database per-user
Update the POST route handler to create a new database in Xata for each new user using the Xata client:
export async function POST(request: NextRequest) {
  try {
    ...

    const event = JSON.parse(rawBody);

    const dbList = await xata.databases.getDatabaseList({
      pathParams: {
        workspaceId: XATA_WORKSPACE_SLUG!,
      },
    });

    console.log("Existing DB list", dbList);

    if (dbList.databases.find((db) => db.name === event.data.id)) {
      const msg = "User DB already exists";
      console.log(`${msg}:`, event.data.id);

      // Return 200 as the event is processed and we don't want Hookdeck to retry
      return NextResponse.json({ message: msg }, { status: 200 });
    }

    const createResult = await xata.databases.createDatabase({
      pathParams: {
        dbName: event.data.id,
        workspaceId: XATA_WORKSPACE_SLUG!,
      },
      body: {
        region: "us-east-1",
      },
    });

    console.log("User DB created:", createResult.databaseName);

    return NextResponse.json(createResult);
  } catch (error) {
    console.error("Error creating DB", error);
    return NextResponse.json({ error }, { status: 500 });
  }
}
With the Xata client in place, retrieve the list of existing databases in your Xata workspace by calling xata.databases.getDatabaseList. Pass the workspaceId as a path parameter, which is retrieved from the environment variable XATA_WORKSPACE_SLUG.
The event.data.id is the ID of the user in Clerk, so this is a good value to use when creating a database.
First, check if a database with the same Clerk user ID already exists by using the find method on the dbList.databases array. If a database with the same name is found, log a message indicating that the user database already exists and return a 200 response with a message. This indicates to Hookdeck that the event is processed, and Hookdeck will not retry the webhook.
If the database does not already exist, create a new database by calling xata.databases.createDatabase. Pass the dbName and workspaceId as path parameters, and for the moment hard code the database region to us-east-1.
Finally, return the result of the database creation as a JSON response. If any errors occur during the process, catch them, log the error, and return a 500 response with the error message.
Use Hookdeck to replay the user.created Clerk event
When you previously created a user in Clerk by signing in, the webhook events were only logged by the Next.js application and a Xata database was not created.
Hookdeck provides the ability to retry and replay events, so we can replay these old events during development.
Head to the Hookdeck Dashboard, go to the Events section, find the user.created event, and click the replay icon to replay the event.
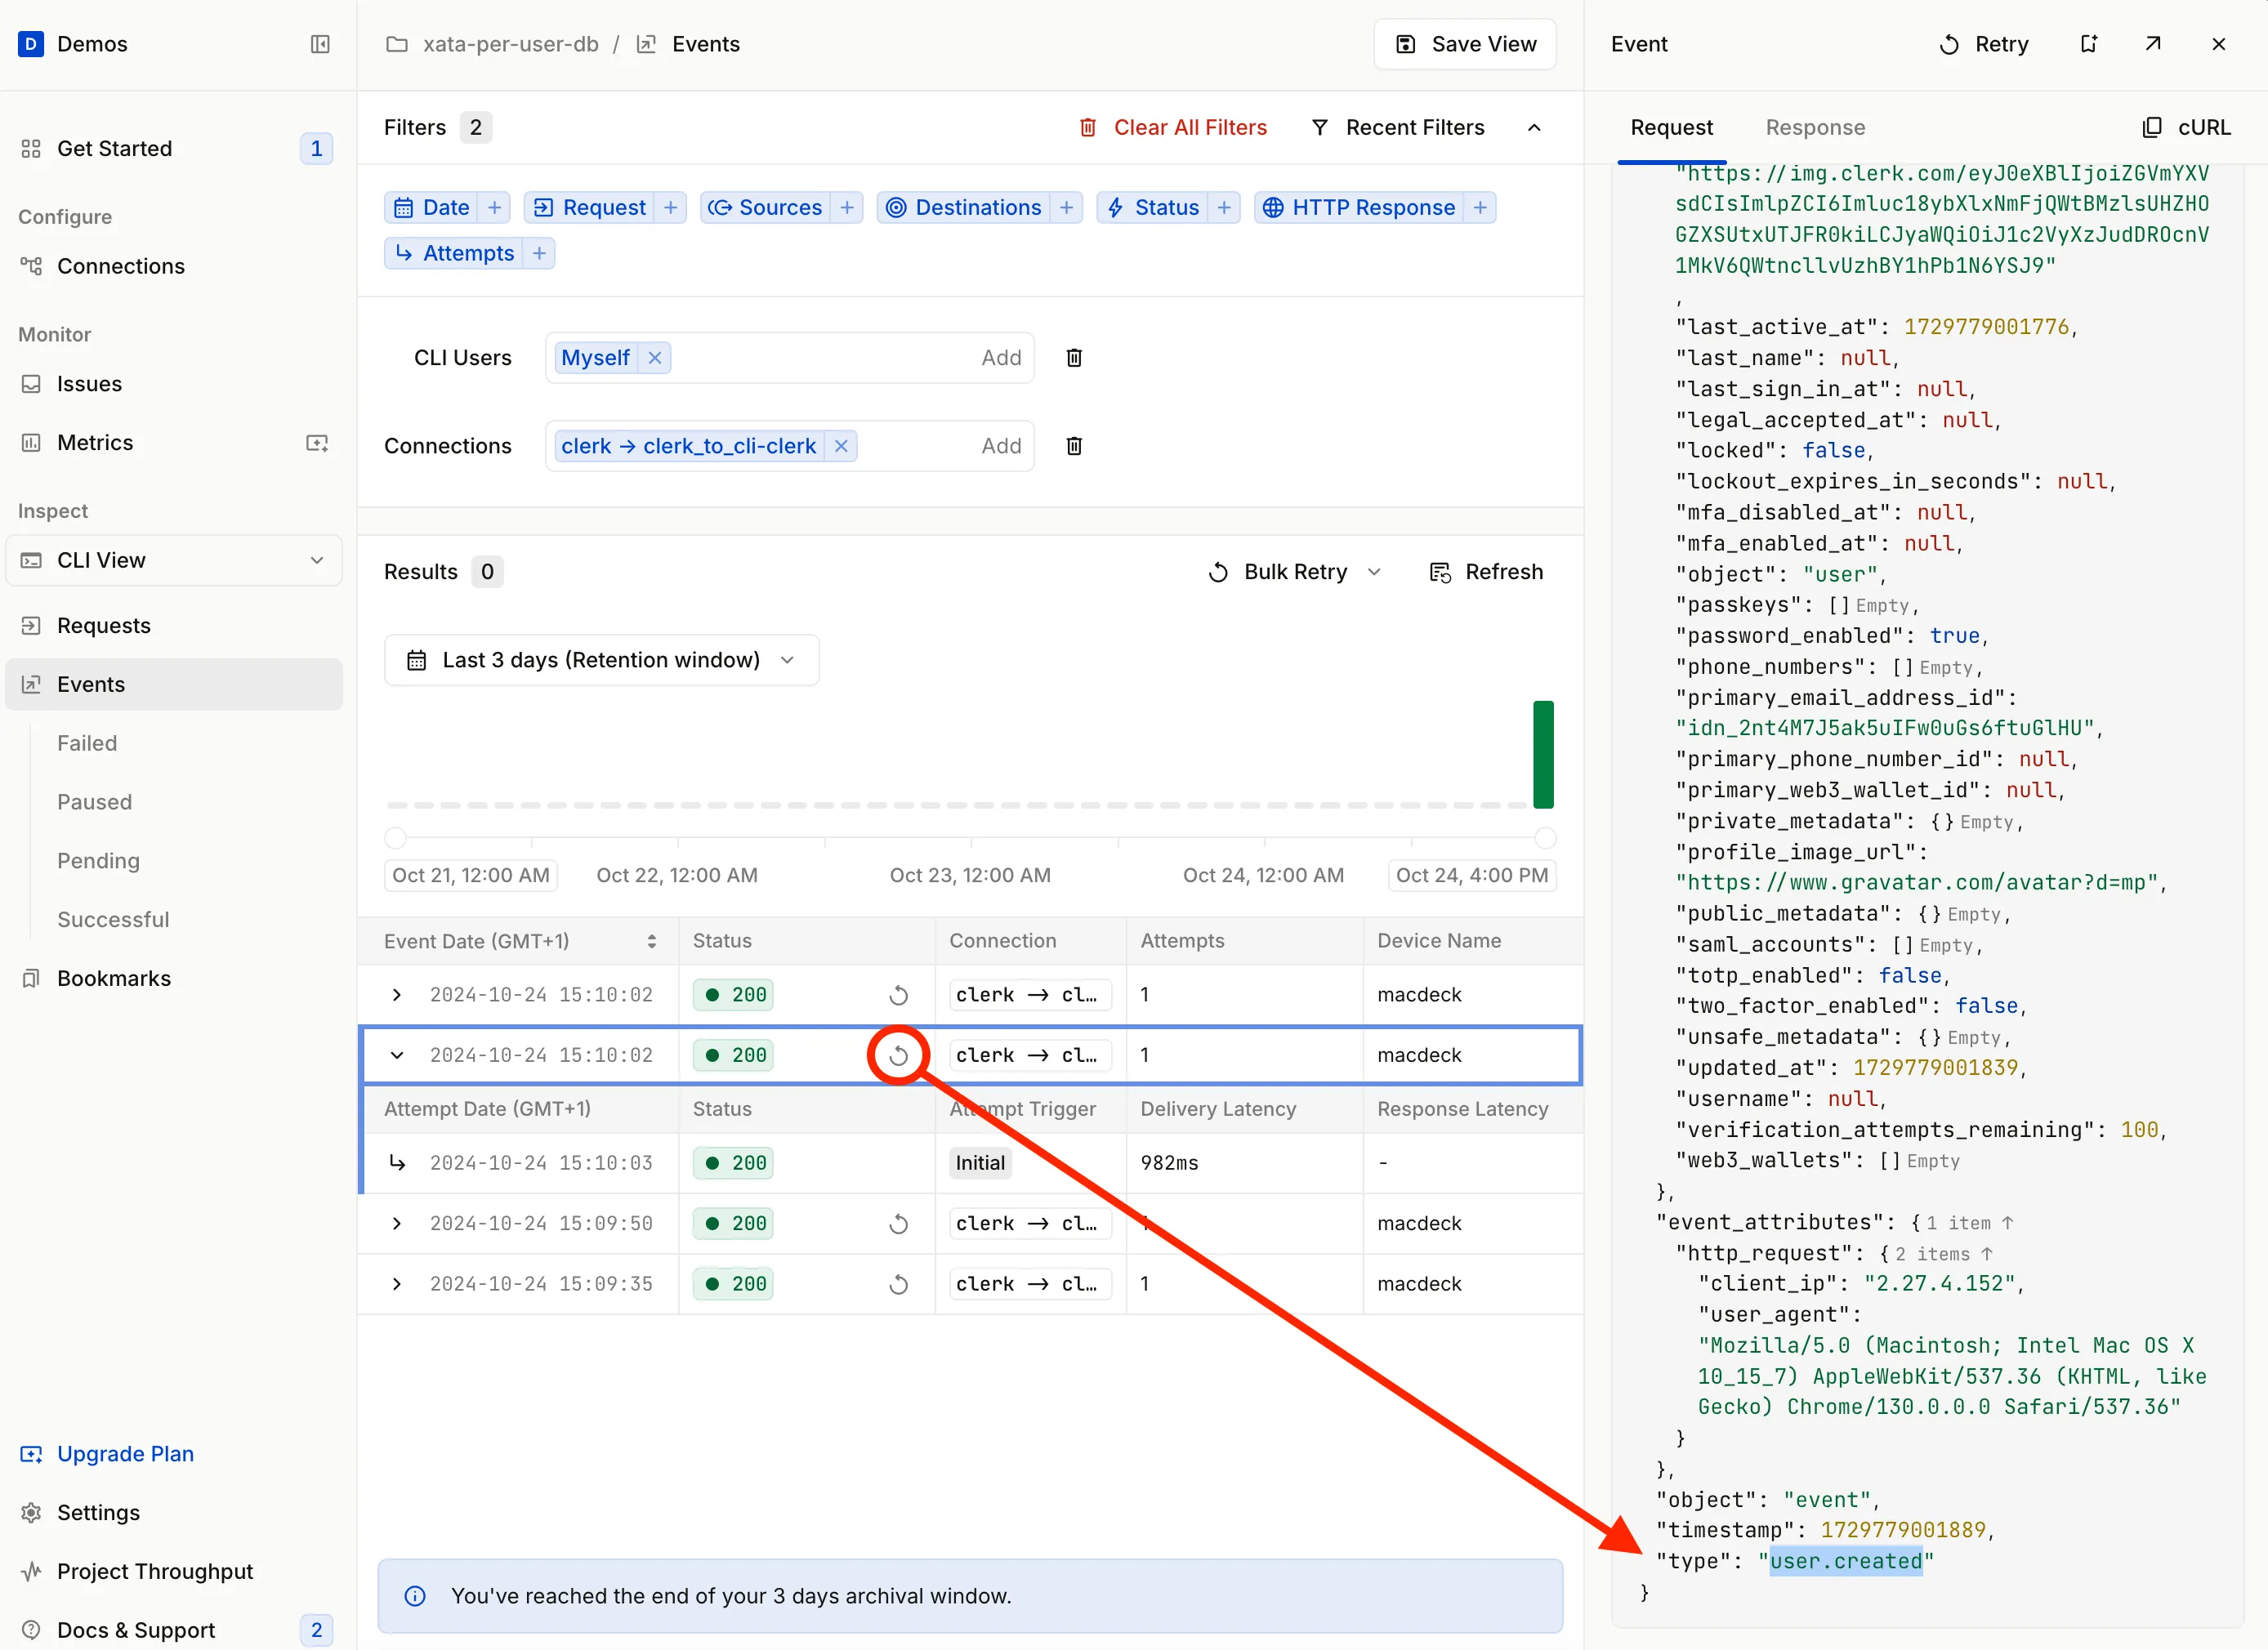
The following message will be logged to indicate the database is created:
User DB created: user_{id}
Head your Xata workspace and check the database was created.
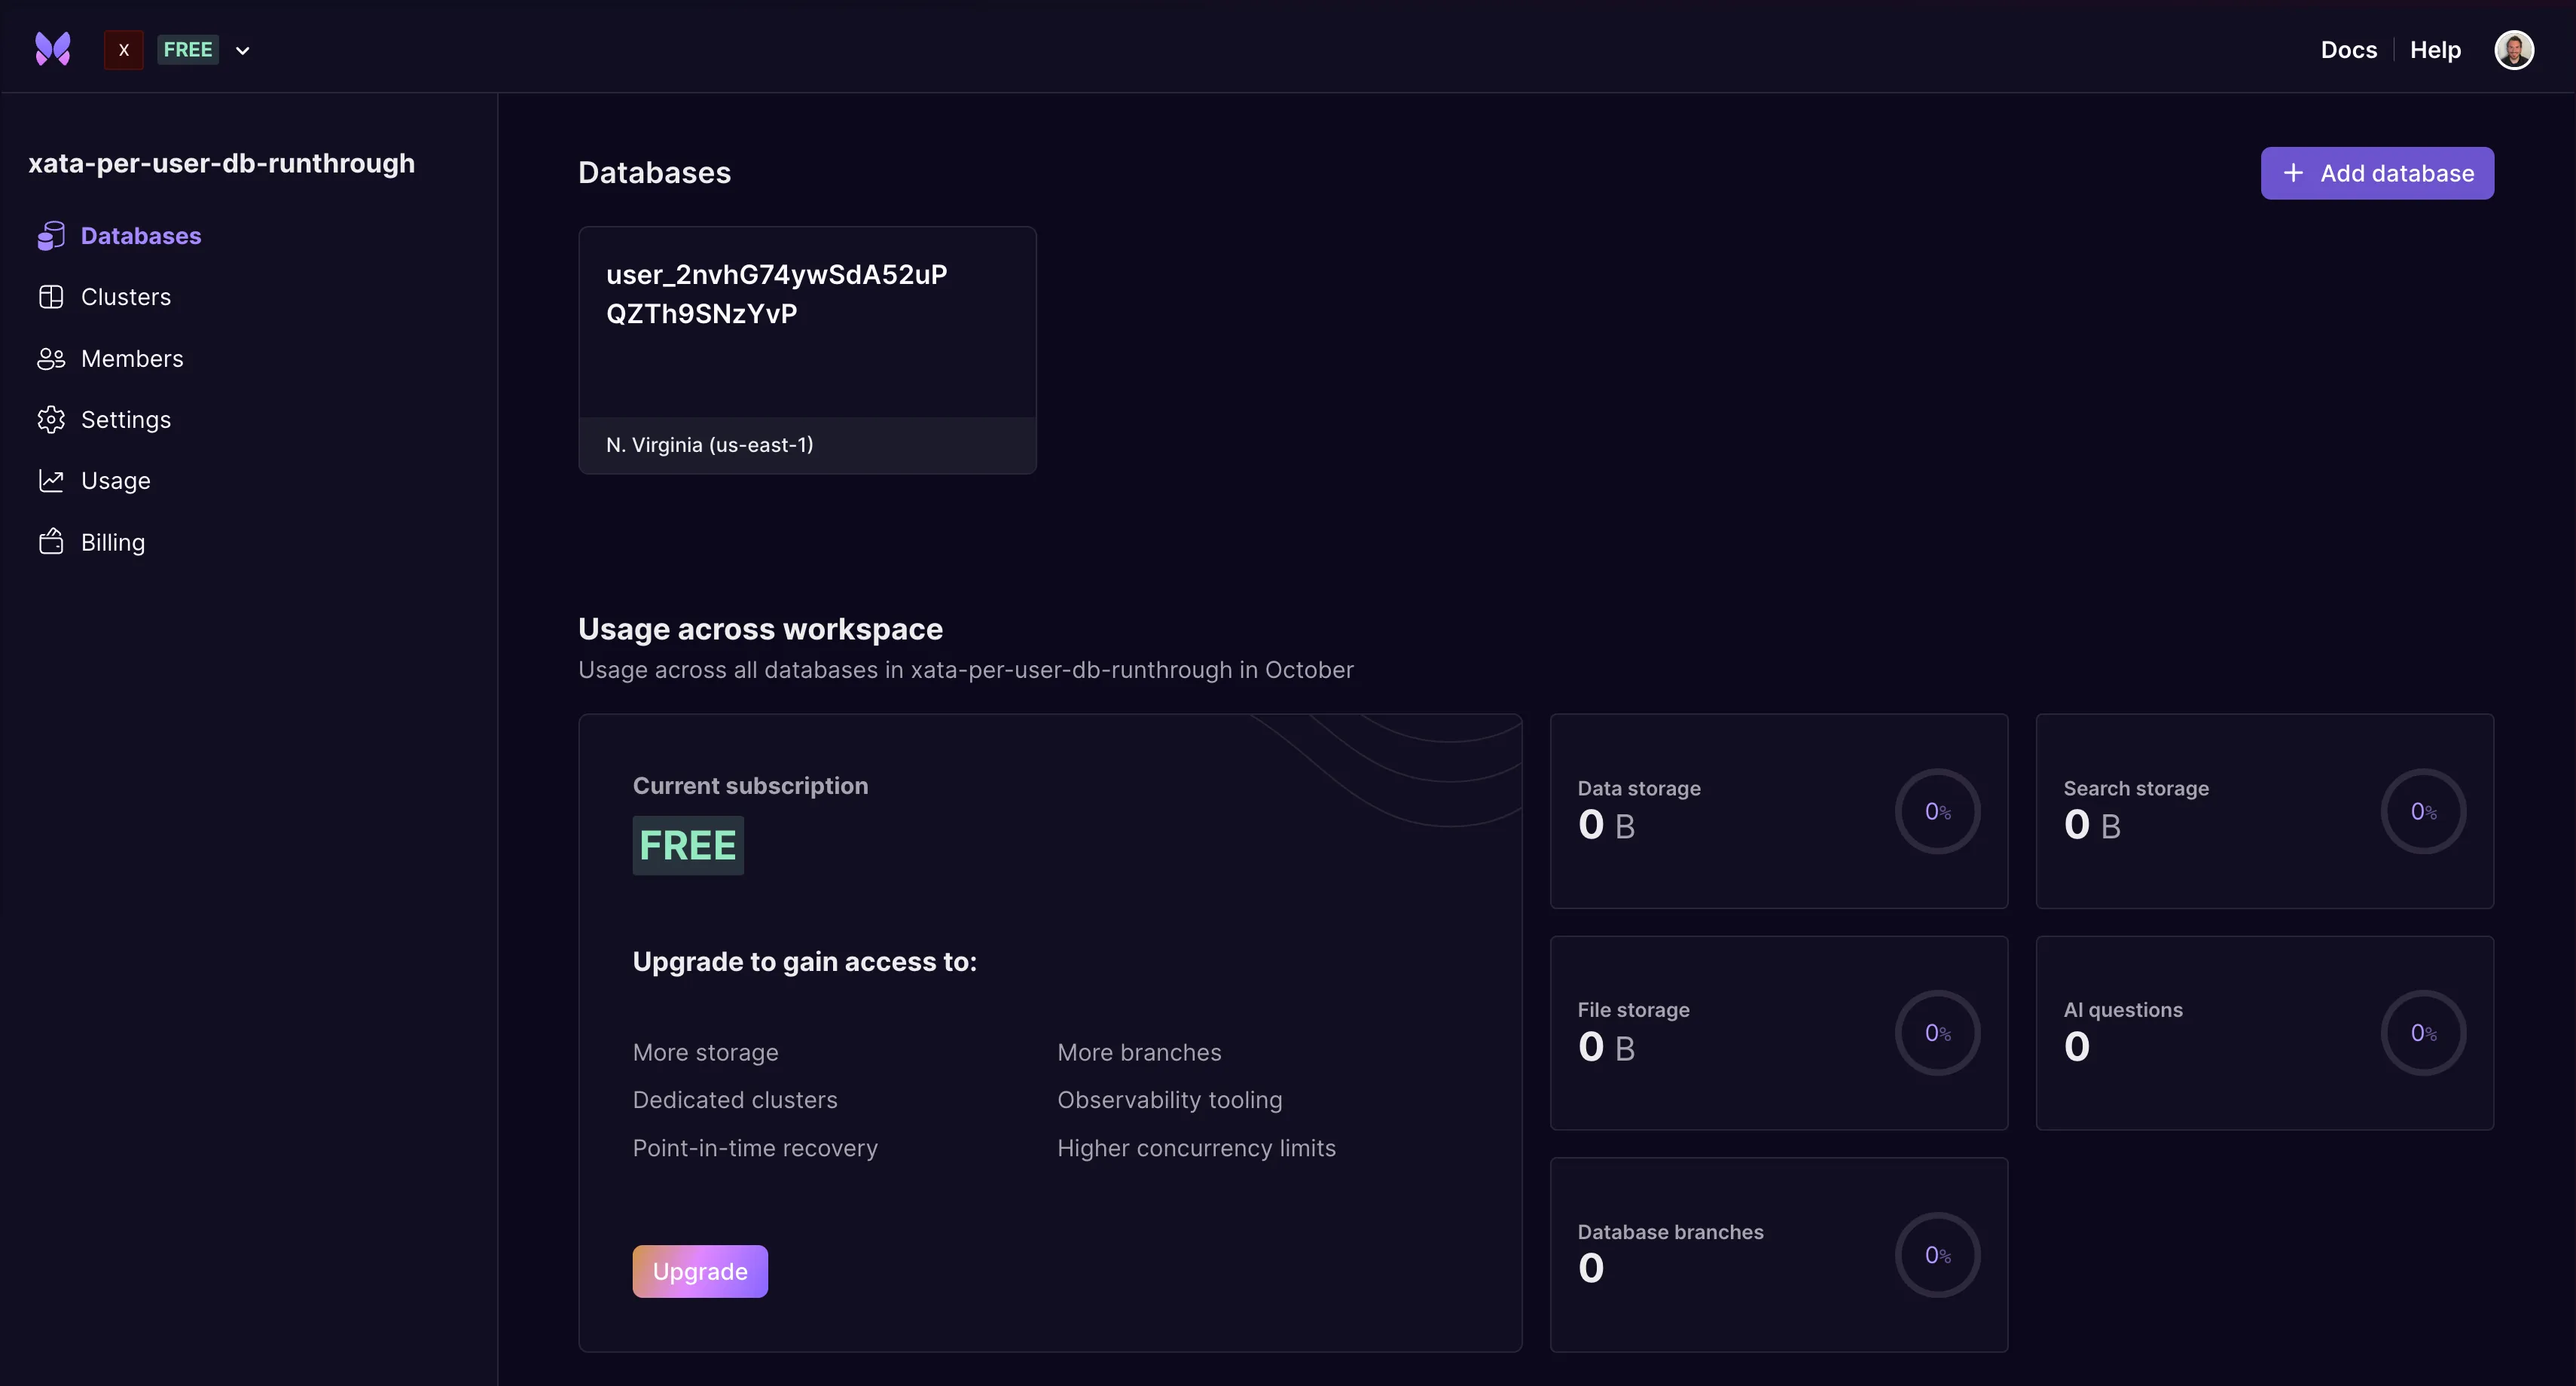
Replay the user.created event again via the Hookdeck Dashboard and ensure that the User DB already exists message is logged.
User DB already exists: user_{id}
 POST /webhooks/clerk 200 in 652ms
And that's it! Every time a new user is created in Clerk, triggered by a new user sign up, a new per-user database is created in Xata.
Example: Regional database creation
As mentioned, one of the use cases for creating a database per-user is to enable the data to be hosted in a specific region for data privacy or security reasons. So, here's an example of changing the database region based on an IP address lookup using the location the user signed up from. In a real world scenario, you'd ask the user where they want to host their data either during of after signup.
Update the POST function in src/app/webhooks/clerk/route.ts:
export async function POST(request: NextRequest) {
  try {
    const headers: Record<string, string> = {};
    request.headers.forEach((value, key) => {
      headers[key] = value;
    });

    const rawBody = await request.text();

    const verificationResult = await verifyWebhookSignature({
      headers,
      rawBody,
      signingSecret: HOOKDECK_WEBHOOK_SECRET!,
    });

    if (!verificationResult.isValidSignature) {
      console.error("Invalid signature");
      return NextResponse.json({ error: "Invalid signature" }, { status: 401 });
    }

    const event = JSON.parse(rawBody);

    const dbList = await xata.databases.getDatabaseList({
      pathParams: {
        workspaceId: XATA_WORKSPACE_SLUG!,
      },
    });

    console.log("Existing DB list", dbList);

    if (dbList.databases.find((db) => db.name === event.data.id)) {
      const msg = "User DB already exists";
      console.log(`${msg}:`, event.data.id);

      // Return 200 as the event is processed and we don't want Hookdeck to retry
      return NextResponse.json({ message: msg }, { status: 200 });
    }

    let dbRegion = "us-east-1";
    try {
      const ipLookupResponse = await fetch(
        `http://ip-api.com/json/${event.event_attributes.http_request.client_ip}?fields=continentCode`
      );
      const ipLookupData = await ipLookupResponse.json();

      switch (ipLookupData.continentCode) {
        case "EU":
          dbRegion = "eu-west-1";
          break;
        case "OC":
          dbRegion = "ap-southeast-2";
          break;
      }
    } catch (error) {
      console.error("Error looking up IP. Defaulting to US.", error);
    }

    const createResult = await xata.databases.createDatabase({
      pathParams: {
        dbName: event.data.id,
        workspaceId: XATA_WORKSPACE_SLUG!,
      },
      body: {
        region: dbRegion,
      },
    });

    console.log("User DB created:", createResult.databaseName);
    console.log("In region:", dbRegion);

    return NextResponse.json(createResult);
  } catch (error) {
    console.error("Error creating DB", error);
    return NextResponse.json({ error }, { status: 500 });
  }
}
This example defaults to using the us-east-1 region, but also performs an IP address lookup to determine a region closer to their location when they signed up.
It uses ip-api which is free for non-commercial use and can handily returns a continentCode which is used to determine the region where the database instance is created.
The free version of ip-api uses an unsecured HTTP request for IP lookup.
Conclusion
In this tutorial, you learned the benefits and use cases of a per-user database architecture, particularly in scenarios requiring data isolation, security, and compliance.
You also walked through the steps to set up a Next.js application integrated with Clerk for user management, Hookdeck for local webhook development and overall reliable webhook handling, and Xata for database services where Xata makes the process of creating a per-user database simple and lightweight.
You configured Clerk webhooks to trigger a per-user database to be created within Xata for each new user. Additionally, you explored how to customize database region creation based on user location.
More information
Where next?
We'd love to hear your feedback on this tutorial, learn more about your experiences with Xata, or discuss contributing a community blog or guide. Connect with us in the Hookdeck Community Slack or follow us on X | Twitter.
