![]() Fongang Rodrique
Fongang Rodrique
How to Test PayPal Webhook Events on localhost with Hookdeck
PayPal is a safe and secure online payment system that enables users to pay for purchases, accept payments when selling goods or services, and send money to friends and family.
Integrating PayPal webhooks into your application is crucial for managing real-time notifications of events such as payments, disputes, and subscriptions. However, handling these webhooks efficiently can be challenging due to issues like timeouts, server overloads, and other unforeseen problems.
Hookdeck provides an event gateway that helps manage inbound webhooks including monitoring and replaying events, ensuring reliability and visibility
🟢 By relaying your PayPal webhooks through Hookdeck, you can track all events, troubleshoot failures, and maintain a reliable webhook integration.
This guide will walk you through the steps to connect PayPal webhooks to a localhost application using Hookdeck. We will cover how to:
- Set up a localhost webhook endpoint.
- Create a Hookdeck Connection.
- Create a PayPal app and webhook.
- Test PayPal webhook event to localhost app.
Setting up a localhost webhook endpoint
For this example, we are going to use the sample Node.js code from Hookdeck's repository. Feel free to follow up with any application or code you might have.
- Open up your terminal and clone the repository by running:
git clone https://github.com/hookdeck/nodejs-webhook-server-example.git
- Navigate into the cloned directory and install the dependencies:
cd nodejs-webhook-server-example
npm install
- Start the server by executing:
npm run dev
🟢 The node.js server starts up on
http://localhost:1337. See the list of endpoints in thesrc/routes.tsfile. We will the/paypal-webhooks-endpoint.
Create a Hookdeck Connection
There are several ways of creating a Hookdeck Connection. But for this guide, we're using the Hookdeck CLI without a Hookdeck account. This dynamically creates a connection and makes available a Hookdeck console for you to use.
Create Hookdeck Connection with Hookdeck CLI
- Install the Hookdeck CLI.
npm install hookdeck-cli -g
yarn global add hookdeck-cli
brew install hookdeck
-
scoop bucket add hookdeck https://github.com/hookdeck/scoop-hookdeck-cli.git -
scoop install hookdeck
-
Download the latest release's tar.gz file.
-
tar -xvf hookdeck_X.X.X_linux_x86_64.tar.gz -
./hookdeck
- Open up your terminal and expose the localhost port with:
hookdeck listen 1337
- The Hookdeck CLI initiates the creation of a guest account that will be used.
- You get prompted to do some basic setup.
- Create a new source (ex. paypal).
- Set the path to be forwarded to as
/paypal-webhooks-endpoint. - Name the connection label (ex. localhost-app).
- The connection is created and you are given:
- A unique URL to use for your Hookdeck console
- The webhook URL needed
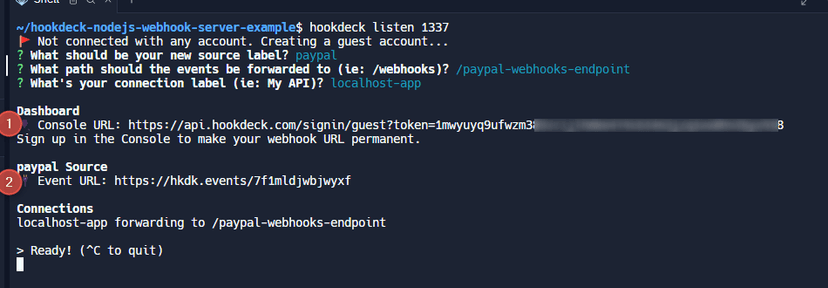
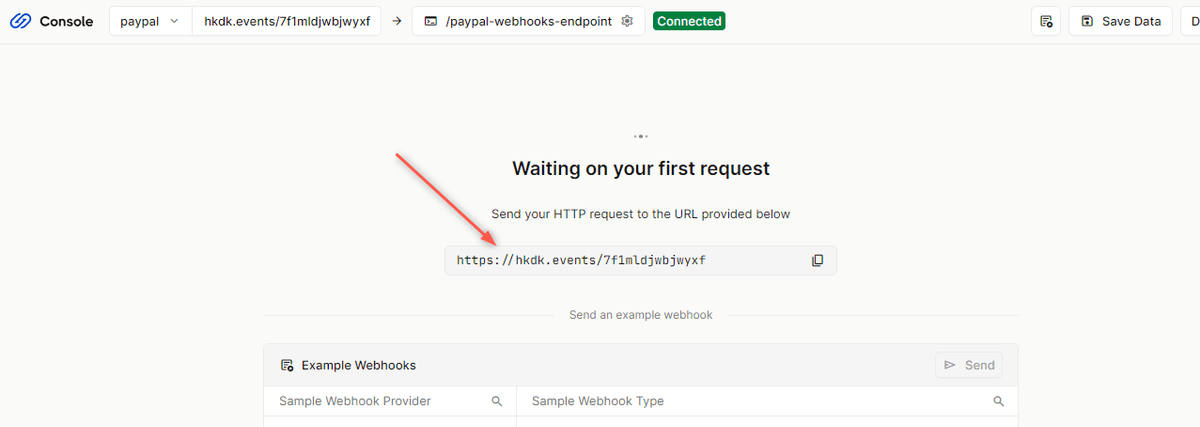
- The same connection can be seen on your Hookdeck guest console after following the link. Copy the PayPal Source webhook URL. It will be used later when creating the PayPal application and webhook.
Creating a PayPal app and webhook
- Sign up or log in to your PayPal Developer Dashboard.
- Navigate to My Apps & Credentials on the sidebar.
- Click to open the default app provided by PayPal or use any existing app you may have.
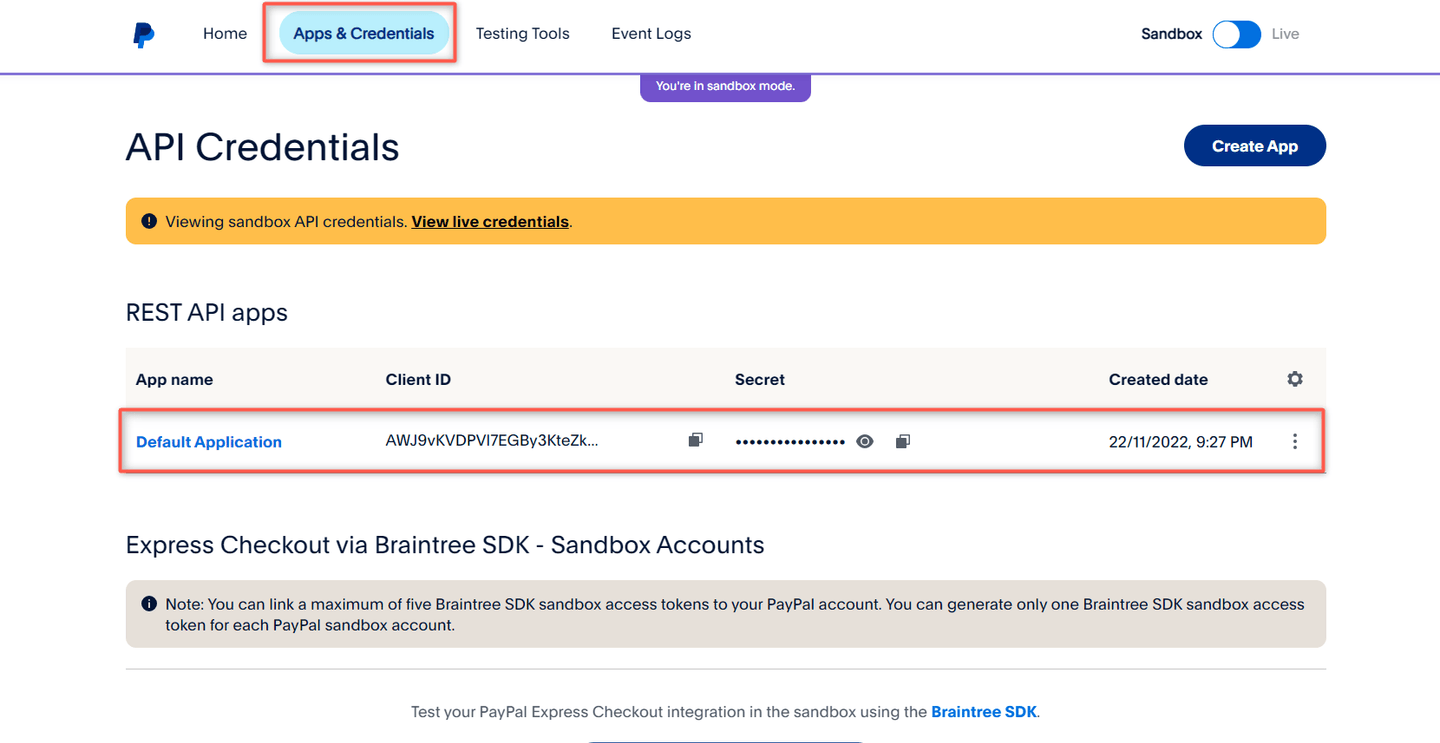
🔵 For production applications, use Live credentials.
- Click on Add Webhook to create a new webhook.
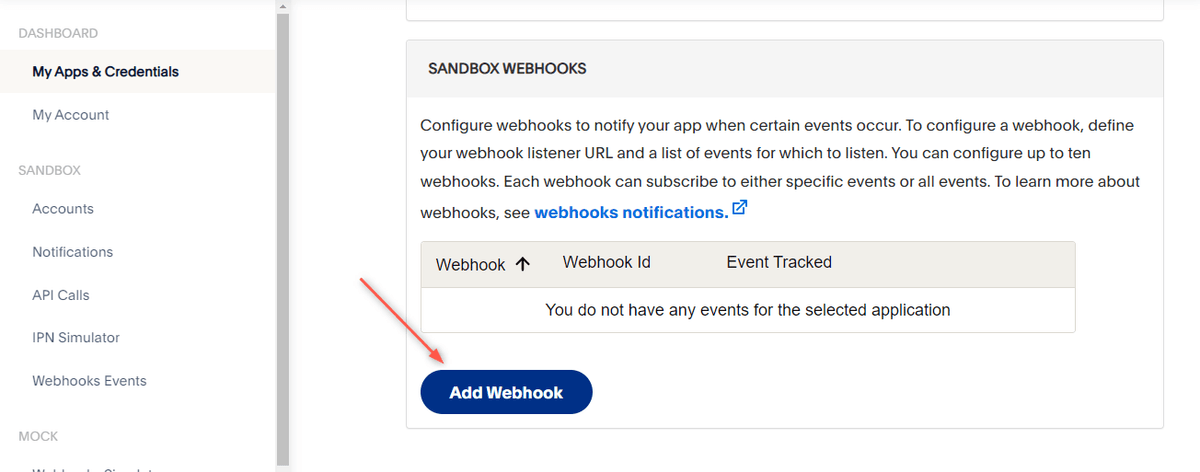
- Fill in the Webhook URL with the URL you copied from Hookdeck and select
Billing plan createdas an event to listen to, then Save.
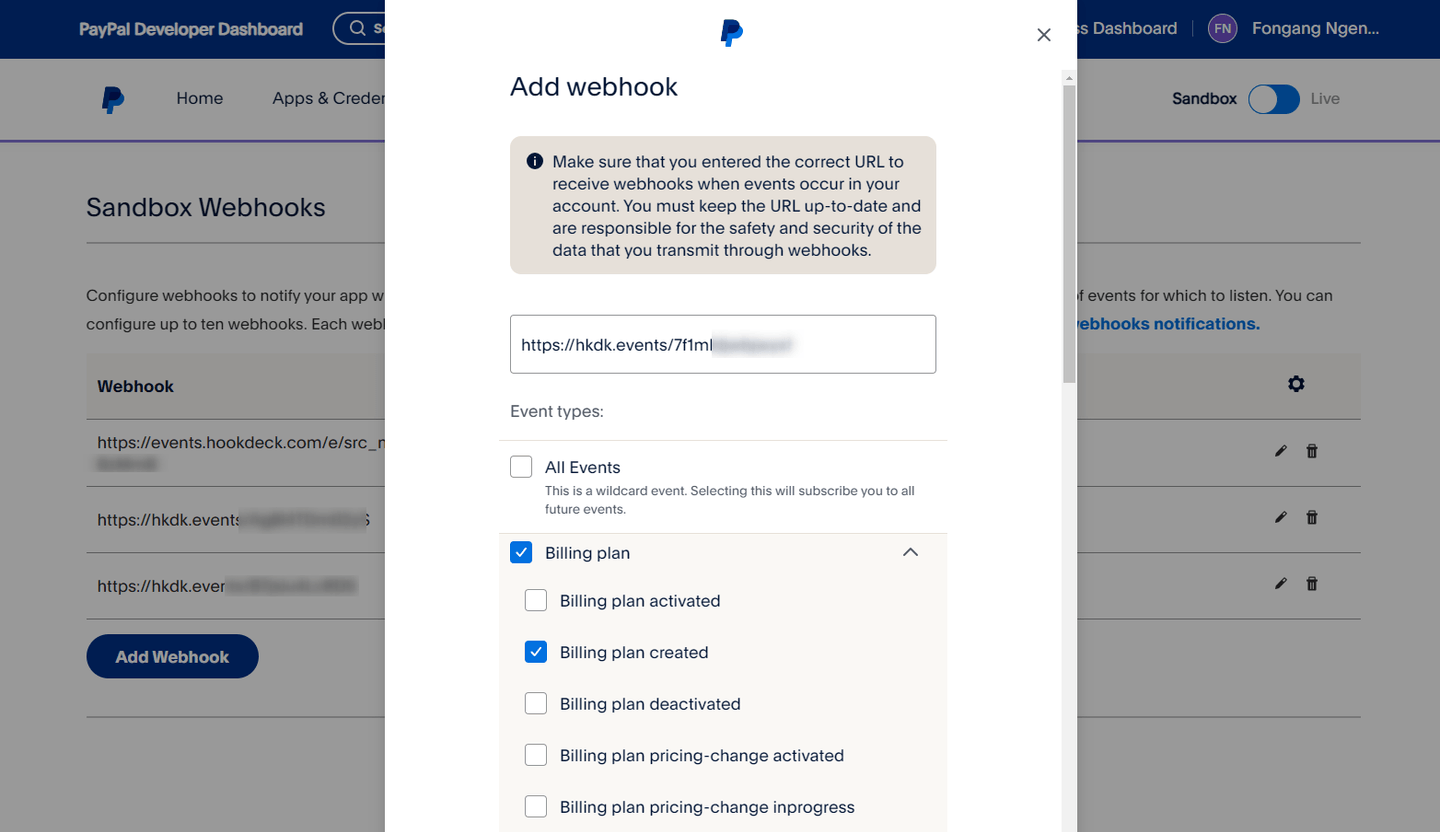
The webhook is successfully created and will be triggered anytime a PayPal billing plan is created.
Using PayPal’s Webhook Simulator to test webhook events
We have successfully set up our local server, created a Hookdeck Connection, and configured a PayPal webhook.
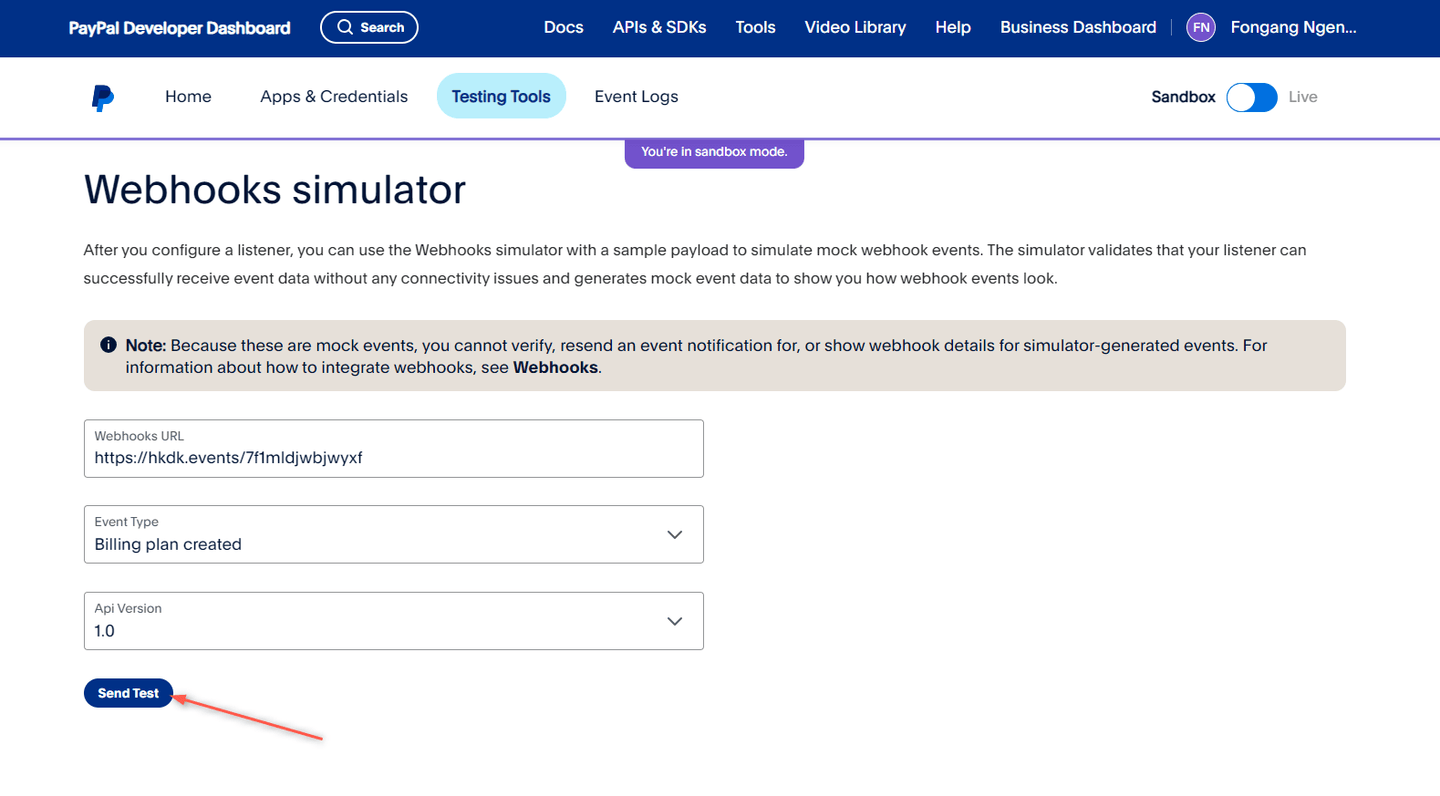
With the PayPal Webhook Simulator, we can simulate webhook events and see how they get relayed through Hookdeck to our local application.
🔵 Note that the Webhook Simulator functions independently of the webhook event created on any PayPal app.
- Go to the Webhook Simulator tab in the PayPal Developer Dashboard.
- Fill in the Webhook URL copied from Hookdeck.
- Select the event to trigger and click Send Test.
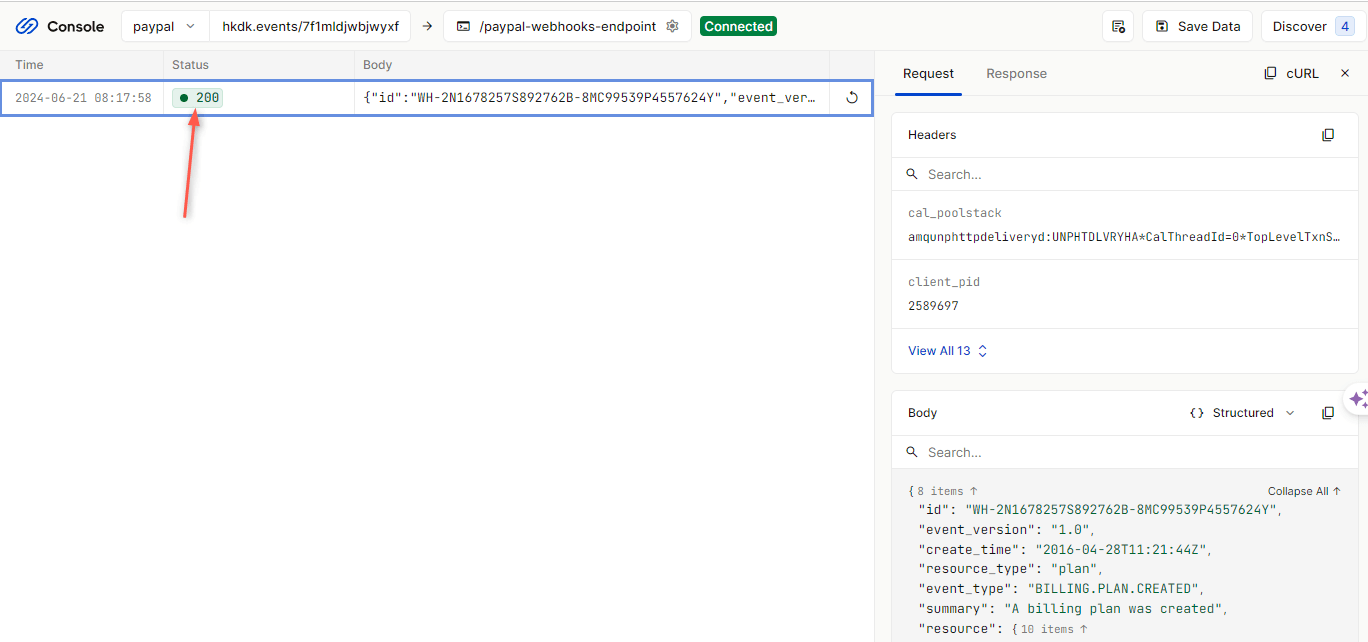
After triggering the Billing plan created event, it is relayed by Hookdeck directly to your localhost application. Check the Hookdeck Console for a successful request with a 200 status code.
🔵 Hookdeck provides a reliable uptime webhook endpoint and queues all incoming webhook requests that can be modified and replayed.
Back in the terminal of the localhost application, the successful payload from the webhook is received and printed.

Retrying error or failed events
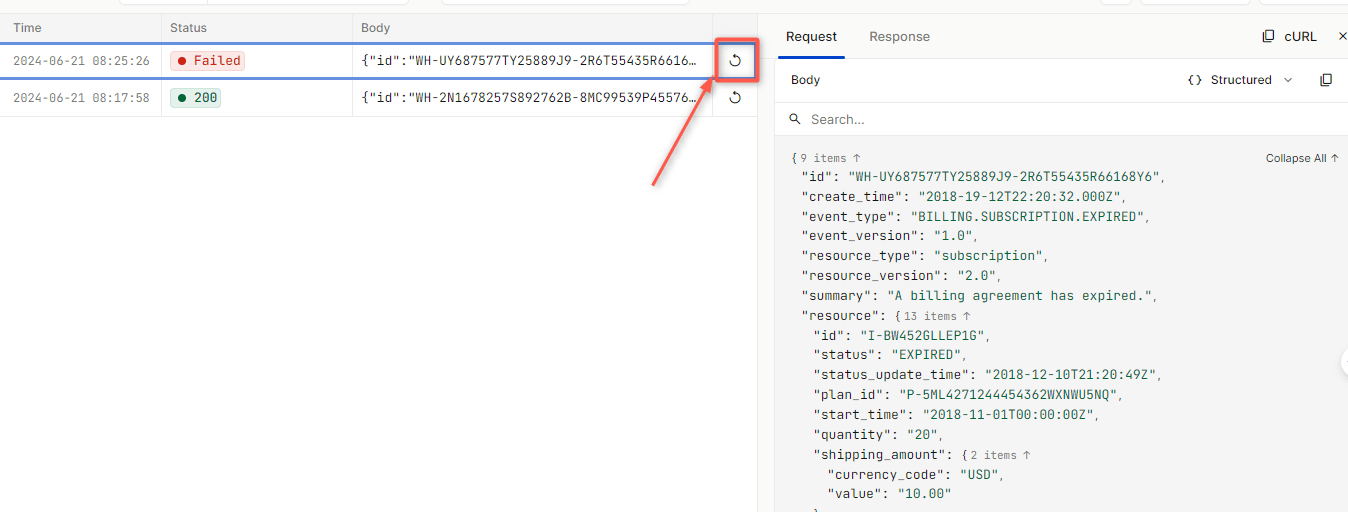
In case there are any failed events that don’t make it to your destination, Hookdeck give you the ability to retry any attempts to deliver any failed or error event.
To retry a failed event:
- Click on the Retry icon by the right of the failed event. This replays the the event again from Hookdeck to the local application.
For more details on managing Hookdeck requests and events, refer to the Hookdeck documentation.
Conclusion
In this tutorial, you learned how to receive PayPal webhook events through Hookdeck to an application running on localhost using the Hookdeck CLI and Hookdeck Console.
If you found this helpful, try out the Hookdeck platform to safely consume, monitor, and troubleshoot your PayPal webhooks in development and production, ensuring seamless operation and transaction tracking for your business.
