Guide to Creating your Hookdeck Connections
Connections are at the core of what Hookdeck has to offer.
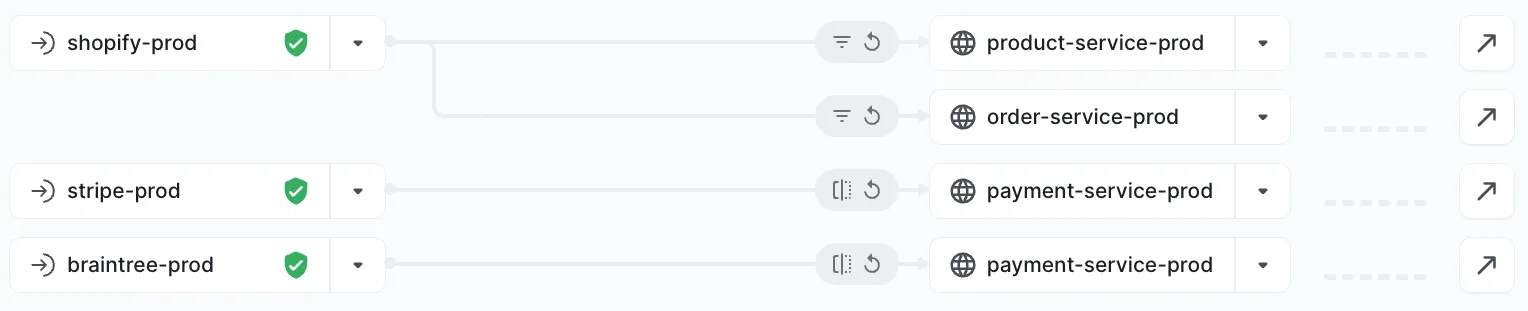
A connection consists of a Source and its Destination along with a few Connection Rules. A source is any service that sends you webhook. A destination is any endpoint to which your webhooks can be routed. Each source and destination combination creates a connection. A source can have one or multiple destinations, and vice versa.
While original created with webhooks in mind, Hookdeck can be used as an asynchronous event gateway that routes events in and out of your systems. Thanks to our configurable sources, destinations, and rules, Hookdeck can integrate deeply into your stack, connecting various internal and external systems.
Some example patterns of real companies using Hookdeck in production sending and receiving millions of events monthly:
- accept webhooks from external services and route them to internal services
- connect external services together
- or even send events from an internal system to other services, internal or external alike
In this guide, we’ll go over the basics of Hookdeck: how to configure your connections.
You can create a new connection from the dashboard or via our API. Either way, here are the 4 core components that make up a Hookdeck connection.
Source
Overview
A source is any service that sends you webhook. After creating a source, you will receive a Hookdeck URL that you can use and register to an external service to start accepting events. In your project, every source must have a unique name, and you can further provide a description to give better clarity of your sources.
Verification (optional)
As your webhooks are by default a public HTTP endpoint that anyone can interact with, it is recommended that you verify that the requests you’ve received are from the expected origin. You can configure Hookdeck to perform the verification step for you so you don’t have to learn about different platforms.
Hookdeck provides verification integration with many external platforms like Stripe, Twitter, GitHub as well as generic mechanism like HMAC, Basic Auth, or API Key. If none of these mechanism works for your use case, please reach out to us and we’re happy to build the integration for you.
HTTP Method Customization
Most webhooks communicate via HTTP POST requests. At Hookdeck, our source URL accepts POST, PUT, PATCH, and DELETE requests by default. If your integration requires Hookdeck to accept GET requests, you can turn that on in Advanced Configuration. You can also use it to lock down the allowed methods in case that URL is public or given to a user.
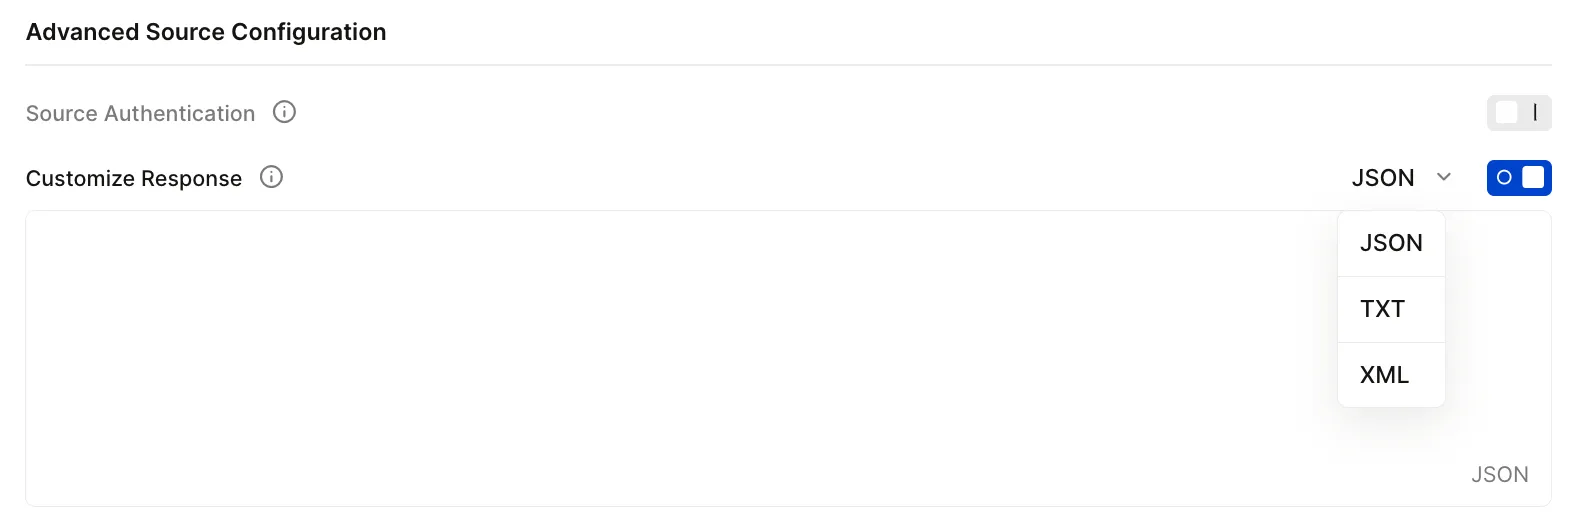
Response Customization
After receiving requests, Hookdeck sources will respond with a HTTP 200 status code and this body template:
{
    "status": "SUCCESS",
    "message": "Webhook handled by Hookdeck. Check your dashboard to inspect the request: https://dashboard.hookdeck.com/requests/req_abc123_example_id",
    "request_id": "req_abc123_example_id"
}
If you need to customize this response, you can do so under Advanced Configuration when creating or editing your source. We currently only support static response in either JSON, TXT, or XML format.
Destination
Overview
A destination is any endpoint to which your webhooks can be routed. Typically, when working with webhooks, the destination is your own HTTP endpoint from your backend API. We call this your internal service. This is a common use case that Hookdeck helps with. Furthermore, you can also use Hookdeck to route your incoming requests to a third-party services from another provider in your tech stack. We call this your external services.
Every destination in your project must have a unique name. You can also give it a description if that’s helpful for you and your team.
Destination Type
There are 3 types of destionation:
1: HTTP destination
HTTP destination is a public endpoint that you want to route your events.
2: CLI destination
During development, you can use Hookdeck CLI and the CLI destination to forward events to your local server to test your Hookdeck integration.
3: Mock API destination
Hookdeck provides a Mock API that accepts all API requests sent to it. You can use it to start accepting webhooks and observe the incoming events without writing a single line of code.
This is helpful when you don’t fully understand the data shape or the behavior of your webhook source provider and just want to observe how things work.
Rate Limit
Hookdeck lets you set a rate limit for your destination. This limit can help shield your server from volume spikes.
Under the hood, Hookdeck places your incoming requests into a FIFO queue with your rate limit configuration before routing these webhook events to their final destinations.
There are several common scenarios where setting a rate limit on a destination can prove useful:
- Your receiving API enforces a rate limit policy that rejects requests exceeding a predetermined maximum rate of arrival.
- You perform a bulk update operation within the sending platform, like bulk updating all your products in Shopify.
- The sending platform, having experienced an outage, has accumulated a backlog of webhooks that it tries to deliver all at once.
- You have a sudden burst in usage because of a new customer or specific world events, like Black Friday.
- A common scenario is that your API is calling another API with a rate limit. For instance, for each Shopify order, you update that order with some metadata but you can’t do so faster then 120 per api key per Shopify’s own API rate limit.
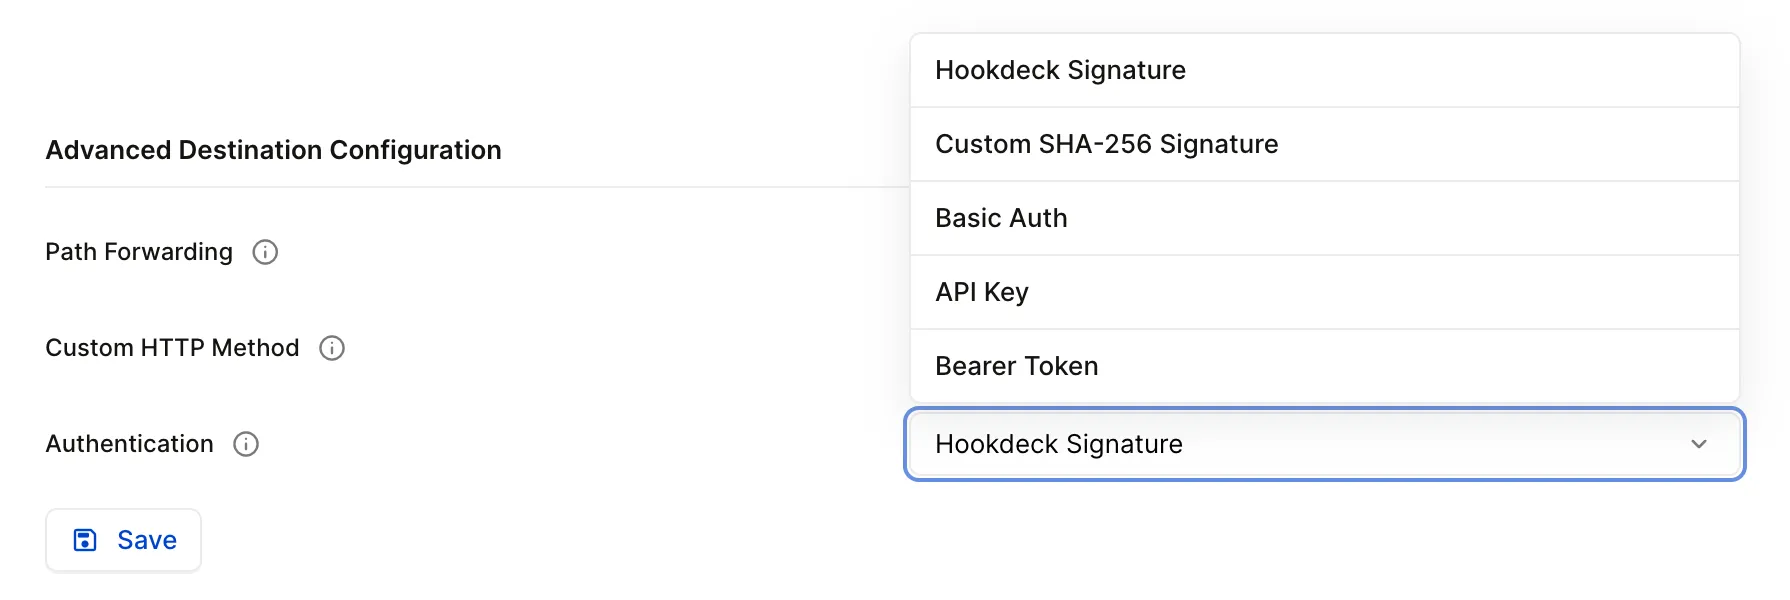
Authentication
Hookdeck allows you to customize the authentication behavior of the events call to your destinations. By default, Hookdeck will send events with a digital signature for you to verify that it’s coming from Hookdeck. This is helpful when your destination is an internal service.
When you want to use your destination as an external service, you can configure the destination with API keys or other authentication strategy to satisfy the authentication requirement of your external provider.
Here are the available authentication strategies you can configure for your destinations:
- Hookdeck Signature (default)
- Custom SHA-256 Signature
- Basic Auth
- API Key
- Bearer Token
You can also customize the HTTP method of the outgoing events as well to fit your requirement better.
Path forwarding
By default, Hookdeck preserves any path appended to the Hookdeck URL when routing a webhook to its destination.
For example, if a provider is set up to send webhooks to https://hkdk.events/abcxyz/path/to/forward and your destination URL is https://www.example.com/webhooks, then your destination will receive the request at https://www.example.com/webhooks/path/to/forward.
To prevent this behavior, disable path forwarding on the destination.
Rules
A rule is a piece of instructional logic that dictates the behavior of events routed through a connection. There are four types of rules in Hookdeck: retry, delay, filter, and transformation.
Retry rule
The retry rule determines the rate and limit of automatic retries on failed events.
| Retry Rule Element | Explanation |
|---|---|
| Strategy | A linear strategy means retries will occur at regular intervals; an exponential strategy means each retry will be delayed twice as long as the previous (1 hour, 2 hours, 4 hours...) |
| Interval | The delay between each automatic retry |
| Count | The number of automatic retries Hookdeck will attempt after an event fails |
Automatic retries max out after one week, or 50 attempts – whichever comes first. Events can be manually retried after exceeding this limit.
Delay rule
The delay rule allows you to introduce a delay between the moment Hookdeck receives an event, and when it's forwarded to your destination.
Filter rule
The filter rule allows you to route webhooks differently based on the contents of their Headers, Body, Query, and/or Path.
For more information on how to set up filters, see our filter documentation.
Transformation rule
The transformation rule allows you to modify the payload of a webhook before it gets delivered to a destination.
For more information on how to set up transformations, see our transformation documentation.
Connection Details
You can optionally set a name and description for your connection. It’s generally recommended that you leave the connection name blank. However, in case you have multiple connections with the exact same source and destination, a connection name can be helpful for you to differentiate among your connections without looking more into the whole connection configuration.
And that’s it. Once you’ve gone over all 4 sections of the form, you can now create a new connection with Hookdeck and start accepting webhooks. Happy eventing!