![]() Fikayo Adepoju Oreoluwa
Fikayo Adepoju Oreoluwa
How to Create Webhooks in the Shopify Admin Dashboard Tutorial
Shopify webhooks provide a one-way communication medium for Shopify to send notifications and data about events taking place in your store to an external application. In this article, we will take a more hands-on approach to learning and understanding how Shopify webhooks work. If you are new to Shopify webhooks, our getting started with Shopify webhooks guide is a great place to begin.
Each Shopify store comes with an administrative interface to manage the store. Webhooks can also be created and managed using this interface. In this tutorial, we are going to create a webhook, test it, and later delete it through Shopify's admin interface.
Read the how to create Shopify webhooks with the Shopify API if you are more interested in using Shopify's Admin API.
Tutorial
Example: How to log Shopify cart events with webhooks
In this tutorial we will explore logging, a common use case for Shopify webhooks, as engineers often use webhooks to feed information into an external logging system. These logs are mostly integrated with tools that help visualize the webhook data.
Here's a quick summary of the steps we need to take to achieve the Shopify webhook logging setup:
- Clone the workflow logger API.
- Generate a webhook URL that will be used to create a webhook on Shopify.
- Set up a webhook on Shopify.
- Trigger and inspect the webhook.
- View the webhook logged by the API.
Now, let's look at what you need for the project.
Project requirements
To set up our demo logging system, we are going to use a local Node.js API with an endpoint that receives and logs a portion of the webhook payload.
To follow along with this tutorial, it's required that you have the following items set up:
- Have Node.js installed on your system, version 12 or greater is fine (if you already have a local API that you prefer to use, that is fine. Just make sure it exposes a
POSTendpoint and listens on a known port). - Hookdeck CLI installed.
- An active Shopify store with access to Shopify apps (Shopify apps are required for the webhook authentication step, but more on this later).
Cloning the demo API
Clone the application repository for the API by running the following command:
git clone --single-branch --branch shopify-webhooks https://github.com/hookdeck/nodejs-webhook-server-example.git
Navigate to the root of the project and install the required dependencies by running the following commands:
cd nodejs-webhook-server-example
npm install
When the installation completes, you can then run the Node.js server with the following command:
npm run dev
This will boot up the API application and print a message to the screen indicating that the API is now running and listening for connections on port 1337.
We are using one endpoint in this project.
/shopify-webhooks-endpoint: This is the endpoint that will be receiving the Shopify webhook and logging it to the console.
Generating a webhook URL using the Hookdeck CLI
We now have a locally running server that contains an endpoint to receive our webhook. However, this endpoint is not accessible to the public, thus it cannot be targeted by Shopify webhooks.
A mechanism is required to route our webhooks to the locally running API endpoint, and this is where the Hookdeck CLI comes in. The Hookdeck CLI is built specifically for working with webhooks, and it helps tunnel external HTTP requests into your local development environment by providing you with a publicly accessible HTTPS URL. You can also inspect the headers and payloads of your webhooks, as you will see later on in this tutorial.
Visit Hookdeck's CLI documentation to install and set up the tool on your operating system. For macOS users, you can run the following command to install the CLI tool:
brew install hookdeck
If you're using the Windows operating system, use the following command to install the CLI tool:
scoop bucket add hookdeck https://github.com/hookdeck/scoop-hookdeck-cli.git
scoop install hookdeck
Once the setup process is complete, the next step is to use the CLI to generate a webhook URL that points to the running API application. To do this, run the following command (note: replace the port 1337 value with the port number on which your API is running if you're not using the sample project):
hookdeck listen 1337 Shopify --path /shopify-webhooks-endpoint
This command creates a Hookdeck Source called Shopify and instructs Hookdeck to route any events received by that Source to the /shopify-webhooks-endpoint path on your locally running app.
With this information, the CLI will begin the process of generating the Source URL and once it's done, you will see the URL printed to the screen and the CLI indicating that it is ready to receive requests.
hookdeck listen 1337 Shopify --path /shopify-webhooks-endpoint
🚩 Not connected with any account. Creating a guest account...

Dashboard
👤 Console URL: https://api.hookdeck.com/signin/guest?token={token}
Sign up in the Console to make your webhook URL permanent.


Sources
🔌 shopify URL: https://hkdk.events/mxu5aglgaodtff

Connections
shopify -> shopify_to_cli-shopify forwarding to /shopify-webhooks-endpoint

> Ready! (^C to quit)
Note: If you're running the CLI in guest mode, you will need to use the guest Console URL link in the console to access the Hookdeck Console. Copy and paste this into your browser to begin a guest login session.
Creating a webhook subscription using the Shopify admin interface
Now that you have your webhook URL, the next step is to create a webhook subscription on Shopify. On your Shopify admin dashboard, navigate to Settings → Notifications → (scroll down to) Webhooks. Click the Create webhook button and fill the webhook form as follows:
- Event:
Cart Update - Format: JSON
- URL: The Webhook URL printed to your Hookdeck CLI session screen
- Webhook API version: Select the version marked Latest
See below an example of the filled form:
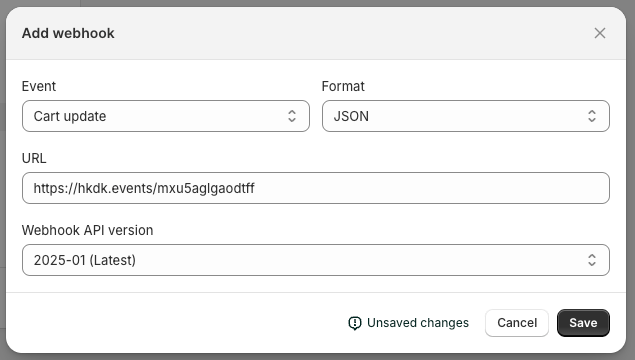
Click Save to complete the webhook creation process. You will then see your newly created webhook displayed in the Webhooks list as shown below:

Testing your webhook
Great! You now have your webhook logging system set up, and it's time to put it to the test. Conveniently, Shopify provides a way to send a test webhook notification, which you can do by clicking the ... button next to your webhook and selecting Send test.

Click this button for your Cart update webhook subscription to send a test webhook. Once sent, you will see an entry in your Hookdeck CLI session like below:
2025-01-16 10:20:47 [200] POST http://localhost:1337/shopify-webhooks-endpoint | https://console.hookdeck.com/?event_id=evt_PKT5If3EpvGuUBvtQd
As seen in the above image, the status of the request is 200, indicating that the request has been accepted.
To view details of the webhook, copy the event URL, which is the last item on the logged webhook in the CLI. Load this URL in your browser and you will see a screen similar to the one below:

The webhook event page provides you with in-depth details regarding the webhook you just received. At the top the Source name of shopify is listed along with the associated Source URL. The CLI path of /shopify-webhooks-endpoint is displayed. As is the Hookdeck CLI connection status.
The main section shows the logged webhook. The right section contains a Request and Response tab.
The Request section contains Headers where you can access all the headers that came with the webhook and inspect their values:

For the webhook payload, scroll down to the Body section which contains a browsable object representing the webhook payload. You can expand this object to inspect all the properties contained in the data that came in the payload:

Viewing the webhook logs
So, we have successfully received a webhook on our logging application. Let's now check the application logs to confirm that our webhook is indeed being logged. To have an appreciable amount of webhooks logged, click the Send test button a few more times.
Then, within the console of your Node.js application you will see the logged events.
Now, it's time to verify.
How to verify Shopify webhooks with HMAC Signature
Webhooks create a communication medium between your external apps and Shopify, so you need to make sure that only Shopify is able to use this medium to speak to your app. Attackers often take advantage of the open-ended nature of a webhook URL to send requests containing malicious content to the webhook endpoint.
Fortunately, in the X-Shopify-Hmac-Sha256 header sent with each webhook, Shopify sends an encrypted version of the payload. This encrypted value is created using your Shopify app's shared secret key and the HMAC cryptographic algorithm.
You can get a Shopify shared secret for your store within the Webhooks section underneath the list of webhooks.
When you receive a webhook, you can compute the same encrypted version of the payload using the shared key and HMAC, and then compare the result with the value sent in the X-Shopify-Hmac-Sha256 header. If there is a match, then the payload is valid and it originated from Shopify. If not, then it's suspicious and should be ignored.
You can find this verification logic in the routes.ts file as a commented middleware function verifyShopifySignature, shown below:
function verifyShopifySignature(req, res, next) {
  const sigHeaderName = "x-shopify-hmac-sha256";
  const secret = process.env.VITE_SHOPIFY_WEBHOOK_SECRET;
  if (!secret) {
    console.log("No Shopify secret configured");
    return next();
  }
  if (!req.rawBody) {
    return next("Request body empty");
  }
  const body = req.rawBody;
  const hmacHeader = req.get(sigHeaderName);

  // Create a hash based on the parsed body
  const hash = crypto
    .createHmac("sha256", secret)
    .update(body, "utf8")
    .digest("base64");

  // Compare the created hash with the value of the X-Shopify-Hmac-Sha256 Header
  if (hash !== hmacHeader) {
    return next(
      `Request body digest (${hash}) did not match ${sigHeaderName} (${hmacHeader})`
    );
  } else {
    console.log("Shopify: Signature is valid, accepted");
  }
  return next();
}

router.post(
  "/shopify-webhooks-endpoint",
  verifyHookdeckSignature,
  verifyShopifySignature,
  (req: Request, res: Response) => {
    console.log(req.body);
    res.send("Shopify: Successfully received Webhook request");
  }
);
For more information on security considerations for your webhooks, check out our webhooks security checklist.
How to delete Shopify webhooks
Deleting webhooks from your Shopify store is simple and straightforward using the admin interface. Click the ... and then the the Delete button next to your webhook on the webhooks list:
Shopify will prompt you for to confirm to ensure that you really want to take this action. Note that once a webhook is deleted, it cannot be recovered again.
Conclusion
The Shopify administrative interface provides easy-to-use tools to create and manage your store webhooks. In this tutorial, you have learned how to use the Shopify admin interface to set up a webhook, test it, and then delete the subscription.
If you like doing things programmatically, or want to set up automated tasks like scheduled cron jobs to interact with Shopify webhooks and other store resources, Shopify also provides an API that you can call. We have detailed how you can authenticate with Shopify's API and use it to set up your webhooks in the how to create programmatically Shopify webhooks article.
Happy coding!
