![]() Anumadu Moses
Anumadu Moses
How to Create Zendesk Webhooks With the Zendesk API Tutorial
Subscribing to Zendesk’s webhooks allows you to receive automatic notifications and data to external applications whenever a ticket is created, updated, or deleted. Creating a Zendesk webhook from the dashboard is easy but can be limiting to developers who need more flexibility in terms of programmatically carrying out a task. For more information on how to use the Zendesk dashboard to set up a webhook, test it, and delete a webhook subscription, check out our tutorial here.
Because the dashboard can be limiting, Zendesk allows webhooks to be created via an API request. This API allows developers to create and perform automated tasks on their webhooks without using the manual dashboard interface for creating a webhook.
In this article, I’ll walk you through the step-by-step process of setting up Zendesk API and subscribing to Zendesk’s webhooks by API.
Tutorial prerequisites
To follow along with this tutorial, you’ll need the following:
- Node.js and npm should be installed on your computer. This is needed to run the demo app used in the tutorial.
- You should have Hookdeck CLI installed on your computer. If Hookdeck CLI is not installed on your computer, click here to read how to install it.
- You’ll need an active Zendesk account.
How to set up Zendesk API authentication
Before webhooks can be created via API request, you need to generate an API token from the Zendesk Admin Center.
To get started, log in to your Zendesk Admin Center dashboard and navigate to Apps and integrations > Zendesk API from the side menu.
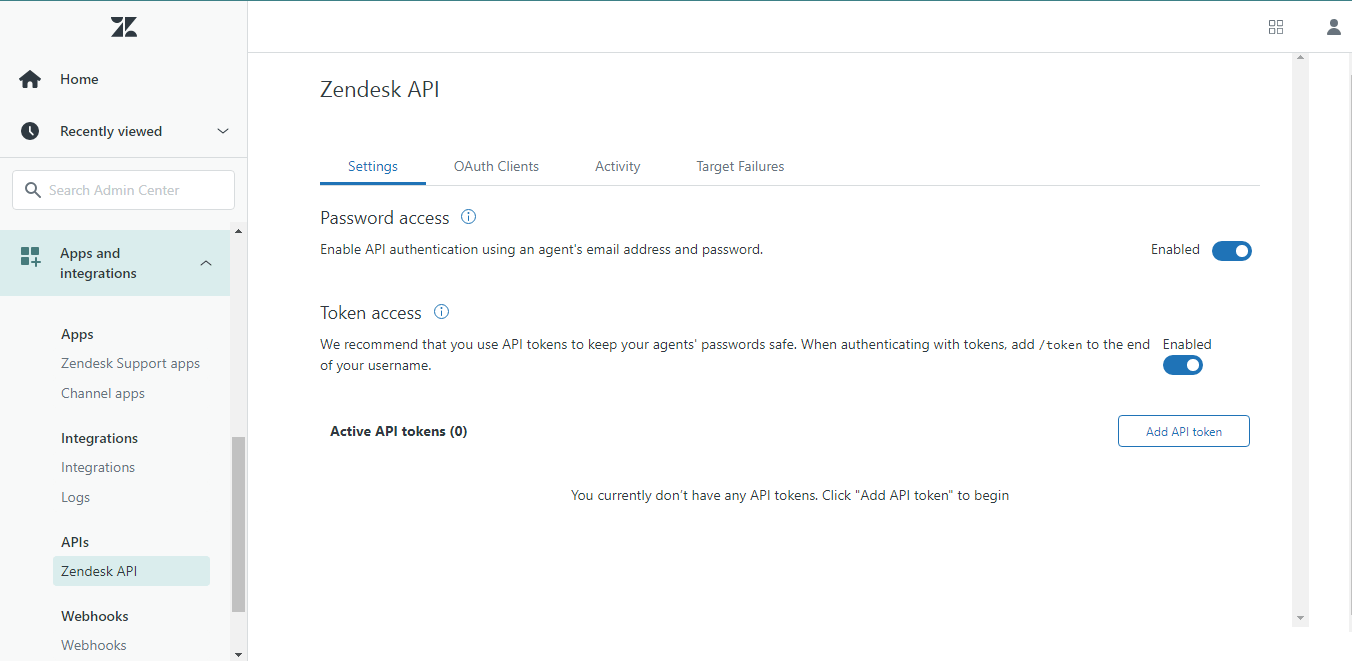
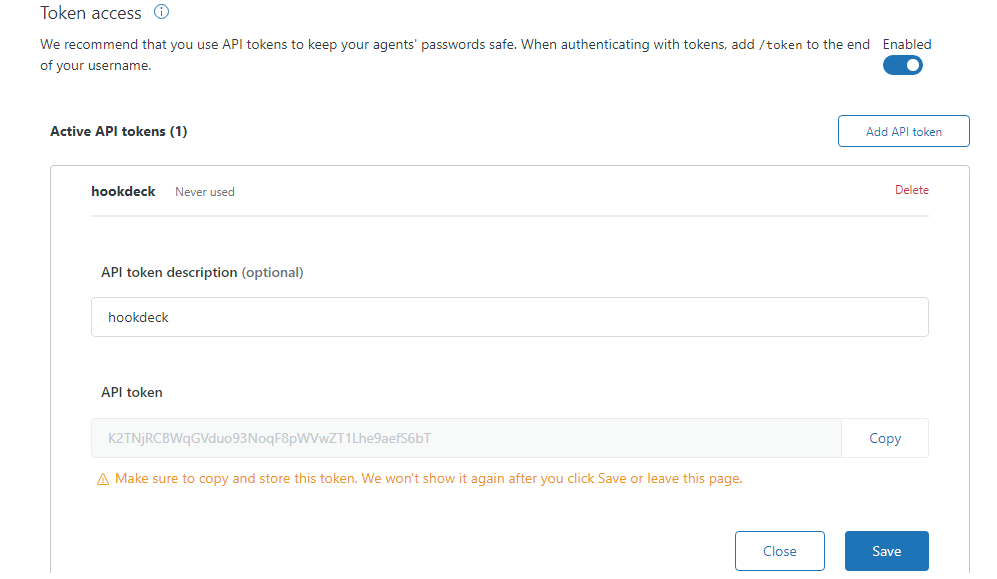
Toggle Token access to enabled, then click Add API token. Enter a description for your token (e.g., “Webhook management”).
Copy the generated API token and save it — the full token value is only shown once. Click the Save button to finish.
Zendesk API token authentication uses the Basic Auth scheme with your email address followed by /token as the username and the API token as the password. You can verify your credentials with the following curl command:
curl “https://{subdomain}.zendesk.com/api/v2/users/me.json” \
  -u “{email}/token:{api_token}”
Replace {subdomain} with your Zendesk subdomain, {email} with your account email, and {api_token} with the token you just generated. You should get a successful response containing your Zendesk account details.
How to clone the demo API
This Node.js demo app sends messages to a provided email address when it receives a webhook from Zendesk when a ticket is created.
To get the demo application running on your local server, clone the application from this repository using the git clone command:
git clone popoolatopzy/webhook-dashboard_config_project
Once you have cloned the application successfully, you need to install all the necessary dependencies and start the server using the following commands:
cd webhook-dashboard-config-project

Npm install

Node index.js
Now we have our localhost server running on port 5000. The path to handle the webhook responses is http://localhost:5000/webhookapi.
How to generate the webhook URL using the Hookdeck CLI
Now that we have our app running on a local server, let’s configure our application to receive webhook data from Zendesk whenever a new ticket is created.
To get data through a webhook URL on localhost, we need a way to tunnel our localhost Node.js application URL to the web. For the sake of this tutorial, we will use Hookdeck which also makes it easier to monitor and troubleshoot our webhook connection when creating the tunnel.
If you are new to Hookdeck, check out the documentation for a more comprehensive guide on how to install it on different operating systems using the following link: CLI documentation.
macOS users can quickly install the CLI using the command below:
brew install hookdeck
Windows users can do the same using:
scoop bucket add hookdeck https://github.com/hookdeck/scoop-hookdeck-cli.git

scoop install hookdeck
Now that we have Hookdeck installed and our Node.js app is running locally, The next step is to generate a secure webhook URL for our application using Hookdeck CLI. To do this, enter the command below in your terminal:
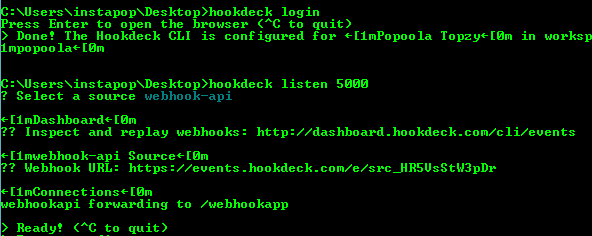
hookdeck listen 5000
This command starts an interactive session where the CLI collects information about the endpoint you're about to create. Below are the questions and the answers you should supply to each question. Ensure to hit the Enter key after each answer.
| Prompt | Answer |
|---|---|
| What source should you select? | Create new source (this prompt does not show up if you have not created any previous connections) |
| What should your new source label be? | webhook-api |
| What path should the webhooks be forwarded to (i.e.: /webhooks)? | /webhookapp (if you're using your own custom server, replace this value with your endpoint) |
| What's the connection label (i.e.: My API)? | My API |
With this information, the CLI will begin the process of generating the URL and once it's done, you will see the URL printed to the screen and the CLI indicating that it is ready to receive requests.
Note: If you're running the CLI in guest mode, you will need to use the guest
Login URLlink in the console to access the dashboard. Copy and paste this into your browser to begin a guest login session.
How to create a webhook using Zendesk API
We have generated a webhook URL for our app, and what we need to do next is create a webhook via Zendesk API. A Zendesk webhook can be created by making a POST request to https://{subdomain}.zendesk.com/api/v2/webhooks (replace the values in {subdomain} with your Zendesk subdomain).
To create the webhook, we need to send a POST request to the above endpoint containing the webhook data. The webhook data to be sent along with the webhook API request must be structured as shown below:
{
  "webhook": {
    "endpoint": "{Hookdeck's webhook_URL}",
    "http_method": "POST",
    "name": "{webhook name}",
    "request_format": "json",
    "status": "active",
    "subscriptions": ["conditional_ticket_events"]
  }
}
Replace {webhook_url} with the webhook URL that we generated from Hookdeck. Also, replace {webhook name} with your preferred name for the webhook.
Run the following curl command in your terminal to create the webhook. Replace {subdomain} with your Zendesk subdomain, {email} with your Zendesk email, and {api_token} with your API token:
curl -X POST "https://{subdomain}.zendesk.com/api/v2/webhooks" \
  -u "{email}/token:{api_token}" \
  -H "Content-Type: application/json" \
  -d '{
    "webhook": {
      "endpoint": "{Hookdeck_webhook_URL}",
      "http_method": "POST",
      "name": "{webhook_name}",
      "request_format": "json",
      "status": "active",
      "subscriptions": ["conditional_ticket_events"]
    }
  }'
You should get a successful JSON response with the details of the webhook that we just created.
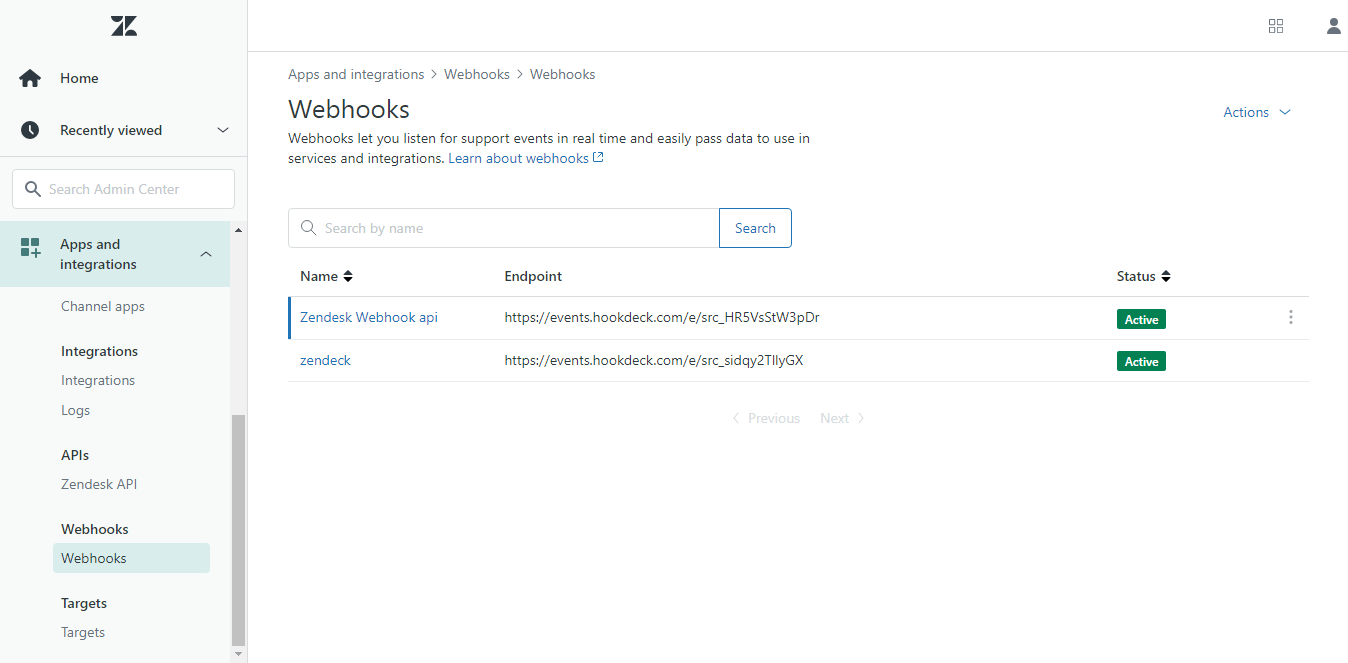
When you go to your Zendesk webhook dashboard, you should see the new webhook that we just created.
How to link Twitter with Zendesk
Now we need to link our Twitter account to Zendesk to create a ticket when a Tweet is liked, and send a notification to our localhost app via webhook.
To link your Twitter account, navigate through Channels > Messaging and social > Twitter accounts from the admin center side menu.
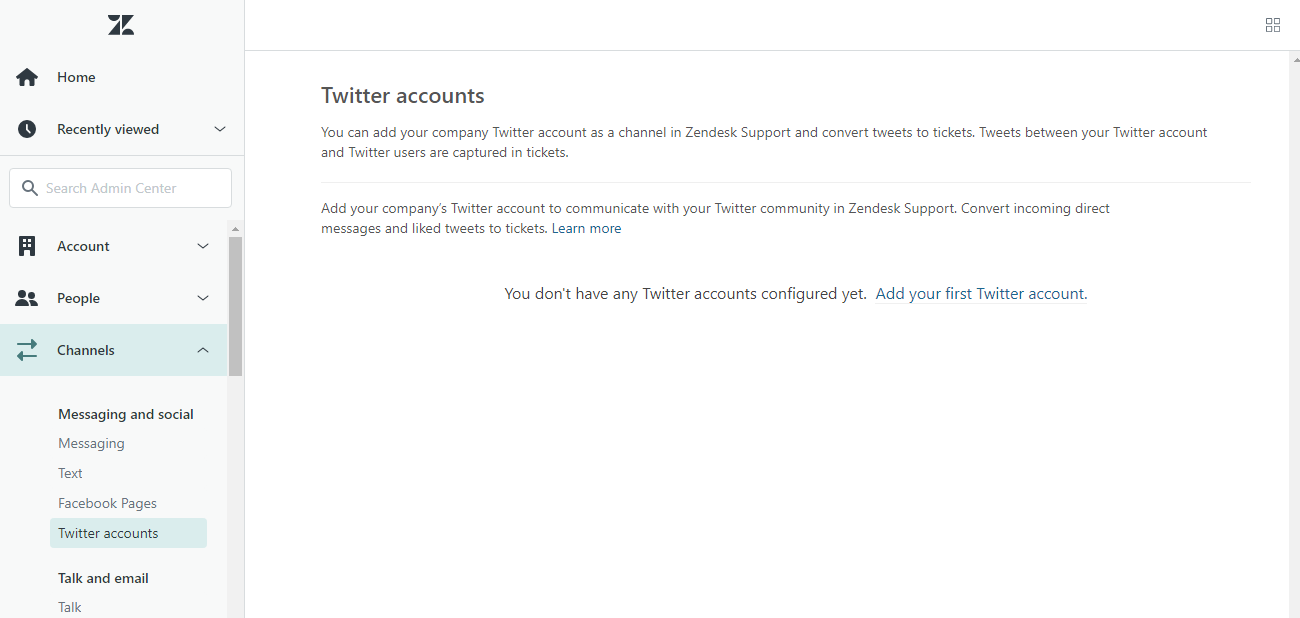
Now click on Add Your First Twitter Account. Then you will be redirected to Twitter's third-party authentication page.
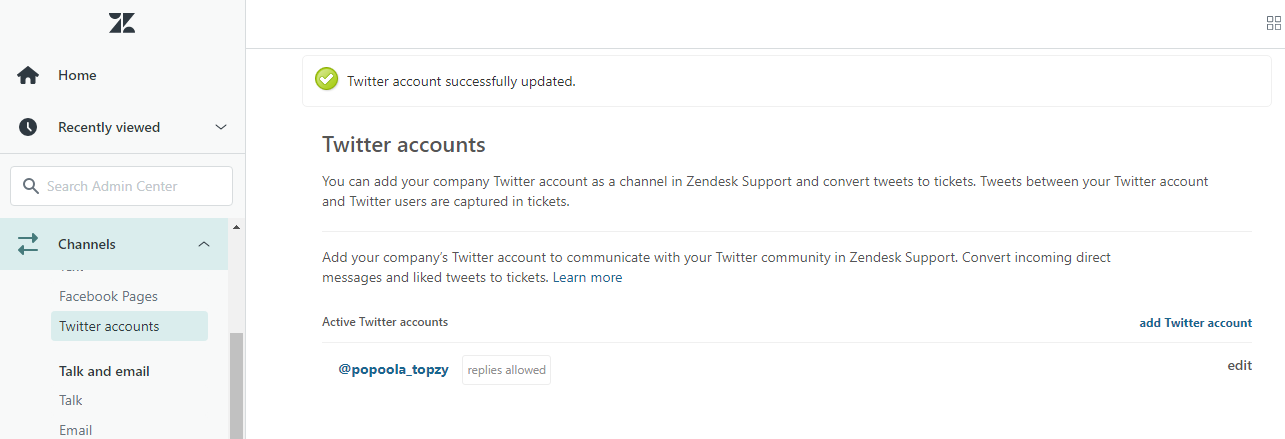
After you've entered your login details, click on the Authorize app button. After the Twitter account has been authorized successfully, it will redirect you to the admin dashboard where you can manage all the linked Twitter accounts.
How to test and inspect your webhook
Our localhost app is ready to receive webhook data, and we have created a webhook on Zendesk that is ready to send data to the webhook URL. What we need now is to add a trigger action to the webhook. To do this, navigate through Objects and rules > Business rules, then click on Triggers in your Zendesk admin center.
Next, click on Add trigger and fill in all the necessary values, then click on Create as shown below:
Provide the following details to continue:
- Trigger name: webhook-trigger
- Category: Notification
- Conditions: Select
Channel,IsandTwitter like - Actions: Select
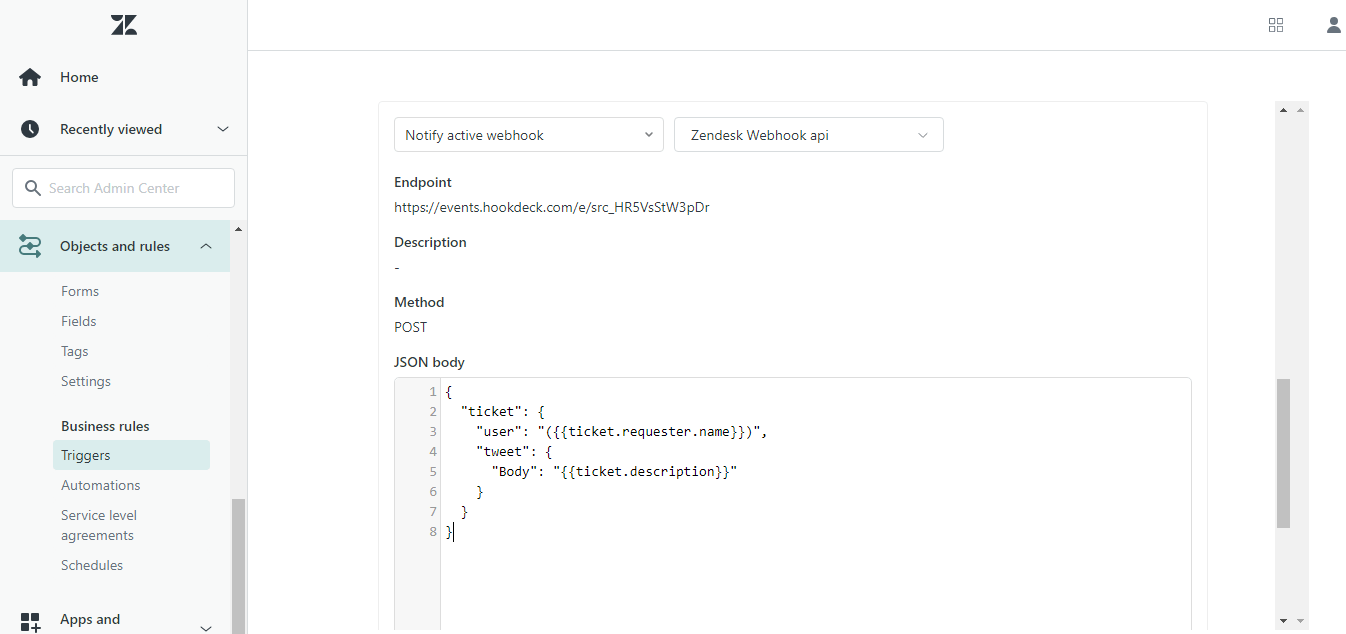
Notify active webhookandWebhook API - JSON body:
{
  "ticket": {
    "user": "({{ticket.requester.name}})",
    "tweet": {
      "Body": "{{ticket.description}}"
    }
  }
}
To test our webhook, share a Tweet on Twitter and like the Tweet. Then you should see a new entry on your terminal.

Check the email provided in our demo app. You should see a new message from the application that your Tweet has been liked.
When you receive a webhook response on your application, Hookdeck allows you to monitor all responses on your dashboard. You can inspect the received data and the response your application gives. Once Hookdeck receives a new webhook entry, it then generates a URL on your terminal, as shown in the CLI output above. Copy the URL and load it in your browser, and you will see an event page where you can view details of the data received.
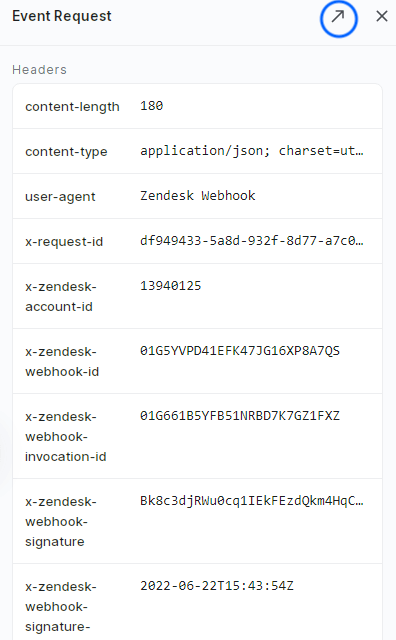
You can view the header details of the received webhook data. Under Event Request, click on the header section. You can inspect all the header details from this section.
The body section contains data that our application can work with in JSON format. You can view the structure of the data received under this section.
 Hookdeck saves the response that our app returns after handling the data received from the webhook; this can be inspected under the response section.

How to implement signature verification for Zendesk webhook
Webhooks provide an extra layer of protection by verifying that the webhook is authentic and originated from the right source. This is important if you want to ensure that only Zendesk can communicate with your webhook endpoint and that the data communicated or sent is as accurate as your application expects.
Every Zendesk webhook request includes two headers for verification:
X-Zendesk-Webhook-Signature— the Base64-encoded HMAC-SHA256 signatureX-Zendesk-Webhook-Signature-Timestamp— the timestamp used in signature generation
To verify the request, compute Base64(HMAC-SHA256(timestamp + body, signing_secret)) and compare it to the signature header. You can find your webhook's signing secret in the Zendesk Admin Center by navigating to the webhook's details page and clicking Reveal secret, or via the API at GET /api/v2/webhooks/{webhook_id}/signing_secret.
Store your signing secret in an environment variable — never hard-code it in your application. Zendesk also includes
x-zendesk-account-id,x-zendesk-webhook-id, andx-zendesk-webhook-invocation-idheaders on every request. The invocation ID is useful for deduplication and tracking.
const express = require("express");
const crypto = require("crypto");

const SIGNING_SECRET = process.env.ZENDESK_WEBHOOK_SECRET;
const SIGNING_SECRET_ALGORITHM = "sha256";

const PORT = 3000;

const app = express();

function isValidSignature(signature, body, timestamp) {
  const hmac = crypto.createHmac(SIGNING_SECRET_ALGORITHM, SIGNING_SECRET);
  const sig = hmac.update(timestamp + body).digest("base64");

  return crypto.timingSafeEqual(
    Buffer.from(signature),
    Buffer.from(sig)
  );
}

function storeRawBody(req, res, buf) {
  if (buf && buf.length) {
    req.rawBody = buf.toString("utf8");
  }
}

app.use(
  express.json({
    verify: storeRawBody,
  })
);
app.use(express.urlencoded({ verify: storeRawBody, extended: true }));

app.post("/hook", (req, res) => {
  const signature = req.headers["x-zendesk-webhook-signature"];
  const timestamp = req.headers["x-zendesk-webhook-signature-timestamp"];
  const body = req.rawBody;

  console.log(
    isValidSignature(signature, body, timestamp)
      ? "HMAC signature is valid"
      : "HMAC signature is invalid"
  );
  res.status(200).send("Success");
});

app.listen(PORT, () => console.log(`Server running on port ${PORT}`));
For more information on security considerations for your webhooks, check out our security checklist.
Wrapping Up
Using the Zendesk API to create webhooks is very useful when it comes to helping developers create and perform automated tasks on their webhooks without using the Zendesk dashboard.
In this tutorial, I have demonstrated how to set up the Zendesk API and then subscribe to a webhook. For a comprehensive overview, see our guide to Zendesk webhooks features and best practices. We also used Hookdeck CLI to generate a secure webhook URL that can receive webhook data on our localhost application.
Happy coding!
