![]() Fongang Rodrique
Fongang Rodrique
How to Receive and Replay Webhooks in Rocket.Chat with Hookdeck
Webhooks are a vital component for real-time communication between different applications and platforms. Rocket.Chat, a popular open-source team collaboration platform, supports incoming webhooks which allows external services to send messages to Rocket.Chat rooms.
Hookdeck is a webhook and event management platform that helps developers reliably receive, monitor, and replay webhook events. By integrating Hookdeck with Rocket.Chat, you can ensure that your Rocket.Chat channels receive webhook messages consistently and efficiently.
In this guide, I will show you how to set up an incoming webhook in Rocket.Chat and integrate it with Hookdeck for improved webhook event management.
Create an incoming webhook in Rocket.Chat
Before we can start receiving and replaying webhooks with Hookdeck, we need to configure Rocket.Chat to accept incoming webhooks. Follow the steps below.
This guide assumes that you have:
A Rocket.Chat workspace deployed and accessible through a public URL (see this guide).
The admin role and access to the administration panel of your Rocket.Chat workspace.
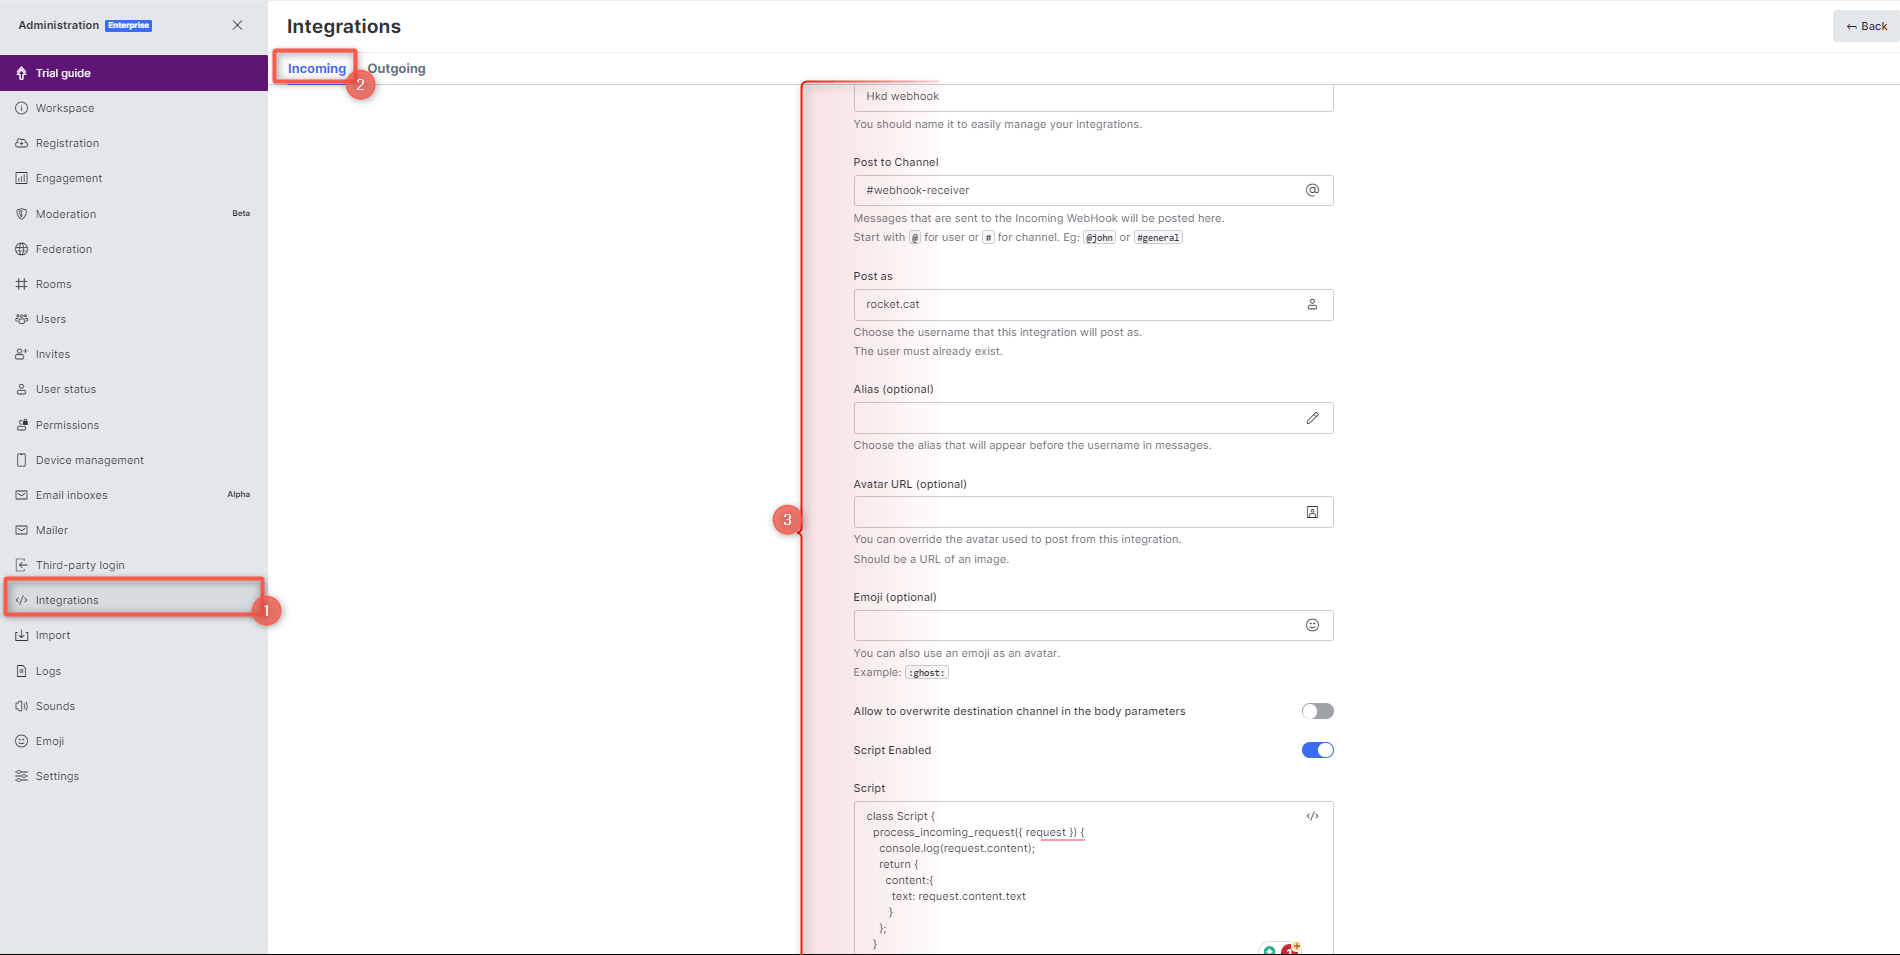
In your Rocket.Chat workspace, go to Administration > Workspace > Integrations.
Click New and switch to the Incoming tab to create a new incoming webhook.
Enable and complete the webhook configuration.
- Give the webhook a name
- Select the channel to post messages (e.g. #**webhook-receiver)**
- Choose a username to post as (e.g. rocket.cat)
Enable the Script Enabled toggle.
Paste the sample webhook script below into the script box. Learn more about Rocket.Chat webhook script.
Note: Your webhook script must have a text property that gets translated to a message text in Rocket.Chat.
class Script {
  process_incoming_request({ request }) {
    console.log(request.content);
    return {
      content:{
        text: request.content.text // Gets the text property from the payload received
       }
    };
  }
}
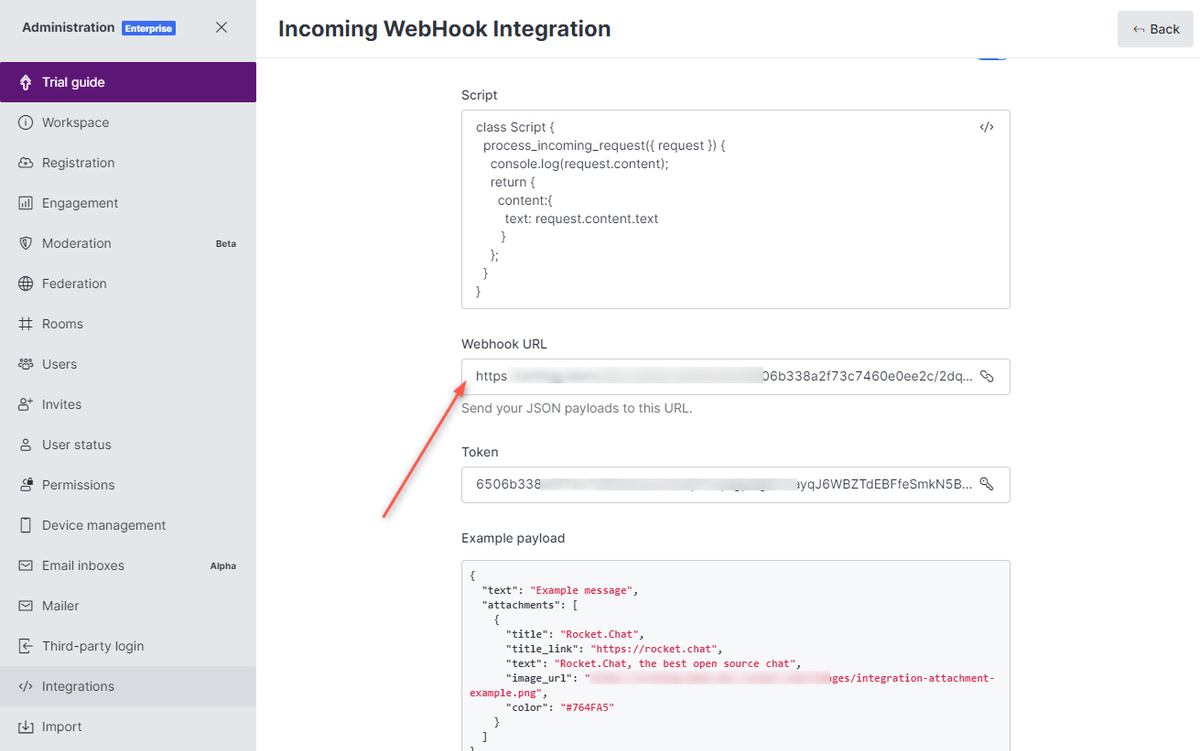
- Save the integration.
After enabling the integration, you are provided with a unique Webhook URL to use for posting messages. Copy this URL as it is needed below to integrate with Hookdeck.
Learn more about Rocket.Chat integrations and webhooks here.
Integrating Rocket.Chat with Hookdeck
Hookdeck enhances the reliability and management of webhook events. Follow these steps to integrate Hookdeck with Rocket.Chat incoming webhooks:
Sign in to your Hookdeck dashboard.
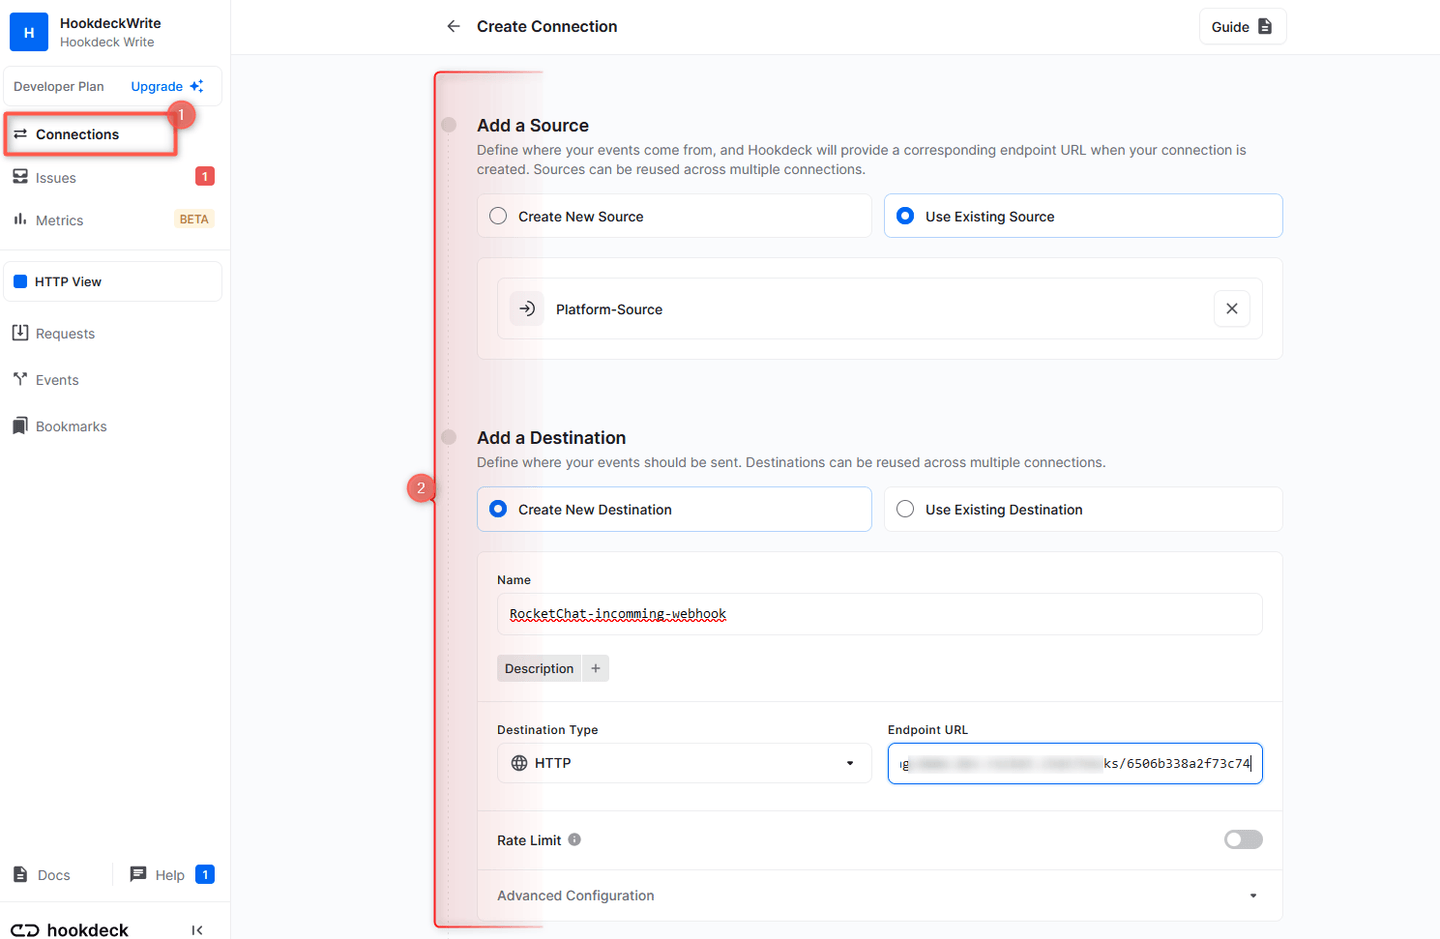
Go to the Connections section and click on + Create Connection to create a new connection.
Configure the connection and Save.
Source: Specify the platform or application that sends the webhook.
Destination: Enter the URL of your Rocket.Chat incoming webhook.
Adding a transformer: Since Rocket.Chat requires a payload body with a
textproperty, we can use Hookdeck Transformers to craft our message within Hookdeck before it reaches Rocket.Chat.Click on Transform in the Add Rules section to add a new Transformation:

In the transformer panel, just add a line of code to create a custom message text that will be rendered in Rocket.Chat and Confirm. See below:

You can customize your transformation to define the structure of the payload that gets received in Rocket.Chat.
After creating the connection, copy the source URL from Hookdeck to use on the source platform where the webhook is to come from.
Hookdeck acts as an intermediary between the source platform and Rocket.Chat, relaying the webhook events.
Receive and replay webhook events
You can use the Hookdeck Console to simulate example webhooks from popular webhook sources.
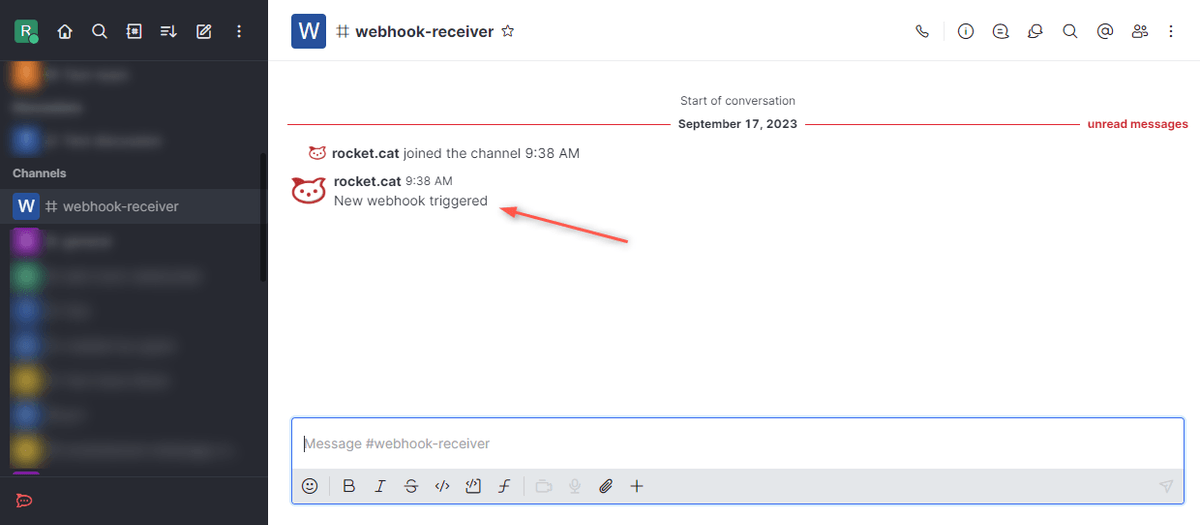
Suppose your webhook source is GitHub. When an event is triggered on GitHub (the source platform), Hookdeck receives the webhook event and forwards it to the Rocket.Chat webhook endpoint which then sends a message into the desired channel.
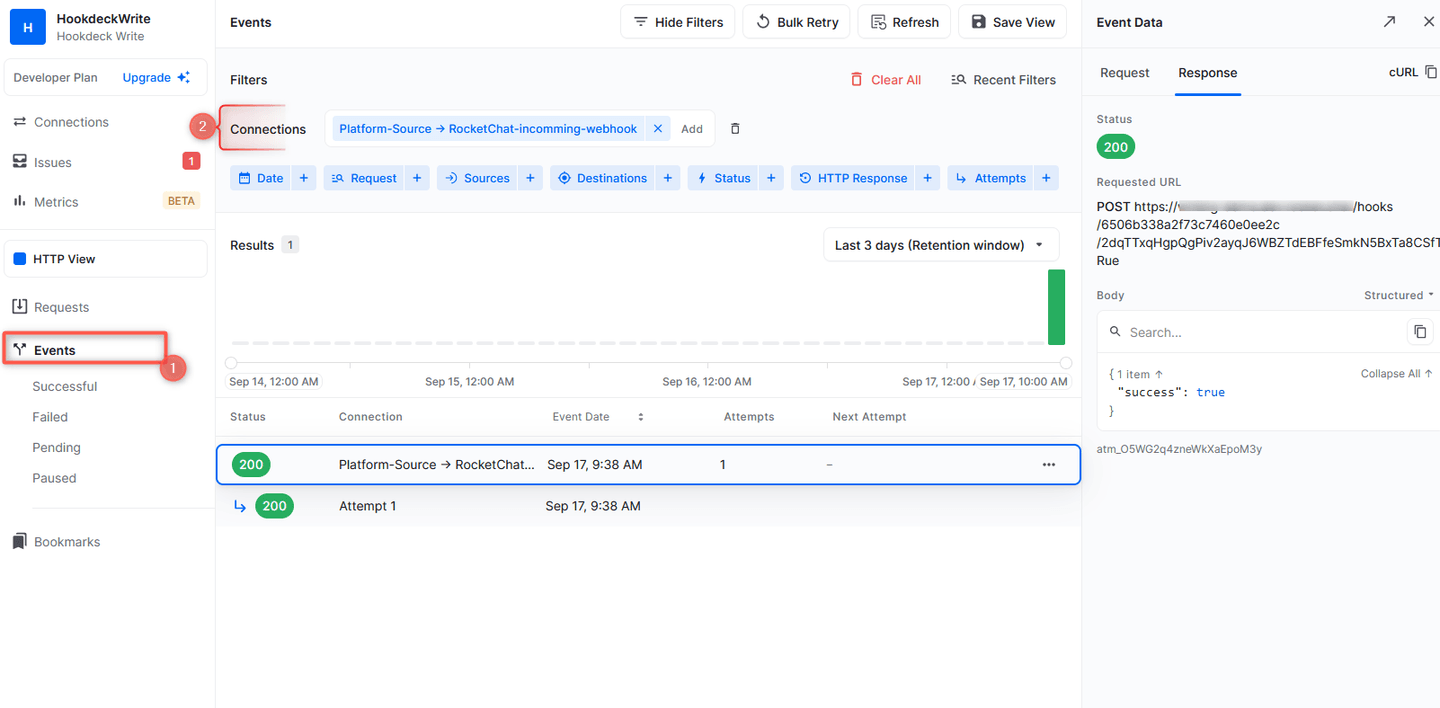
You can monitor the events within the Hookdeck dashboard and track their delivery status.
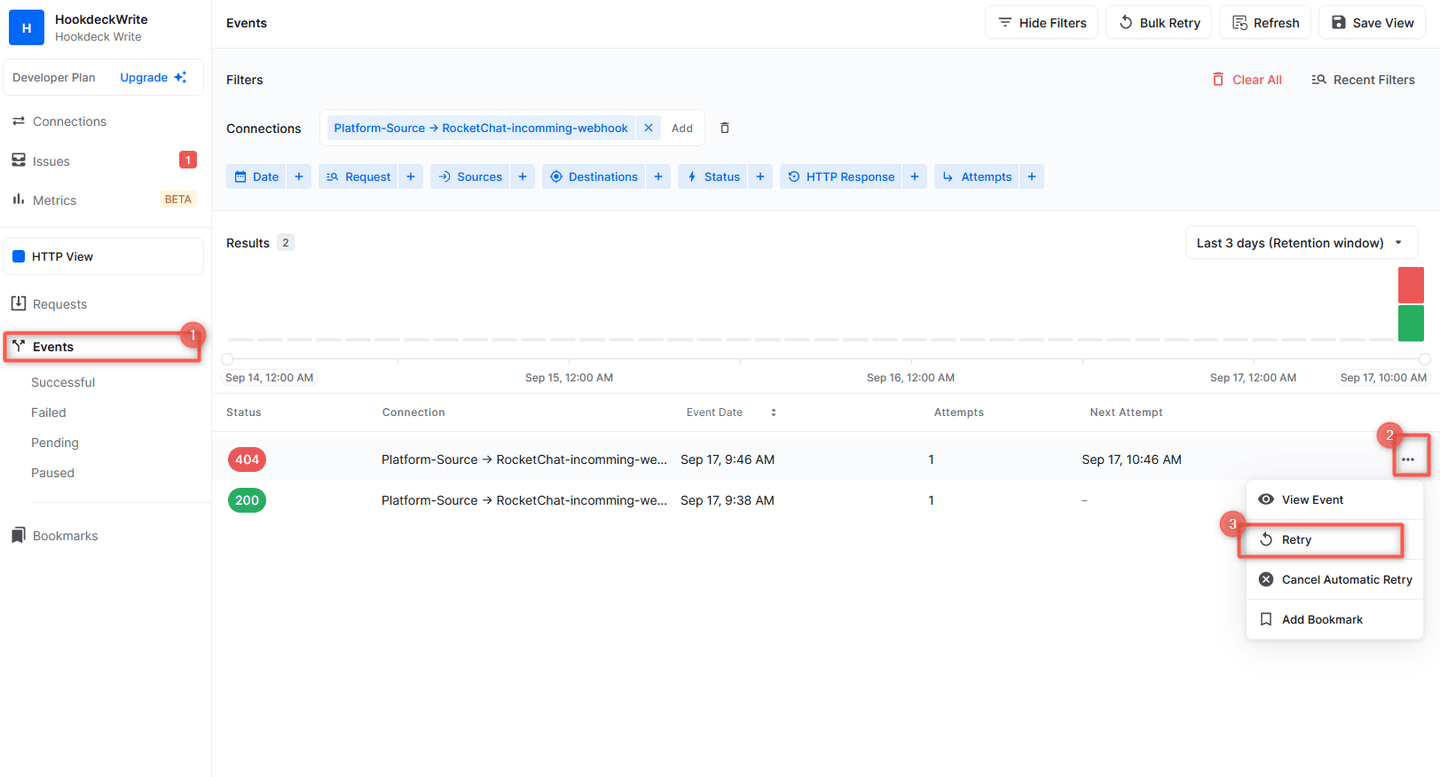
To monitor incoming webhook events, switch to the Events tab from the side panel on your Hookdeck dashboard. Filter the events based on the connection created, and see the activities of the events on that connection.
Similarly, the defined message gets posted in the specified Rocket.Chat channel.
Replay error or failed webhooks
One of Hookdeck's valuable features is the ability to replay webhook events. This is especially useful when a webhook event fails to be processed correctly.
To replay a failed webhook event:
From the Hookdeck Event panel, locate the failed event and click on the kebab menu (three vertical dots) next to it.
Click Retry from the menu of options. This action resends the event to your Rocket.Chat incoming webhook, giving it another opportunity to process the event successfully.
Conclusion
By integrating Hookdeck with Rocket.Chat incoming webhooks, you can efficiently manage and replay external webhook events, ensuring that your Rocket.Chat channels receive crucial information reliably and consistently. Whether you're using Rocket.Chat for team collaboration or communication, Hookdeck enhances the webhook experience, making it a powerful tool for your workflow.
For more information on Hookdeck's capabilities and best practices, explore the Hookdeck documentation.
