![]() Fikayo Adepoju Oreoluwa
Fikayo Adepoju Oreoluwa
Tutorial: How to Configure Discord Webhooks Using the Admin Interface
A Discord webhook is an HTTP-based communication technology that allows external applications to communicate information into Discord channels. If you're new to Discord webhooks, a good introduction can be found in this article.
In this tutorial, we explore a use case for Discord webhooks that is common among development teams who use Discord for their conversations. Together, we will set up a Discord webhook that helps communicate updates from code repositories on GitHub into a Discord channel.
Everything we do with Discord in this article will be done through the admin interface. If you're more interested in using the Discord API to set up your webhooks, check out this tutorial.
Let's dive in!
Discord Webhooks Admin Interface Tutorial
How to receive GitHub commit updates in Discord channels
Before we start, let's have a quick run-through of the prerequisites and steps involved in this tutorial. To begin, you will need the following:
- A Discord account you own
- A GitHub account with a repository to experiment with
- A Hookdeck account (you can sign up for a free account here)
Once you have these three things, we can take the following steps to achieve the GitHub-to-Discord communication flow:
- Set up a Discord channel to receive GitHub commit updates
- Create a Discord webhook where GitHub will send the commit notification
- Create a Hookdeck connection to ingest your webhooks and relay them to Discord
- Create a GitHub webhook that triggers a notification when a new commit is made to the repository
- Test the setup by making a new commit to the GitHub repository
Now that you have a good understanding of the plan, let's begin the step-by-step implementation.
Creating a Discord server and channel
To begin, you need a Discord server and a channel to send the GitHub repository commit updates to. Click the plus button on the side menu to add a new server (Select Create My Own → For me and my friends) like below:

Next, beside the TEXT CHANNELS label on the side menu, click the + icon to create a new text channel, testing-webhooks, like below:

You now have the channel that will receive the commit updates from your GitHub repository.
Creating a Discord webhook
The next step is to set up a webhook on the Discord channel you just created. This webhook will generate a webhook URL endpoint that is capable of receiving messages from GitHub in the channel.
Click the downward arrow icon beside your server name and go to Server Settings. On the settings page, click Integrations on the side menu and then click the Webhooks tab. On the Webhooks page, click the New Webhook button to create a new webhook like below (you can give the webhook any name you like):

Ensure that you select the testing-webhooks channel option in the CHANNEL dropdown. The webhook settings are automatically saved. To complete this step, click the Copy Webhook URL button and save the value somewhere you can easily retrieve it.
The webhook URL follows the format
https://discord.com/api/webhooks/{webhook.id}/{webhook.token}. The token in this URL is the sole authentication — anyone with this URL can post messages to your channel. Treat it as a secret: never commit it to version control or expose it publicly. If compromised, delete the webhook and create a new one.
Discord also supports posting to threads (via the
thread_idquery parameter) and creating new posts in forum/media channels (via thethread_namebody parameter). Webhooks created via Server Settings can target any text channel in the server.
Creating a Hookdeck connection
The next step is to create a webhook connection on Hookdeck. This connection will help ingest the webhook requests coming from GitHub and relay them to Discord to ensure that no webhooks are dropped in the case of a spike in webhook traffic. This strategy is considered a best practice for webhooks in production. If you're interested in more webhook best practices, you can check out this article.
To create a connection on Hookdeck, go to Connections on your dashboard and click the Create button. Fill in the connection form fields as listed below.
- Source Name:
my-github-repo - Destination Name:
my-discord-server - Destination URL: The Webhook URL you copied from Discord
- Ruleset:
discord-default-ruleset
The filled form is shown below as a reference.

Click the Save button to create your connection.
Your connection is now displayed in the list of connections, like below:

Click the Copy webhook URL link on the connection source to get the Hookdeck webhook URL, as shown below:

This is the webhook URL you will need to set up your GitHub webhook.
Setting up your GitHub repository to send commit updates to Discord
The next step is to set up a webhook on your GitHub repository. This webhook will be triggered anytime the push event is fired. A push event is fired when a new commit is made to the GitHub repository.
To set up the GitHub webhook, navigate to the repository you wish to use for this tutorial, then go to Settings → Webhooks and click the Add Webhook button on the Webhooks page. Fill the GitHub webhook form as follows:
- Payload URL: The webhook URL copied from Hookdeck with
/githubappended to it, i.e.https://[MY-HOOKDECK-URL]/github - Content-type:
application/json - Secret: Leave this blank
Leave the remaining options on the form in their default state. A filled version of the webhook form is shown below.

Do note once again to append your Hookdeck URL with /github, as this will ensure that Discord understands how to parse the payload sent by GitHub. Discord provides built-in Slack-compatible (/slack) and GitHub-compatible (/github) webhook endpoints that automatically transform the incoming payload into a Discord message. The GitHub-compatible endpoint supports events including push, pull_request, issues, release, check_run, discussion, and more. This may not be applicable to all applications you want to integrate with Discord webhooks. To find information about the format for Discord webhook messages, check this guide. You can also find more details about GitHub's integration with Discord here.
Click the Add webhook button to complete the GitHub webhook creation process. GitHub will automatically trigger a ping webhook request when a new webhook is created. You can ignore this ping request and move on to the next step.
Testing your Discord webhook notifications
Now that you have created a connection between Discord and GitHub through Hookdeck, time to test the communication flow. Push a new update to your GitHub repository. Once pushed, check the Connections page on your Hookdeck dashboard, where you will see an event similar to the one below:

Clicking on the event will pull up the event details on a right-hand-side screen. However, to view the complete event details, you must click the arrow icon on the top right. On the full event page, you can view the webhook metadata, headers, and body as shown below:
Metadata

Headers

Body

Hookdeck gives you the ability to inspect your webhooks down to the last detail.
Discord enforces a rate limit of 5 requests per 2 seconds per webhook. Each webhook has its own independent rate limit bucket. Discord returns
X-RateLimit-RemainingandX-RateLimit-Reset-Afterheaders with every response — always parse and respect these rather than hardcoding limits. If you exceed the limit, Discord responds with HTTP429 Too Many Requestsand aretry_afterfield indicating how long to wait.
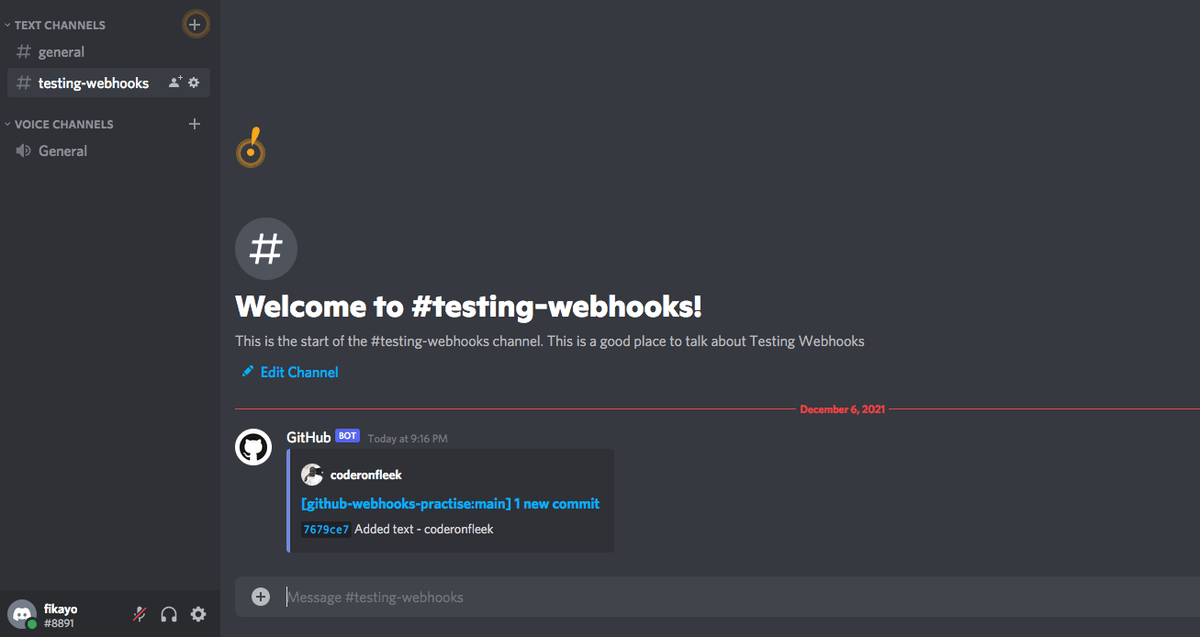
Let's now confirm that the GitHub commit information is being sent to the Discord channel that was created. Return to your Discord account and click the testing-webhooks channel to view the messages in it. You will see a new GitHub message similar to the one shown below:
How satisfying is that?
How to edit Discord webhook notifications
You can also edit the Discord webhooks you already created by changing the webhook name or the channel where the inbound messages are to be sent. This can be done by clicking on the webhook and making any desired change you want, like below:

Once you're done editing, click the Save Changes button to effect your update.
How to delete Discord webhook notifications
You can also completely delete a Discord webhook from the admin interface. To delete a webhook, select the webhook on the Webhooks page and click the Delete Webhook button, as shown below:

Keep in mind that once a Discord webhook is deleted, it cannot be retrieved again. So be sure that you really want to delete a webhook before you do.
Conclusion
Discord webhooks enable developers to involve external applications in Discord conversations. For more on reliability and security, see our guide to Discord webhooks features and best practices. This capability increases the range of collaboration within Discord channels as members do not have to manually copy the information from these external applications.
When sending custom messages to Discord webhooks (rather than using the GitHub-compatible endpoint), you can include rich content via
embeds(up to 10 per message, 6,000 total characters across all embeds), override the webhook's display name withusername, and set a per-message avatar withavatar_url. Message content is limited to 2,000 characters. File attachments are limited to 10 MiB per attachment (reduced from 25 MiB in January 2025). Since April 2025, Discord also supports Components V2 with new layout components like Sections, Containers, Media Galleries, and Thumbnails — use theIS_COMPONENTS_V2message flag to enable them.
When forwarding user-generated content to Discord, always use the
allowed_mentionsparameter to prevent unintended@everyone,@here, or role pings that could disrupt your server.
In this tutorial, you have learned how to set up a Discord webhook and receive updates from GitHub within your Discord channel.
Happy coding!
