How to Receive Webhooks on HTTP Endpoints
You want to receive webhooks to an HTTP endpoint without having to set up any infrastructure for monitoring, queuing, or retrying webhooks.
In this guide we will go through the basics to get you receiving your first webhook events using Hookdeck, and then go over a simple tutorial on how to set up Hookdeck for GitHub webhooks.
Getting started with Hookdeck UI to receive webhooks
Setting up your webhook connection
The first step is to create a connection which indicates to Hookdeck where you are expecting your webhooks to be delivered. A connection consists of the following:
| Component | Explanation |
|---|---|
| Source | Label for your webhook. |
| Destination | here you want to receive your webhooks. A Destination can be either an HTTP endpoint or your localhost. [Read our tutorial to receive webhooks to your local server using Hookdeck's CLI.] |
| Ruleset | Automatic retry and alerts. We will not explore ruleset in this guide, as it is not necessary for receiving webhooks but you can find more information here |
Receiving your webhook URL
After creating your connection, you will receive a webhook URL that is tied to your Source. You have to use this Hookdeck URL instead of your HTTP endpoint when you are setting your endpoint on your API provider.
Testing to validate it works
After setting Hookdeck's URL as your endpoint, when the API provider sends a webhook you should receive them at your destination as well as see them in Hookdeck's dashboard. You can validate the behavior by:
- Sending a test webhook to the Hookdeck's URL
- Triggering an event from the API provider
Getting started with Hookdeck API to receive webhooks
Create a webhook connection
When creating a connection using the API, you will need to input the following parameters:
Connection: Relationship between the webhook sender and webhook consumer
alias: human readable name for the connection
Source : webhook sender
alias: human readable name for the sourcelabel: label for your source
Destination: webhook consumer
alias: human readable name for the destinationlabel: label for your destinationurl: where you want to receive your webhook, either an HTTP endpoint or your localhost to receive webhooks to your local server using Hookdeck's CLI.
{
  "alias": "mysource-to-myapi",
  "source": {
    "alias": "mysource",
    "label": "mysource"
  },
  "destination": {
    "alias": "myapi",
    "label": "myapi",
    "config": {
      "url": "https://example.com/webhook"
    }
  }
}
The formatting of the alias, source.alias, and destination.alias must respect `/^[a-z0-9-_]+$/`.
We will not expand on rulesets in this guide since this does not impact our ability to receive a webhook. Something to note is that when we create a connection using Hookdeck's API, the ruleset will automatically be set to default ruleset unless specified.
Receiving your webhook URL
After creating your connection, the response will include many parameters related to the webhook connection. The parameters we are interested in are:
id: you will need theidto query events related to your webhook connection.url: parameter within the Source object. You have to use this URL instead of your HTTP endpoint when you are setting your webhook on your API provider.
Example of response (trimmed down to show the relevant information):
{
"id": "web_mAJbMKUCt4QDxtfTahqbub7X",
"source": {
    "url": "https://hkdk.events/cnsv4W1wixpFDvACwAAlkLCi
		},
}
Testing to validate if it works
After setting Hookdeck's URL as your endpoint, you should be receiving the webhooks the API provider sends to your destination. You can test you are receiving webhooks by:
- Sending a test webhook to Hookdeck's URL
- Triggering an event from the API provider
To validate if it works, you can query the API to see the events associated with the connection.
https://api.hookdeck.com/events?webhook_id=web_mAJbMKUCt4QDxtfTahqbub7X
Hookdeck UI with Github webhooks tutorial
Setting up GitHub webhook connection
In this example, we are going to subscribe to GitHub's Branch or tag creation event and then trigger a webhook to inspect the request data. Our goal is to understand the payload to eventually create an integration by writing code to respond to it.
Create a webhook connection for GitHub
Let's create a connection in Hookdeck to receive a webhook URL that we will use for GitHub's webhook registration.
- Select
Createin the Connections view. - Select "New" under Source. Set the Source Label as
Github. - Select "New" under Destination: Set the Destination Label as
Mock API, and the Destination URL ashttps://mock.hookdeck.com. - Select the
Default Ruleset. - Click
Create.
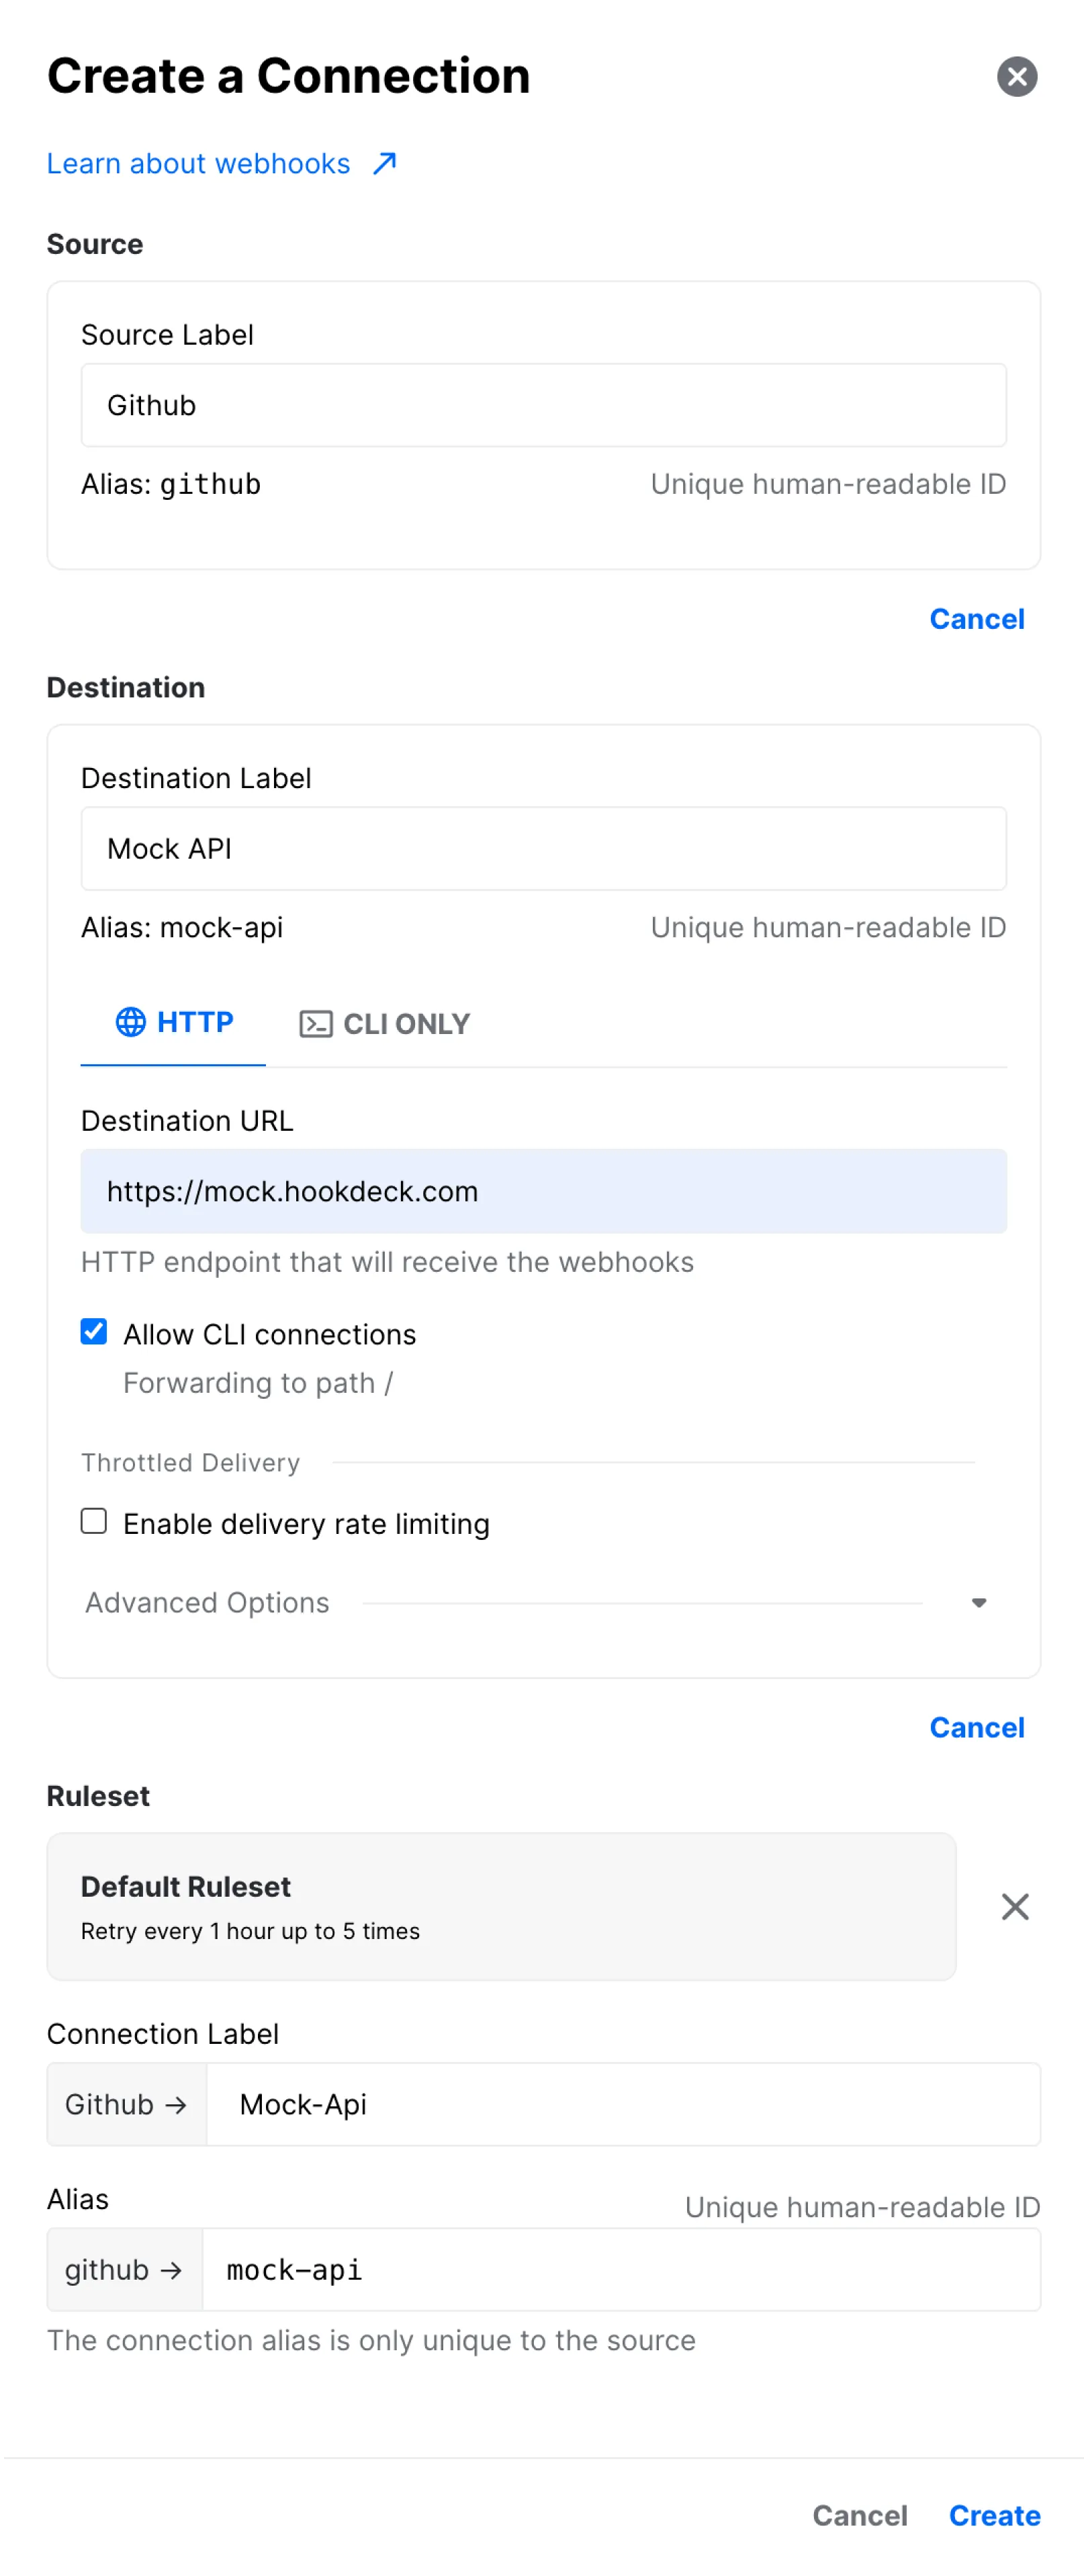
After creating the connection, our connection will look something like this. Take note of the Webhook URL for the next step.

Set Hookdeck URL in GitHub
We are going to add a webhook to our GitHub repository.
- Go in
Settingsof your repository.

- Select the "Webhooks" tab.
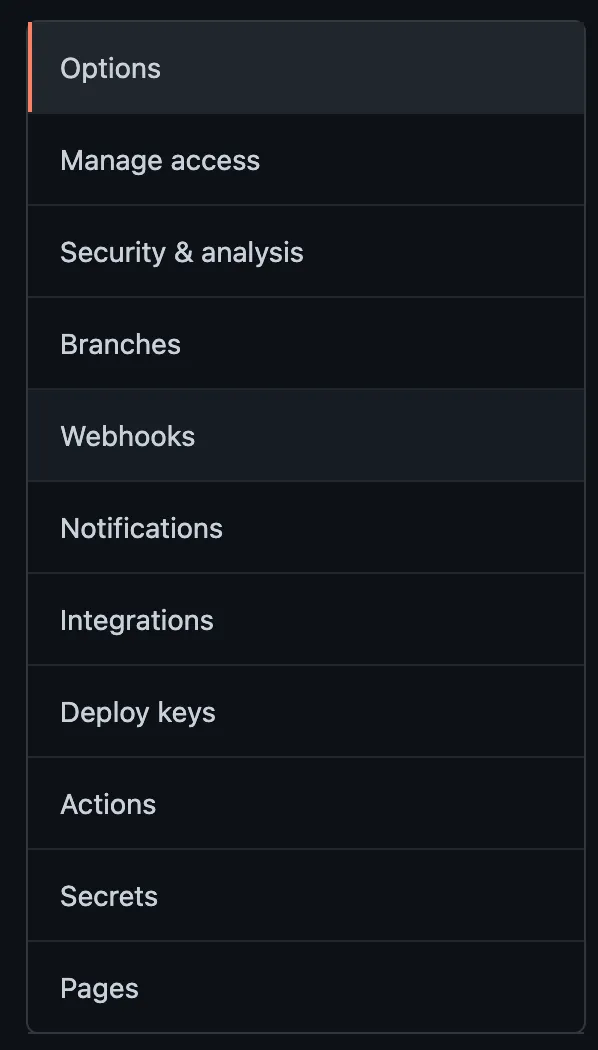
- Click
Add webhook.

- Paste Hookdeck's webhook URL in
Payload URL. - Select the content type
application/json. - Choose "Let me select individual events" and select the
Branch or tag creationevent.
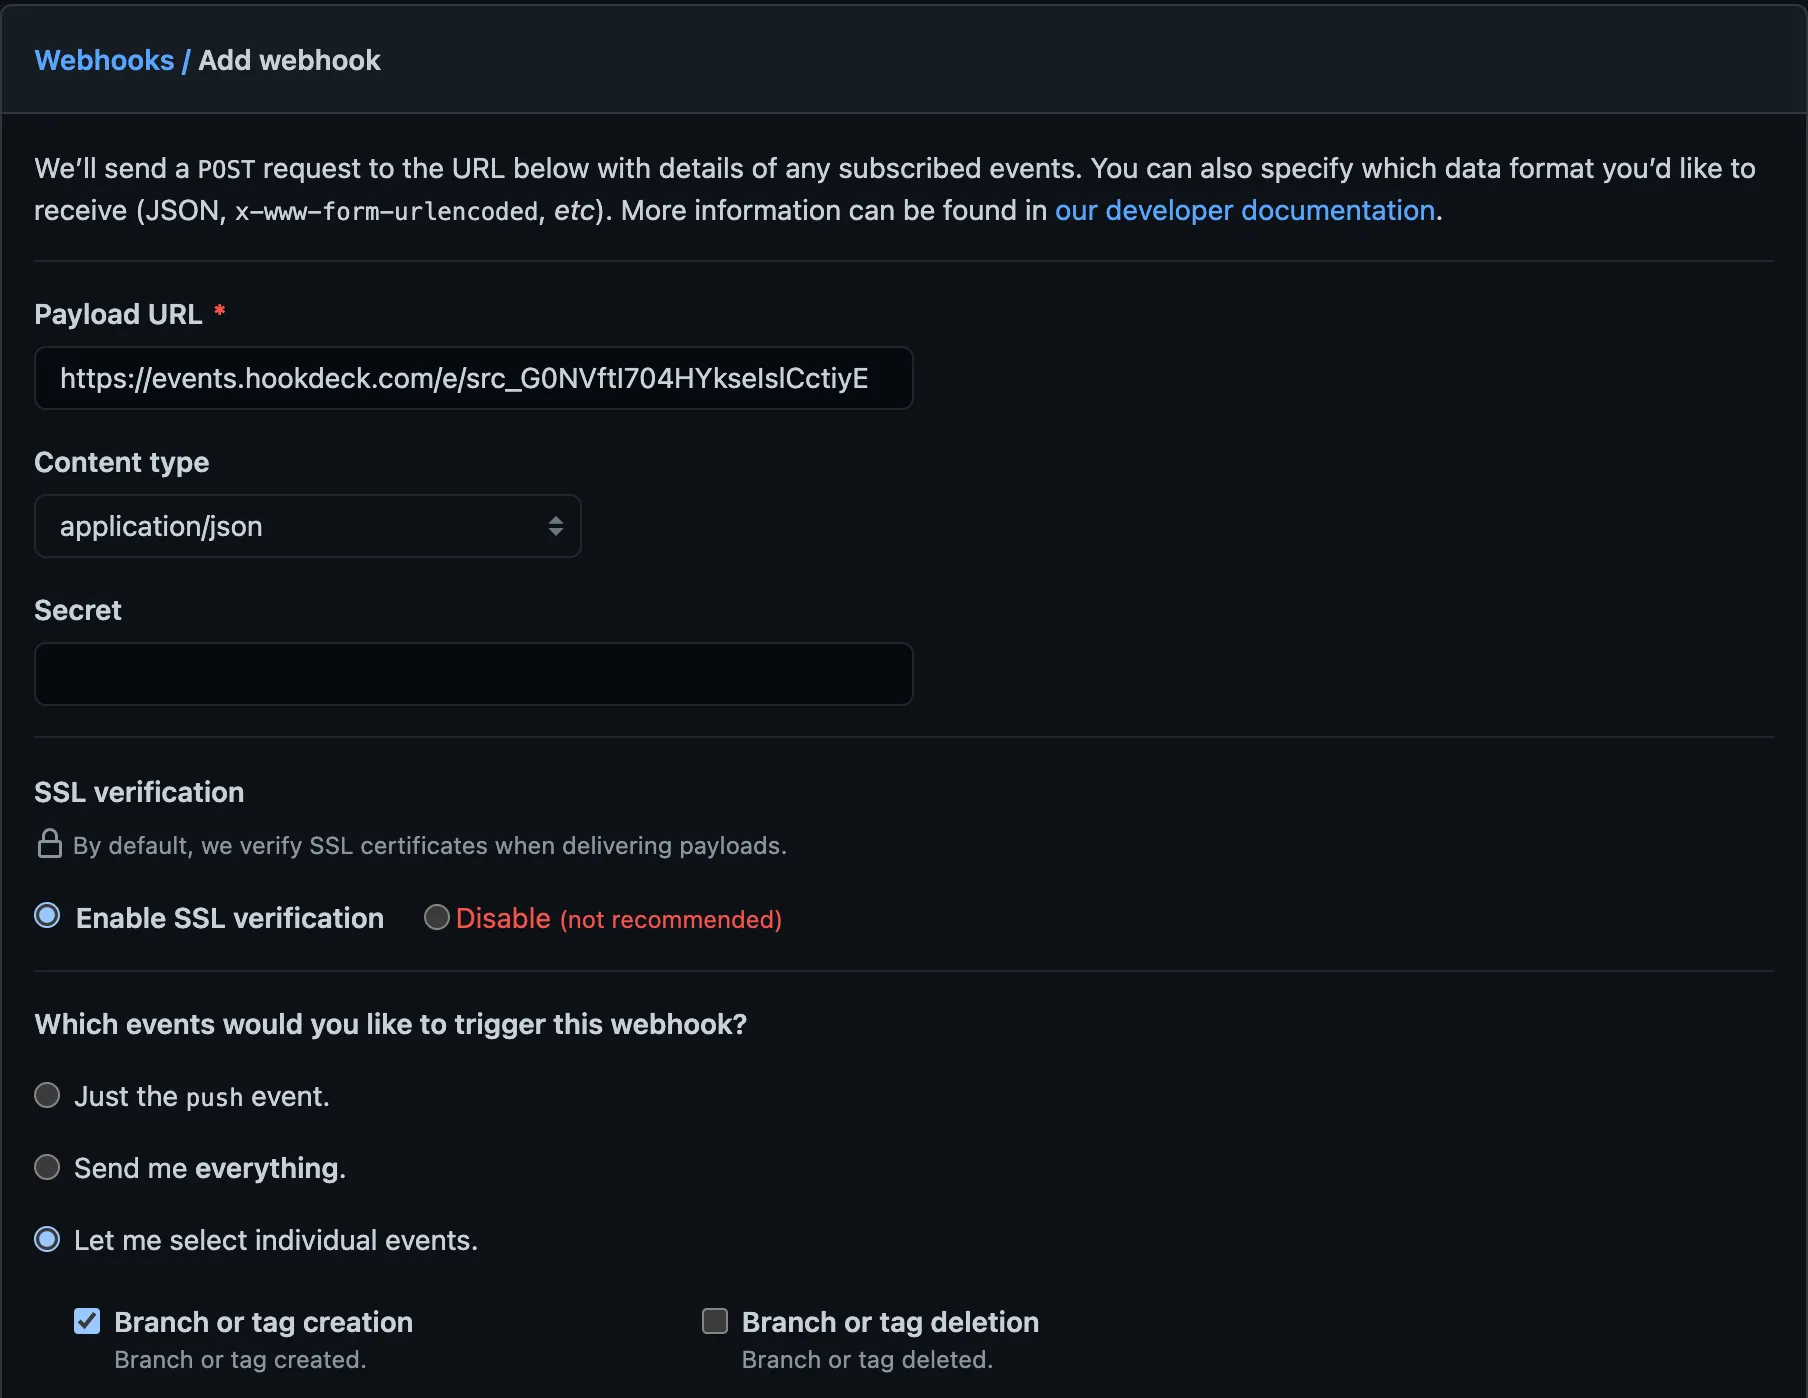
- Click
Add webhook.
Great! We added a webhook that will send us an event every time a branch or tag is created.
Create a branch to trigger a webhook
We are now going to create a branch called New Branch from master to trigger a webhook.
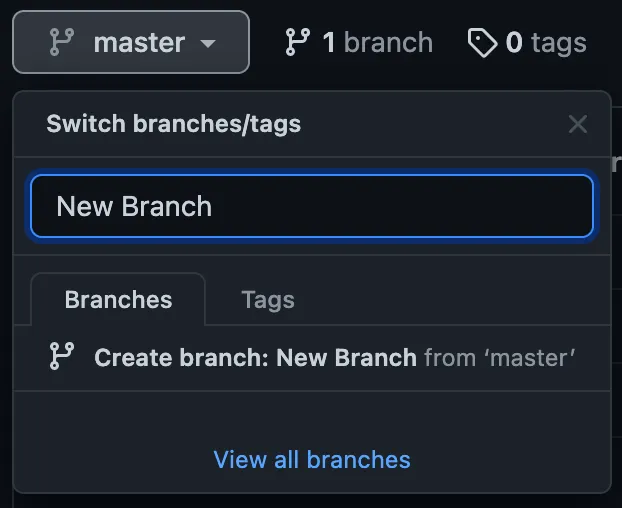
Validate and inspect webhook in Hookdeck
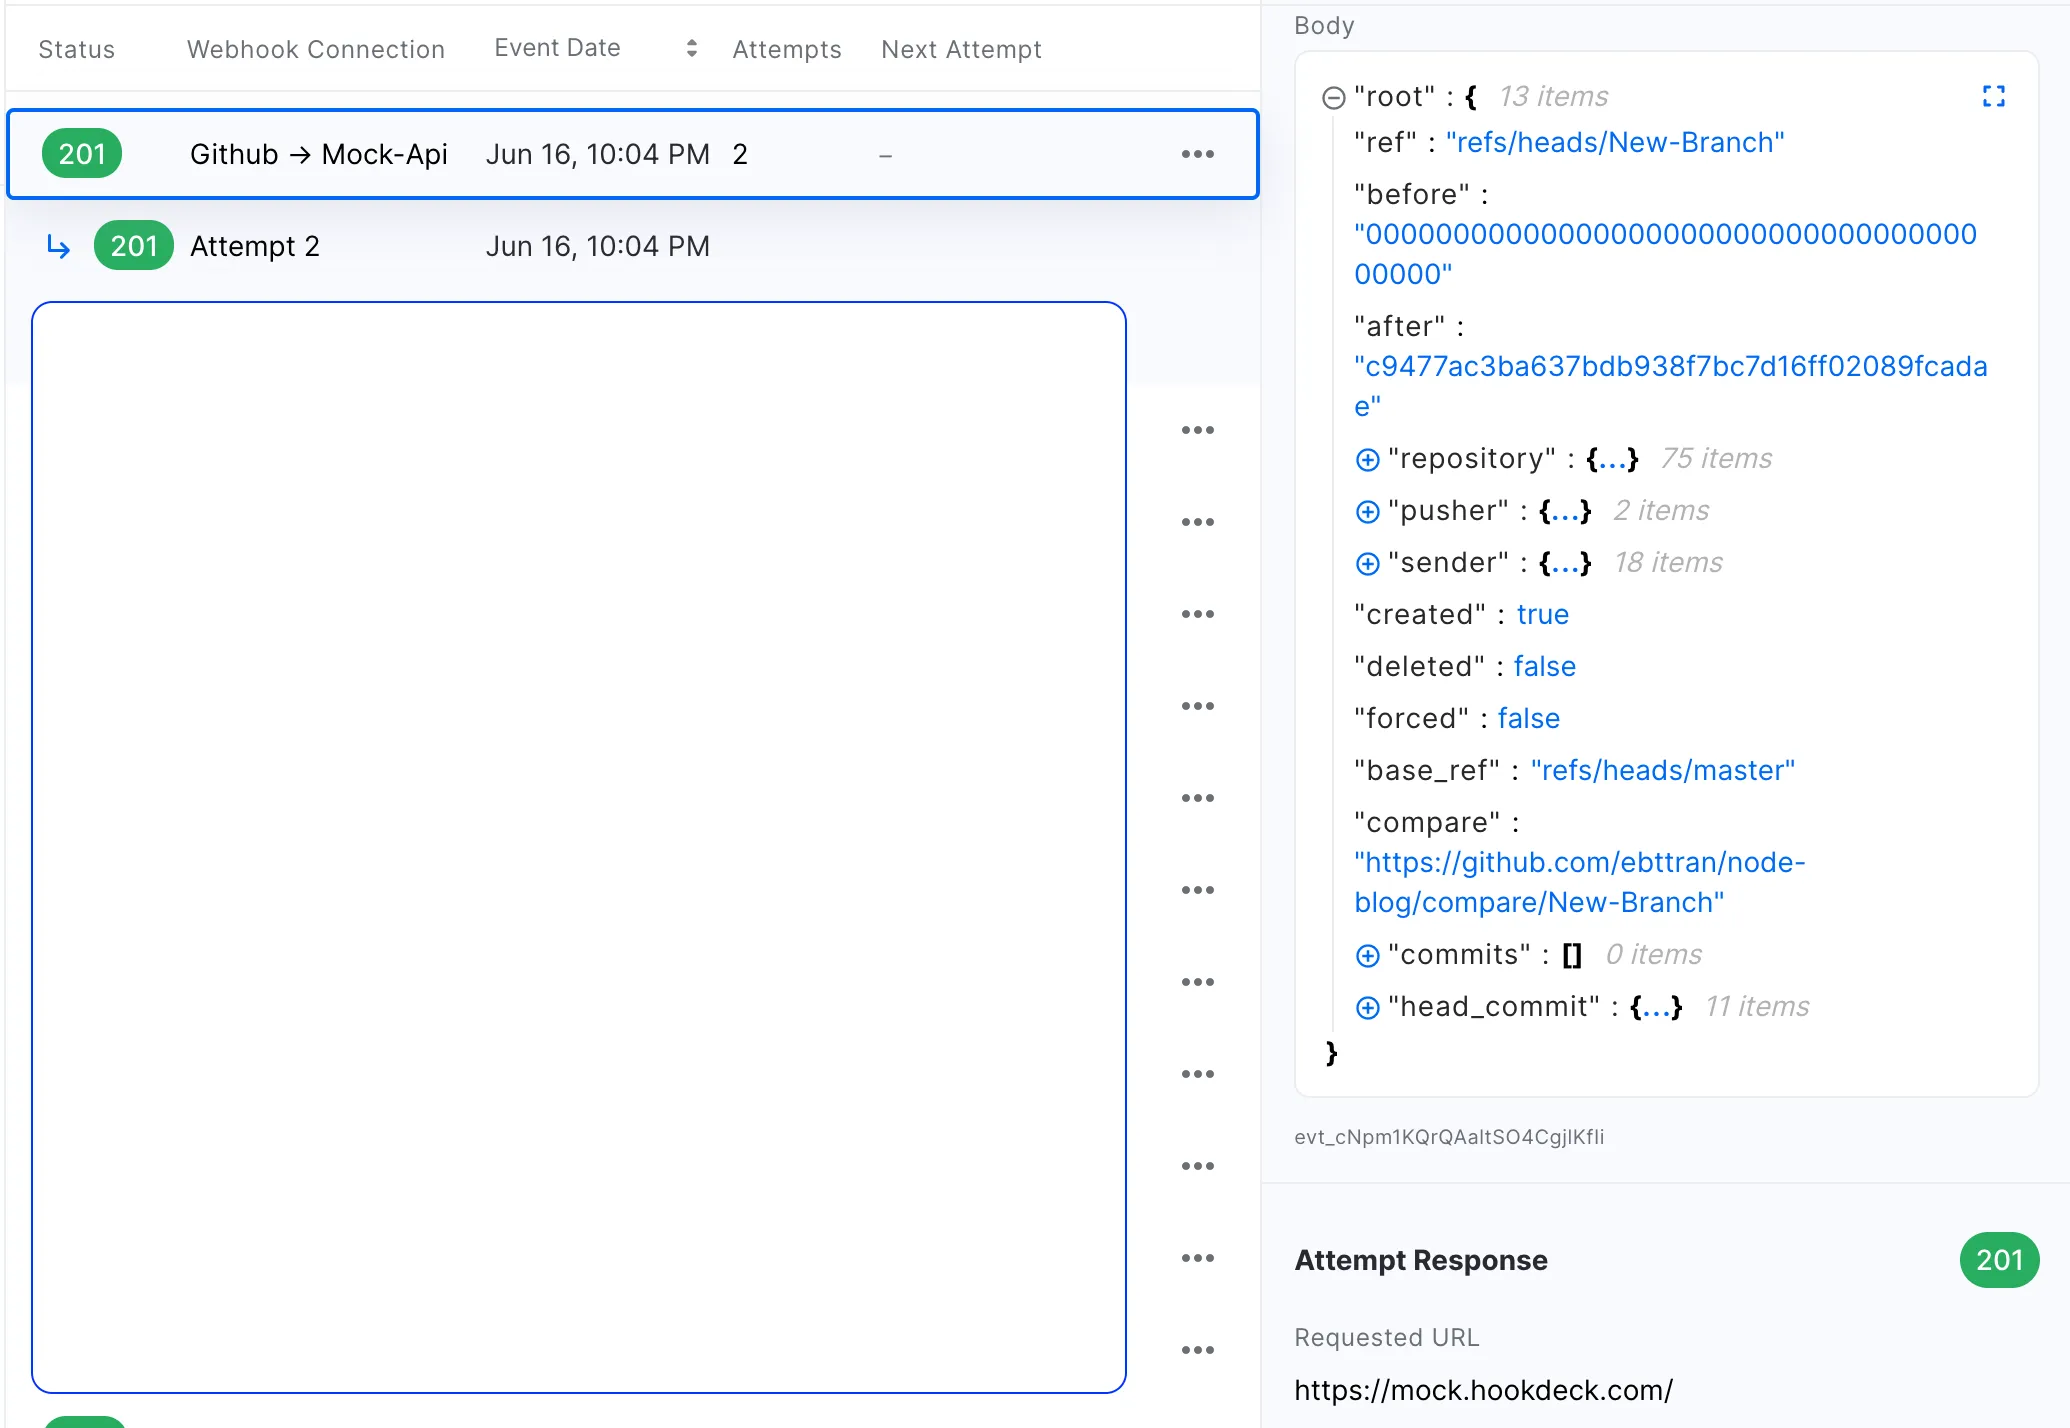
After creating a branch, the webhook becomes visible in the dashboard. When we click on the webhook, we can inspect the request's body.
Hookdeck API with Github webhooks tutorial
Setting up a GitHub webhook connection
In our example, we are going to subscribe to GitHub's Branch or tag creation event and then trigger a webhook to inspect the request data. Our goal is to understand the payload to eventually create an integration by writing code to respond to it.
In this tutorial I will be using Postman for my API calls.
Create a webhook connection for GitHub
Let's create a connection with Hookdeck's API to receive a webhook URL that we will use for GitHub's webhook registration.
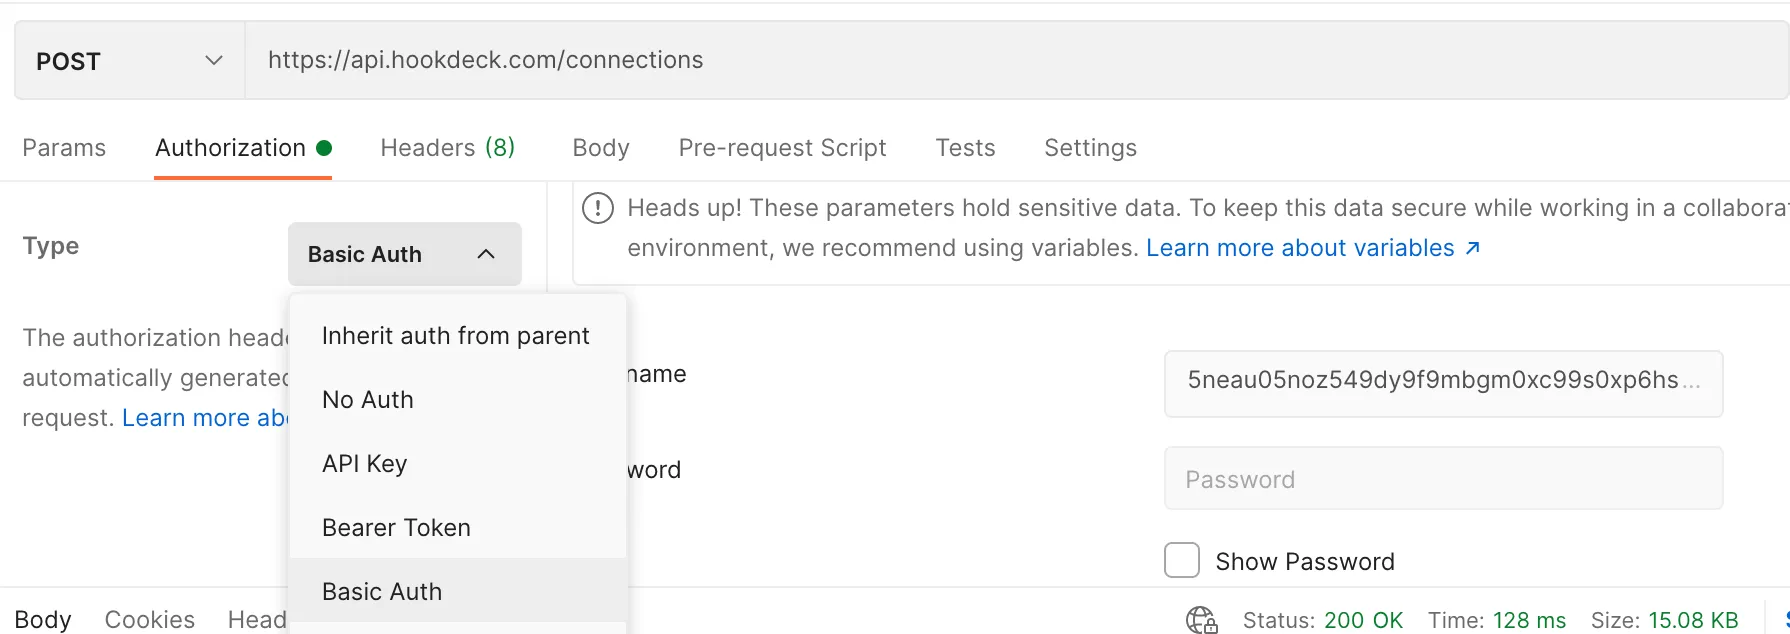
Authentication
We need to set up the authentication to have access to Hookdeck's API.
- Retrieve your key under
Project Secrets.

- Open Postman and choose the
Authorizationtab. - Select the type
Basic Auth. - Enter the API as the username.
To send a request to create the webhook connection:
Select
POST.Enter the following URL
https://api.hookdeck.com/connections.Select
Body>raw>JSON.Enter the following payload:
{
  "alias": "github-to-mockapi",
  "source": {
    "alias": "github",
    "label": "github"
  },
  "destination": {
    "alias": "mockapi",
    "label": "mockapi",
    "url": "https://mock.hookdeck.com"
  }
}
Click send.
You should receive a response with the following parameters:
{
  "id": "web_bKvPP9qnF16kNdR1XBMtK6aJ",
  "label": "mockapi",
  "alias": "github-to-mockapi",
  "team_id": "tm_6PPg9VoEqV51I4ks9f4hzRdT",
  "disabled_at": null,
  "updated_at": "2021-06-17T20:19:06.550Z",
  "created_at": "2021-06-17T20:19:06.582Z",
  "filters": null,
  "destination": {
    "id": "des_0x7haWX4S9kQ5tAf3sHiprwA",
    "team_id": "tm_6PPg9VoEqV51I4ks9f4hzRdT",
    "label": "mockapi",
    "alias": "mockapi",
    "url": "https://mock.hookdeck.com",
    "disabled_at": null,
    "updated_at": "2021-06-17T20:19:06.566Z",
    "created_at": "2021-06-17T20:19:06.563Z",
    "rate_limit": null,
    "rate_limit_period": "second",
    "path": null,
    "path_forwarding_disabled": false
  },
  "source": {
    "id": "src_G0NVftI704HYkseIslCctiyE",
    "team_id": "tm_6PPg9VoEqV51I4ks9f4hzRdT",
    "label": "github",
    "alias": "github",
    "disabled_at": null,
    "updated_at": "2021-06-17T20:19:06.560Z",
    "created_at": "2021-06-17T02:01:54.950Z",
    "integration_id": null,
    "url": "https://hkdk.events/G0NVftI704HYkseIslCctiyE"
  },
  "ruleset": {
    "id": "rls_ITsLdTz80SoBUWW9a3GM6sw5",
    "alias": "default-ruleset",
    "team_id": "tm_6PPg9VoEqV51I4ks9f4hzRdT",
    "label": "Default Ruleset",
    "retry_count": 5,
    "retry_interval": 3600000,
    "retry_strategy": "linear",
    "is_team_default": true,
    "archived_at": null,
    "updated_at": "2021-05-07T21:19:35.607Z",
    "created_at": "2021-05-07T21:19:35.606Z",
    "alert_interval": 86400000,
    "alert_strategy": "last_attempt"
  }
}
We are going to omit the ruleset object for now; we are interested in the id and the url under source for the following steps.
Set Hookdeck URL in GitHub
We are going to add a webhook to our GitHub repository.
- Go in
Settingsof your repository.

- Select the "Webhooks" tab.

- Click
Add webhook.

- Paste the
urlinPayload URL. - Select the content type
application/json. - Choose "Let me select individual events" and select the
Branch or tag creationevent.
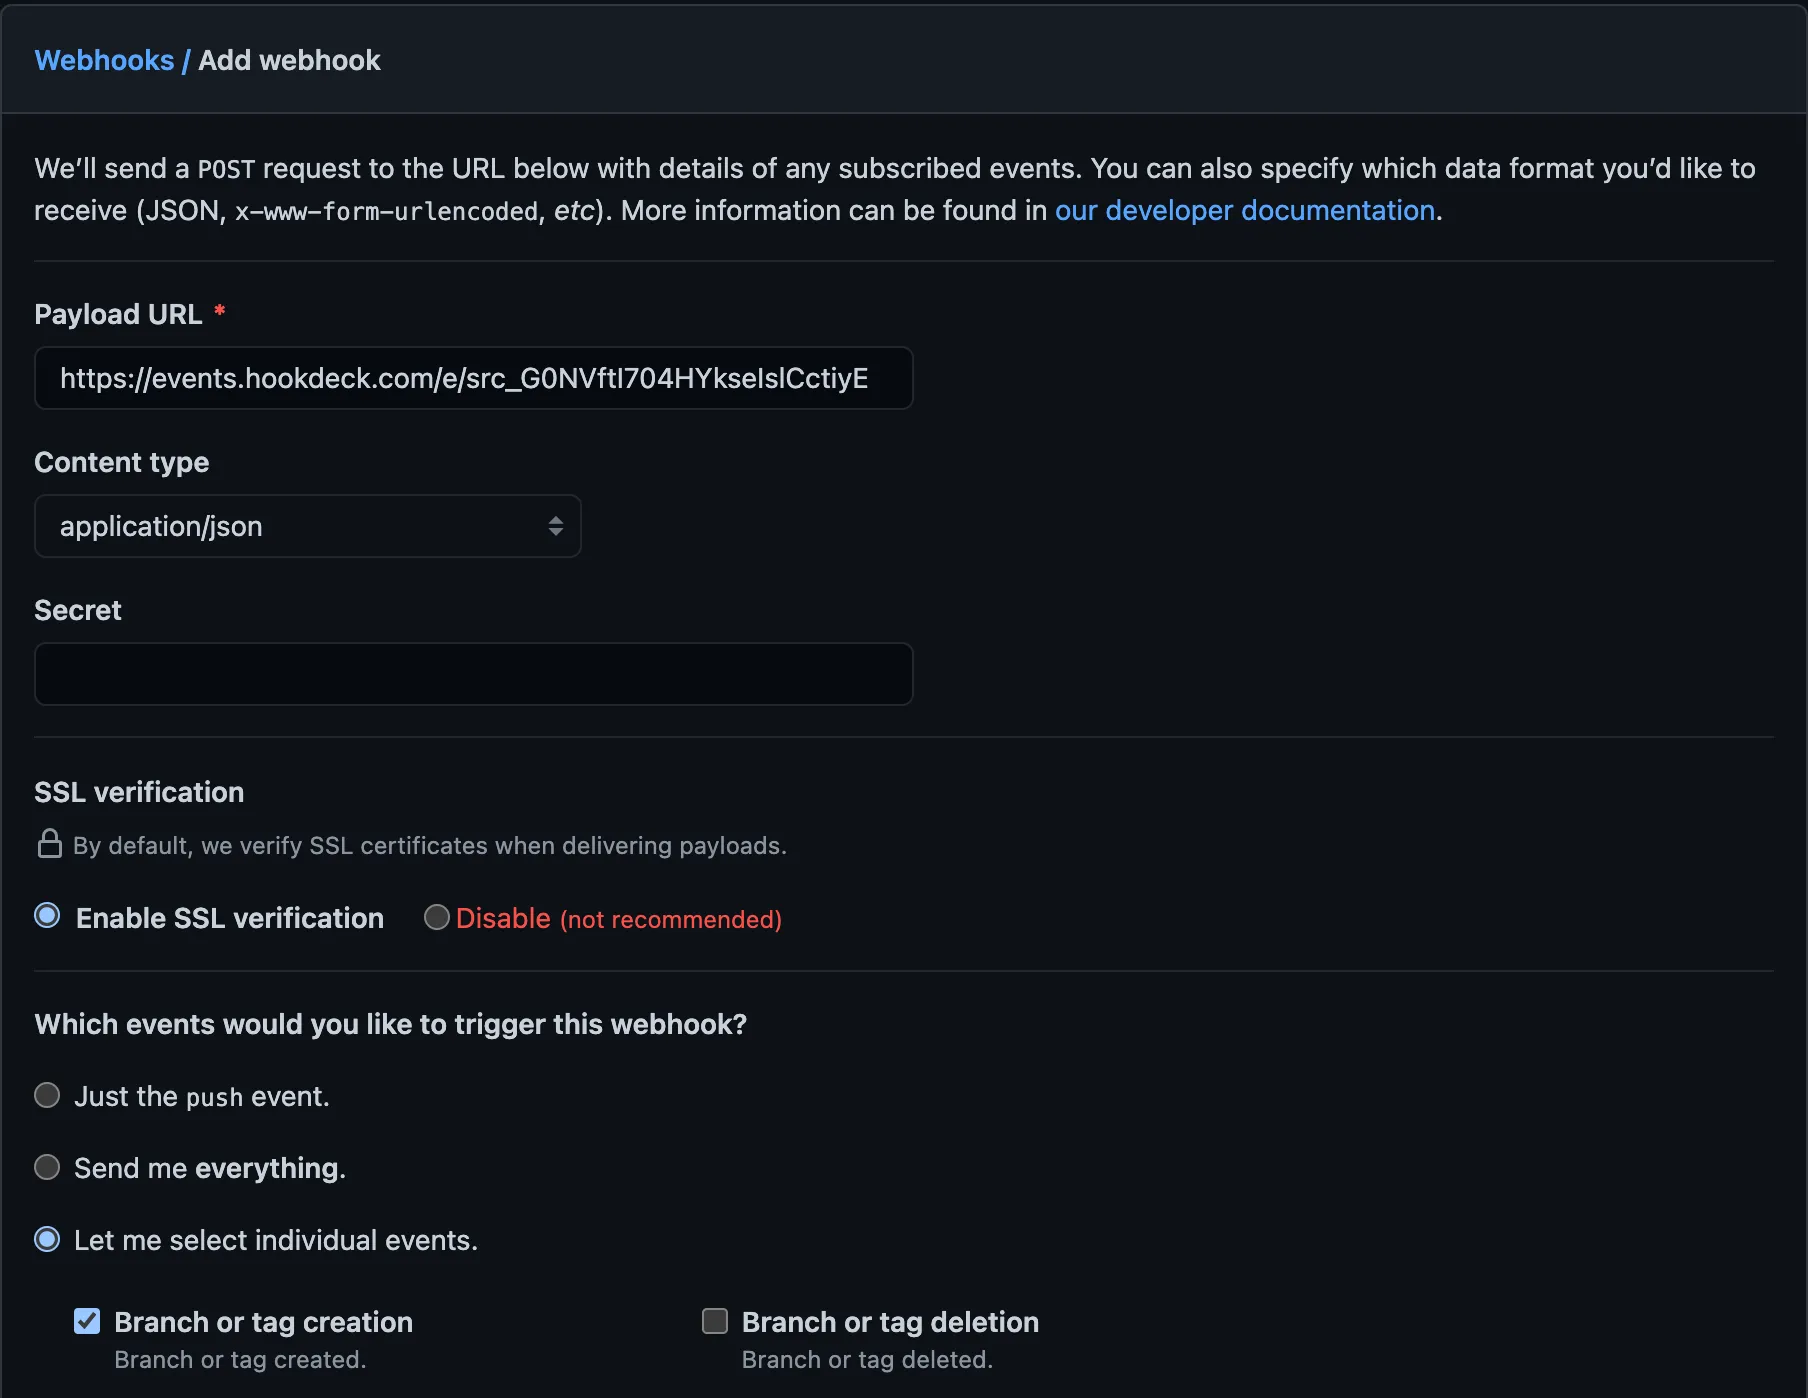
- Click
Add webhook.
Great, we added a webhook that will send us an event every time a branch or tag is created.
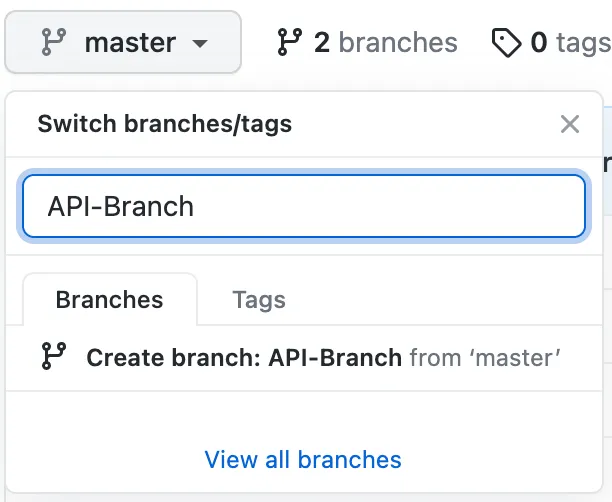
Create a branch to trigger a webhook
We are now going to create a branch called API-Branch from "master" to trigger a webhook.
Validate and inspect webhook in Hookdeck
After creating a branch, we want to query the API to validate if GitHub sent a webhook to our connection.
GET https://api.hookdeck.com/events?webhook_id=web_bKvPP9qnF16kNdR1XBMtK6aJ
Response:
{
  "pagination": {
    "order_by": "created_at",
    "dir": "desc",
    "limit": 100
  },
  "count": 1,
  "models": [
    {
      "id": "evt_8d1ZvFEq6bSpp24j4mCvgI5j",
      "team_id": "tm_6PPg9VoEqV51I4ks9f4hzRdT",
      "webhook_id": "web_bKvPP9qnF16kNdR1XBMtK6aJ",
      "source_id": "src_G0NVftI704HYkseIslCctiyE",
      "destination_id": "des_0x7haWX4S9kQ5tAf3sHiprwA",
      "attempts": 1,
      "response_status": 200,
      "last_attempt_at": "2021-06-17T20:25:27.678Z",
      "next_attempt_at": null,
      "successful_at": "2021-06-17T20:25:27.822Z",
      "updated_at": "2021-06-17T20:25:27.839Z",
      "created_at": "2021-06-17T20:25:27.501Z",
      "status": "NONE",
      "event_request_id": "evtreq_ajmfCUF4h9kFV4EHeKoutTiZ",
      "cli_id": null
    }
  ]
}
We can see that we received an event associated with the connnection. Let's dig in deeper to inspect the event by using ther event's id. id: "evt_8d1ZvFEq6bSpp24j4mCvgI5j"
GET https://api.hookdeck.com/events/evt_8d1ZvFEq6bSpp24j4mCvgI5j
Response (trimmed down to show the relevant information):
{
  "id": "evt_8d1ZvFEq6bSpp24j4mCvgI5j",
  "request": {
    "body": {
      "ref": "refs/heads/API-Branch"
    }
  }
}
Something to note is we can also use the event id to inspect the webhook in the Hookdeck dashboard. We highly recommend it, as visualizing the webhook payload can be helpful for the testing and development workflow.
https://dashboard.hookdeck.com/events?selected_event_id=evt_8d1ZvFEq6bSpp24j4mCvgI5j

Great, we can see in our API request and in Hookdeck's dashboard that the webhook event was indeed for creating our new branch called API-Branch.
Conclusion
Congratulations, we went through a simple example of setting up Hookdeck UI and the API to receive GitHub webhooks. You can now set up Hookdeck to receive any amount of webhooks without worrying about the infrastructure.