How to Prevent Webhook Spikes from Crashing Your Servers
When working with webhooks, you don't control the speed at which the API provider is sending webhooks. This can be a significant source of concern. Setting a rate limit on your destinations negates the risk of getting caught off guard and dropping webhooks because your servers were overloaded and shut down.
Hookdeck is built to ingest your spikes and deliver them safely at a pace your servers can handle. After setting a rate limit, you will be able to handle scenarios where you are the most susceptible to getting spiked, such as:
- Performing a bulk update operation in the platform sending the webhook
- The webhook provider had an outage and has accumulated a backlog of webhooks that they will try to deliver at once; or
- A sudden burst in usage because of a new customer, or during a specific period of the year (Black Friday, New Year's, etc.).
In this tutorial, we will cover how rate limit works and show you step-by-step how to set up a rate limit for your Destination using the UI and the API.
How rate limits work in Hookdeck
What is a rate limit?
A rate limit allows you to decide how many webhooks can hit your Destination at a time or the total number of webhooks that can be consumed within a specific interval.
A rate limit is defined by Destination
A rate limit is applied on a Destination level, NOT on a Connection level. Why?
The reasoning behind it is that you may be re-using the same Destination in multiple connections, but the server's capacity to process webhooks remains constant.
Example of a rate limit for a Destination in multiple Connections
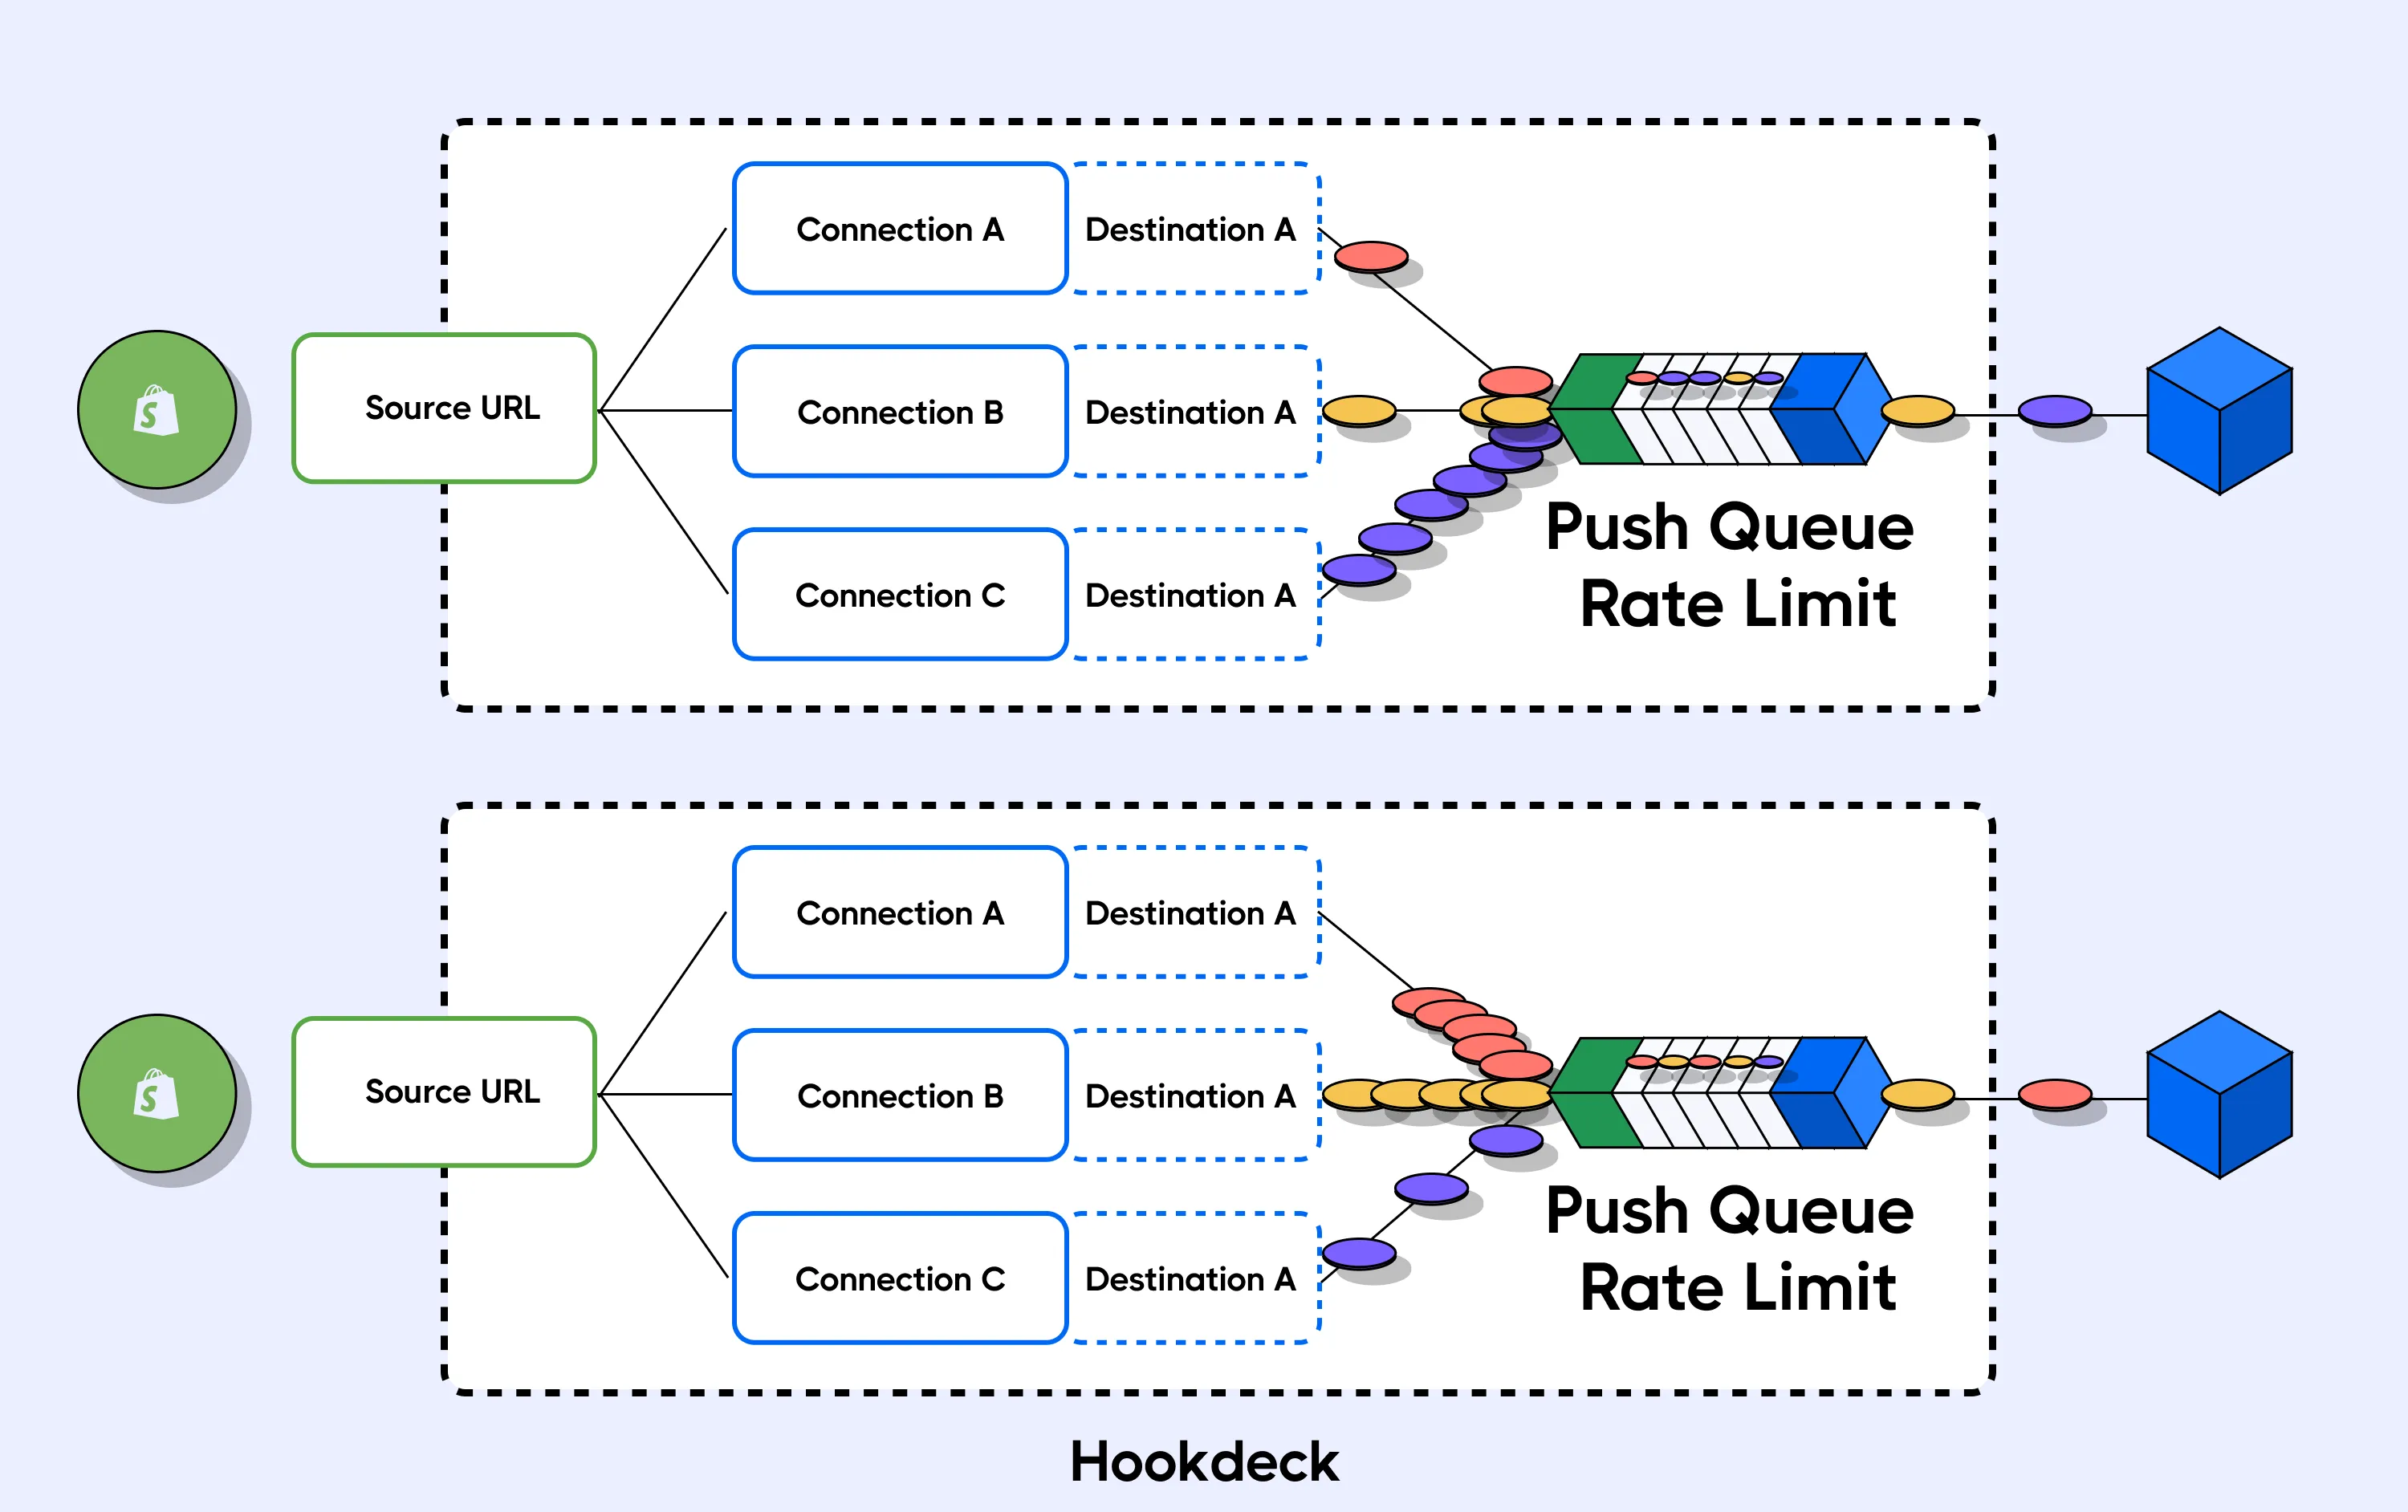
In both these scenarios, regardless of which connection is receiving a spike of webhooks, your server will continue to receive webhooks at a constant pace. This means your server will never be in danger and is protected from being overloaded.
If you decide to increase the capacity of your server to process more webhooks because you foresee an extended period of high throughput, having a rate limit gives you the chance to take action under stable conditions (auto-scaling can sometimes take up 5 minutes, which in some situation might not be fast enough). Once the scaling measure has been put in place, you can update and increase your rate limit.
Also, in case you were wondering, Hookdeck queues all your webhooks until they are delivered and processed on your end. So no rush!
Tutorials on how to set a rate
How to set a rate limit on Hookdeck UI
- Navigate to dashboard.hookdeck.com/connections.

- Select your Destination.

- Click the three dots.
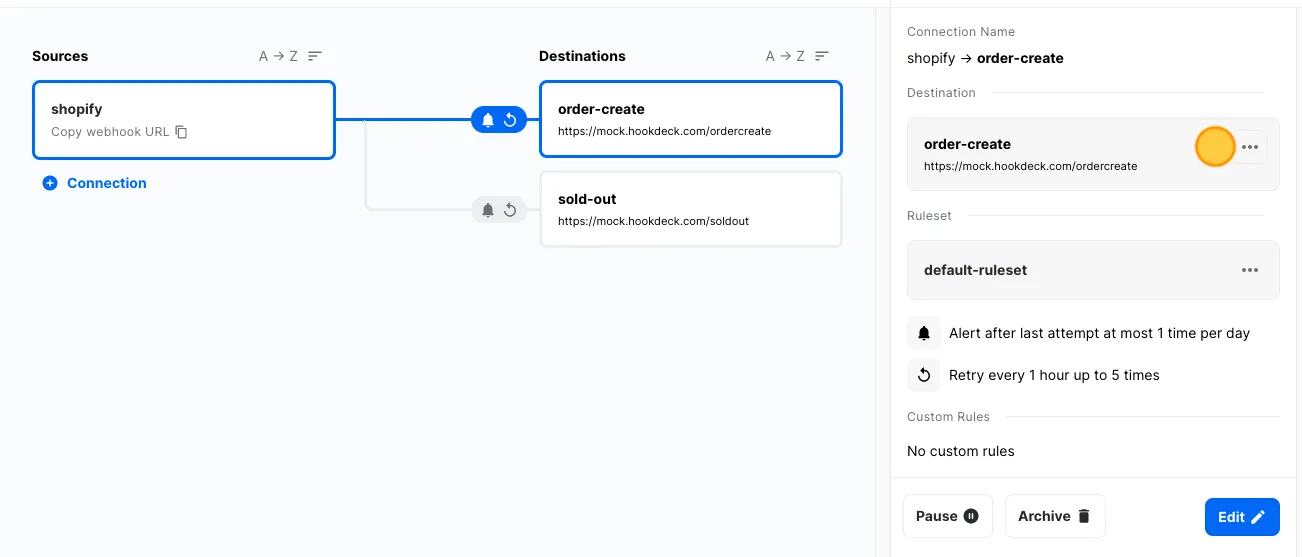
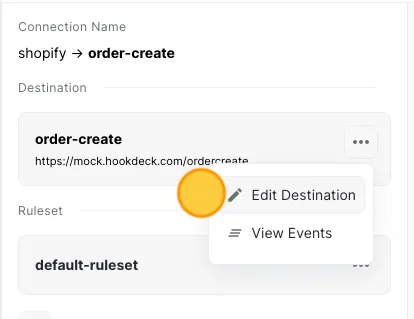
- Click "Edit Destination."
- Click "Enable delivery rate limiting."
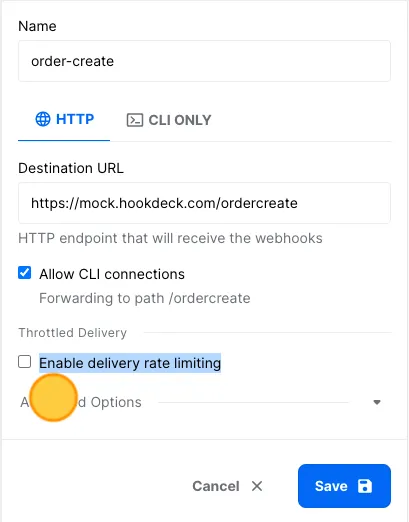
- Set Rate Limit.
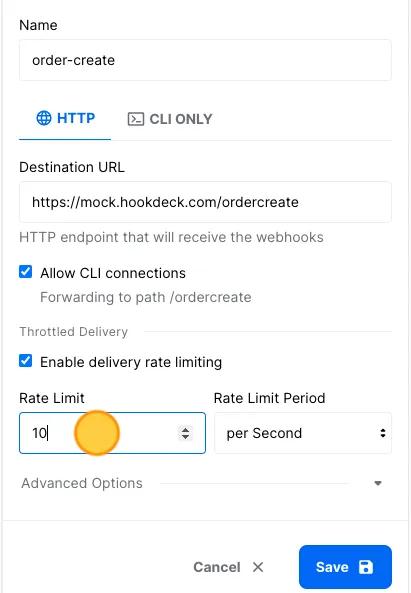
- Set Rate Limit Period.
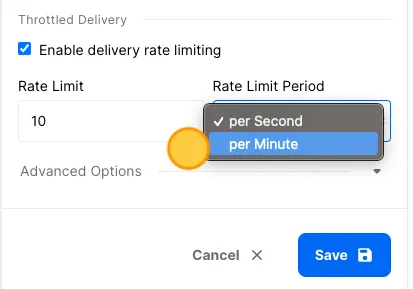
- Click "Save."

How to set a rate limit with Hookdeck API
- Retrieve Destination ID.
We want to get the ID of the Destination we want to set for our rate limit.
GET https://hookeck.com/2021-08-01/destinations
Response:
{
  "pagination": {
    "order_by": "created_at",
    "dir": "desc",
    "limit": 100
  },
  "count": 2,
  "models": [
    {
      "id": "des_TuDSSsdjKFueq8FZpcLIhOT3",
      "team_id": "tm_1O1QDAFf4fNlCd2jYZoLyNSU",
      "url": "https://mock.hookdeck.com/soldout",
      "disabled_at": null,
      "updated_at": "2021-08-04T23:22:16.695Z",
      "created_at": "2021-08-04T23:22:16.694Z",
      "rate_limit": null,
      "rate_limit_period": "second",
      "path": "/soldout",
      "path_forwarding_disabled": false,
      "name": "sold-out"
    },
    {
      "id": "des_uym0ICG4Dehk8ERurcGHzI8O",
      "team_id": "tm_1O1QDAFf4fNlCd2jYZoLyNSU",
      "url": "https://mock.hookdeck.com/ordercreate",
      "disabled_at": null,
      "updated_at": "2021-11-10T02:08:00.739Z",
      "created_at": "2021-08-04T23:21:31.823Z",
      "rate_limit": null,
      "rate_limit_period": "second",
      "path": "/ordercreate",
      "path_forwarding_disabled": false,
      "name": "order-create"
    }
  ]
}
In this example, we will use the Destination for order-create. The ID that matches the Destination is des_uym0ICG4Dehk8ERurcGHzI8O.
- Update the Destination with the rate limit object.
Notice that the parameters for rate_limit and rate_limit_period are currently null and "second." We will update them for a rate_limit of 10, and the rate_limit_period to "minute."
PUT /2021-08-01/destinations
Request:
{
  "id": "des_uym0ICG4Dehk8ERurcGHzI8O",
  "rate_limit": 10,
  "rate_limit_period": "minute",
  "name": "order-create"
}
Response:
{
  "id": "des_uym0ICG4Dehk8ERurcGHzI8O",
  "team_id": "tm_1O1QDAFf4fNlCd2jYZoLyNSU",
  "url": "https://mock.hookdeck.com/ordercreate",
  "disabled_at": null,
  "updated_at": "2021-11-10T02:21:33.414Z",
  "created_at": "2021-08-04T23:21:31.823Z",
  "rate_limit": 10,
  "rate_limit_period": "minute",
  "path": "/ordercreate",
  "path_forwarding_disabled": false,
  "name": "order-create"
}
Great! We can see the values for both rate_limit and rate_limit_period have been updated.
If you have a deterministic scaling formula, you can integrate the API call to update your Destination's delivery rate in your CI/CD. This will automate the delivery rate to be dynamic based on your server's capacity to process webhooks.
Conclusion
Congratulations! You've successfully implemented a delivery rate for your Destination. You prevented your server from crashing and yourself from being a victim of a webhook spike!
If you have more than one Destination in Hookdeck, we recommend that you set a delivery rate to all your Destinations to ensure webhook reliability and peace of mind.